Introduction to gossip/epidemic protocol and memberlist

Amir Keshavarz
Posted on March 21, 2020
Introduction
At the time of writing this article, we have an ongoing pandemic in the world called COVID-19. We’ve seen how pandemics and viruses, in general, are efficient at what they do so why not use this behavior in computer science?
Distributed Systems
Let’s look at the human body and how it works. In this metaphor, the human body is nothing more than a multicellular organism. Multicellular organisms are basically multiple cells acting as a single unit. Each cell does a specific task so they can reach a greater goal altogether since the goal can’t be reached by one cell alone. (You can apply this to our society!)
Now imagine a group of components; each does a specific task and they communicate together about their states and lots of other stuff. That’s it. We just described a distributed system.
We now know that we need a distributed system but how can we connect all these loose components together. That’s when gossip protocol comes into play. It’s not designed to be the answer in every scenario but it’s very useful when peer-to-peer communication is needed between components.
Gossip/epidemic protocol
Since we started the article discussing viruses I’m going to explain this using an epidemic metaphor but the name “Gossip protocol” is generally used instead of Epidemic protocol.
We talked about how good viruses are at their job. Their genome is their state and their job is to share their state. When a person is infected with a virus he/she transmits the virus to a number of other random individuals. The same happens with those and the number of infected people rises exponentially.
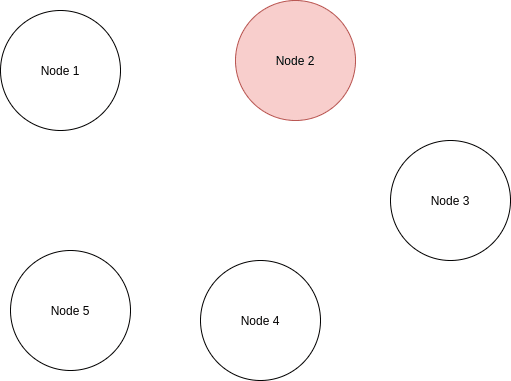
Let’s assume we have 5 nodes (components) in our distributed system. Initially, they’re all in sync and none of them has a different state.
Now we infect one of the nodes, let’s say the “Node 2” with a new state (A new virus!).
Since one of the nodes is in a different state of others, we need to somehow let others know about this. In a distributed system like this, we notify nodes about changes in other nodes.
Now that “Node 2” has something new to share it selects two other nodes to send a copy of its state.

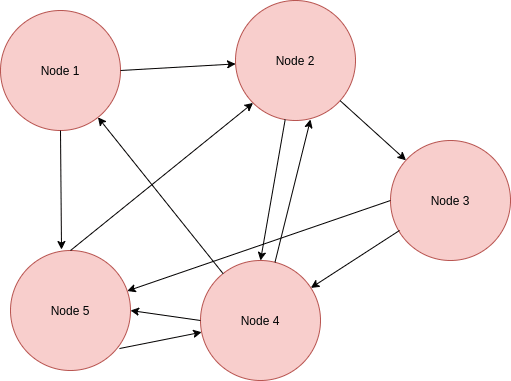
As you can see now “Node 3” and “Node 4” are updated about new changes. The same thing now happens to these nodes and they each select two other random nodes and send out a copy of their state which is now updated.
You can probably predict what happens at the end. Even though sometimes a node selects an already updated node but at the end, all nodes are updated about changes and the overhead is negligible.
As you can see the whole system is in sync now. This is basically implantation of Gossip/Epidemic protocol in its simplest form. There is a lot to talk about like different kinds of communication such as “Push” and “Pull” but this article is only an introduction to this subject so we skip the rest for now in order to get to coding!
memberlist
memberlist is a Go library that manages cluster membership and member failure detection using a gossip based protocol.
The use cases for such a library are far-reaching: all distributed systems require membership, and memberlist is a re-usable solution to managing cluster membership and node failure detection.
memberlist is eventually consistent but converges quickly on average. The speed at which it converges can be heavily tuned via various knobs on the protocol. Node failures are detected and network partitions are partially tolerated by attempting to communicate to potentially dead nodes through multiple routes.
To get an idea of how we can use this library we’re going to create a distributed system that nodes can join in easily with a pre-shared key and check the health of other nodes from its point of view in the network.
First, You need to import the memberlist library:
import (
    "github.com/hashicorp/memberlist"
)
We define two commands. init and join. You can probably guess what they do.
The init command takes two parameters as flags: bind-ip and http-port Where bind-ip is the IP that you want your local node to bind. And http-port is the port of a simple webserver to view health check results.
On the other hand, the join command takes 4 parameters. The first two are the same as the init command. The additional flags are cluster-key and known-ip. cluster-key is the key you receive on the first node. known-ip is your gateway to the cluster; It can be any live node.
We can define these command and flags like this:
joinCmd := flag.NewFlagSet("join", flag.ExitOnError)

joinClusterKey := joinCmd.String("cluster-key", "", "cluster-key")

joinKnownIP := joinCmd.String("known-ip", "", "known-ip")

joinBindIP := joinCmd.String("bind-ip", "127.0.0.1", "bind-ip")

joinHttpPort := joinCmd.String("http-port", "8888", "http-port")

initCmd := flag.NewFlagSet("init", flag.ExitOnError)

initBindIP := initCmd.String("bind-ip", "127.0.0.1", "bind-ip")

initHttpPort := initCmd.String("http-port", "8888", "http-port")
It’s not pretty but it’s simple to read.
Now we define a function called “initCluster” which is supposed to generate a key and initiate a cluster so other nodes can join in.
First, we create a config:
config := memberlist.DefaultLocalConfig()
There are 3 different default configs available. We’re using DefaultLocalConfig which has a 10 second TCP timeout.
And now we configure the IP Address which this node binds to and a secret pre-shared key. Please note that the secret key should be either 16, 24, or 32 bytes to select AES-128, AES-192, or AES-256.
We can make 32 random bytes using “crypto/rand” package.
clusterKey := make([]byte, 32)
\_, err := rand.Read(clusterKey)
Now we set the bind-ip and the secret key in the config:
config.BindAddr = bindIP
config.SecretKey = clusterKey
We can create the memberlist now:
ml, err := memberlist.Create(config)
We also run a webserver to let others view health checks but I’ll explain this later since the join command has a similar webserver.
Also, remember to capture signals so we can leave the cluster gracefully.
incomingSigs := make(chan os.Signal, 1)

signal.Notify(incomingSigs, syscall.SIGINT, syscall.SIGTERM, syscall.SIGHUP, os.Interrupt)

select {
case <-incomingSigs:
    if err := ml.Leave(time.Second \* 5); err != nil{
        panic(err)
    }
}
The initCluster is done. Now we define joinCluster to let other nodes join in.
These two functions are almost exactly the same except in two places. We don’t make a key here since this is a join command and the pre-shared key is already provided by the user. And another different part is when we want to join our node to other nodes. Since a known-ip is provided we call the Join method on memberlist like this:
\_, err = ml.Join([]string{knownIP})
Now we’re good to go and our local node has joined other nodes in the cluster. Like the initCluster we also run a webserver here. This webserver has only one endpoint. When the endpoint is triggered we fetch all of the members in the cluster and we do a TCP health check on them and respond to the HTTP request with the results. This is how our handler function looks like:
func (n \*Node) handler(w http.ResponseWriter, req \*http.Request) {

var items []Item

for \_, member := range n.memberlist.Members() {
        hostName := member.Addr.String()
        portNum := "80"
        seconds := 5
        timeOut := time.Duration(seconds) \* time.Second
        conn, err := net.DialTimeout("tcp", hostName+":"+portNum, timeOut)

if err != nil {
            items = append(items, Item{Ip: conn.RemoteAddr().String(), Status: "DOWN"})
        } else {
            items = append(items, Item{Ip: conn.RemoteAddr().String(), Status: "UP"})
        }
    }

js, err := json.Marshal(items)
    if err != nil {
        http.Error(w, err.Error(), http.StatusInternalServerError)
        return
    }

w.Header().Set("Content-Type", "application/json")
    w.Write(js)

}
As you can see to get the members we call a method named “Members()” on the memberlist.
The final code is hosted on GitHub: https://github.com/satrobit/memberlist-healthcheck-example. It has a fair amount of repeated code so it’s easy to follow.
That’s it. I hope you enjoyed this article.
Links

Posted on March 21, 2020
Join Our Newsletter. No Spam, Only the good stuff.
Sign up to receive the latest update from our blog.


