Serverless Slack Apps and Slash Commands

Samba Diallo
Posted on February 10, 2020
It's crazy to think that I entered the Developer Advocate field almost a year ago. Through that year, I’ve worked to ease the pains that companies and developers had together. I attended meetups, conferences, and hackathons, seeing new companies and products vying for developer attention and adoption. I’ve been happy to work with some of these productivity tools that are hard to go without once used.
Working with serverless technologies has sped up my development over the past year, and I recently used them in creating Slack Apps and slash commands Now come, walk with me, as I show you different methods of serverless and how to search google images via a Slack slash command.
Table Of Contents
- Falling in love with serverless
- Serverless development for Slack-ers
- Traditional Slack Apps
- Boneless Slack Apps
- Search Google Images in Slack
- How does it look?
Falling in love with serverless
Some favorite tools of mine that take a lot of work off my shoulders are serverless platforms. The fact that I don’t have to worry about where or how my code is hosted is amazing to me. Even compared to setting up cloud containers, it’s a whole different ball game.
Although a few serverless providers have become household names in my stack, I’ve only started using them within the last year. Now given the chance between handling the server set up myself or utilizing a cheap/free trial of a serverless API, I’ll always choose the latter. When my project needs to scale, the serverless providers can handle it and they provide a much-needed abstraction over standard cloud providers.
My personal choice for Slack app development is Nimbella Commander, a Slack app that allows you to create serverless functions and connect these functions to your Slack environment. This handles much of the integration and infrastructure that other serverless platforms do not touch. We'll discuss creating Slack Apps using both the traditional serverless platforms and using Nimbella Commander.
Serverless development for Slack-ers
My foray into serverless applications was rewarding, being able to develop my projects using various Functions as a service (FaaS) products was a breeze. My next step was leaping, unhindered by servers, into Slack App development.
I’ve used Slack through college, and it played even more of a role in my life since I joined the workforce. Slack provides a platform to create apps, some of which integrate other services into your favorite team collaboration chat environment. Creating an app inside it requires some research into the Slack API and a way to process and send information to the endpoints provided by Slack. That last section, your code that connects to your Slack workspace via the Slack API, doesn't have to be your traditional hardware in a basement solution. We can use a serverless option to run our application in Slack.
Traditional Slack Apps
Using a serverless solution to connect to your Slack app can save you time, money, and worry. These benefits are similar to making the original switch from a traditional server/cloud platform. Worrying about scaling with your user base is a thing of the past, but you can also skip setting up the connections and storage of your cloud providers. By ignoring the setup time, it allows us to focus more on the use of each serverless function.
Your code, in the serverless cloud providers environment, will directly call the Slack API. The functions you create will need to manage authentication (OAuth 2.0), enable user interaction, and need to implement each feature of your Slack App. This method is already light years better than provisioning your servers and organizing the multitude of clusters your growing app will need. It will take work to start the connection to Slack and it is harder to get someone else set up with your code, but this method can be rewarding and allow complete customizability.
Boneless Slack Apps
I’ve especially enjoyed our third option for serverless Slack App development discussed above, Nimbella Commander. An app that helps you create other Slack apps? It takes care of all of the infrastructure that your app needs when thrown into a Slack community. It allows for the same mindset when developing these serverless functions, but lets you forget about parameter parsing, authentication/logging in, and has other features like automation, logs, and access control. It’s easy to get it set up and you can create your first slash command in a couple of minutes.
For those who help manage their businesses' cloud infrastructure, there are command sets that integrate with AWS, DigitalOcean, and Vultr. These DevOps commands are already hosted publicly on GitHub. If you wanted to get started with a simple way to integrate your code/API into the Slack environment without building the Transcontinental railroad of infrastructure please try it out.
Search Google Images in Slack
To query Google programmatically, we need to complete a few steps:
- Create a Custom Search Engine
- Get a Google JSON API key
- Setup your serverless environment
- Google API Call
- Formatting!
Create a Custom Search Engine
Google doesn't provide an API to search google but will let you create your custom-defined search engine, specifically limiting the search to particular sites you define. We don't want this, but we can do a little hacky magic to navigate around that roadblock. Check out Google's full Custom Search Engine tutorial for more details, but I'll quickly go over what you need to know below.
First, create a custom search engine with the sites to search as any random website you want (I used www.google.com). It doesn't matter what you put in this field, as long as you can create your custom search engine.
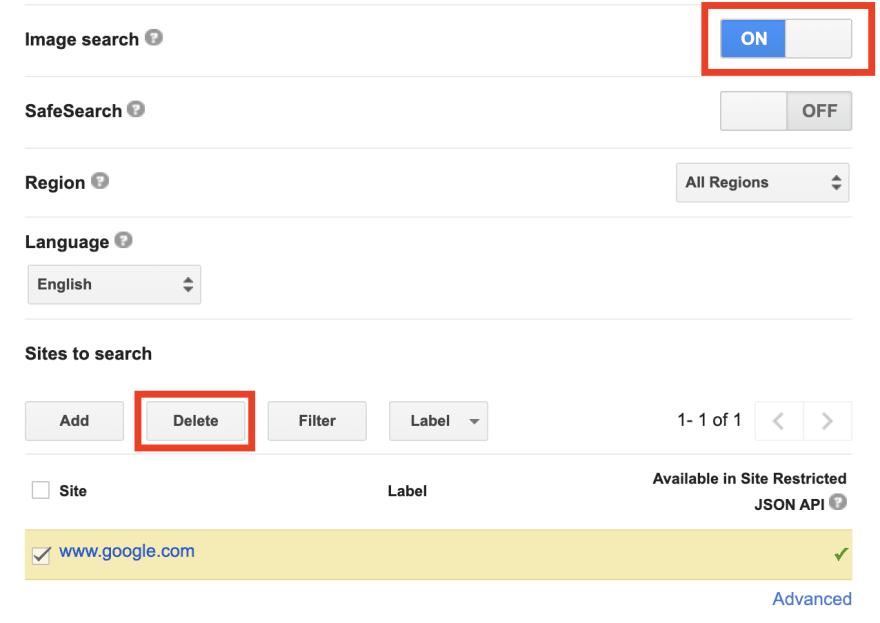
After creating your CSE, click the bottom button that takes you to the control panel. Make sure that ImageSearch is enabled, and delete the sites listed under "Sites to search". This was the "hacky magic", we tell google we want to search that site, but then delete it. Your CSE is now not limited to any specific sites.
The last thing we need from this page is the Search Engine ID. Make sure its handy for when you need it soon!
Get a Google JSON API key
Check out the Custom Search JSON API to get a key from Google. You'll need a project for this key to be under so make sure you can create one on your account.
Setup your serverless environment
It's time for you to set up your serverless environment and its connection to Slack. I'll be using Nimbella Commander so I don't have to worry about any setup besides making sure I'm an admin in my workspace, adding it to Slack, and using /nc dapp_add to set up the default app. Review the Nimbella Commander documentation for more detail while setting up.
Once we have dapp installed, we can create our command. We'll want to allow users to input a query along with the index of the image in the results. If we search the same thing and take the same index of the results we'll often get the same result. Allowing the user to type in an image index gives them choice. Create this command with /nc command_create g_image <search> [<i_index>].
Nimbella Commander will give you a link to access their code editor. I usually develop in my IDE of choice (VSCode ftw) and then insert my code into their editor. Let's get started writing this command!
Google API Call
With our editor open, we can now insert our code! I'll first show you the platform-agnostic API call.
let url = "https://content.googleapis.com/customsearch/v1?cx=" + customSearchEngine + "&q=" + search + "&searchType=" + "image" + "&key=" + googleSearchKey;
let str = await getContent(url);
let searchJSON = JSON.parse(str);
let images = searchJSON.items;
You need to be sure to insert your CSE ID, the search term from your use, and your Google Search JSON key into the URL. This also parses the JSON we receive and puts all the items into images.
While using Nimbella Commander, you can place your API keys into encrypted storage so there's no chance of anyone accidentally posting them to GitHub. I did so by following the documentation.
I also use an async function named getContent to create and handle GET requests as well.
const getContent = (url, headers) => {
  // Return new pending promise
  return new Promise((resolve, reject) => {
    const request = require('https').get(url, {
      headers
    }, response => {
      // Handle http errors
      if (response.statusCode < 200 || response.statusCode > 299) {
        reject(
          new Error('Failed to load page, status code: ' + response.statusCode)
        );
      }

      // Temporary data holder
      const body = [];
      // On every content chunk, push it to the data array
      response.on('data', chunk => body.push(chunk));
      // We are done, resolve promise with those joined chunks
      response.on('end', () => resolve(body.join('')));
    });
    // Handle connection errors of the request
    request.on('error', err => reject(err));
  });
};
Formatting!
Before we get into organizing how our response looks to the user, let's make sure we handle if the user inputs an image index that's either too high or low.
const {
  search,
  num,
} = params;
const {
  customSearchEngine,
  googleSearchKey
} = secrets;


let index = 0;
if (num) {
  if (num > 9 || num < 0) {
    return {
      response_type: 'in_channel', // or `ephemeral` for private response
      text: "Please choose an image range between 0 and 9"
    };
  }
  index = num;
}
If they do, we just return a message explaining the range we accept.
The Slack API has tons of ways to interact and show off your content to users. Sending messages back to users after they call your slash command is one of the most direct and easy interactions you can create. Check out the Message builder or the Block Kit builder for all of your options on message formatting.
My message formatting looks like this.
return {
  response_type: 'in_channel', // or `ephemeral` for private response
  blocks: [{
    "type": "image",
    "title": {
      "type": "plain_text",
      "text": images[index].title,
      "emoji": true
    },
    "image_url": images[index].link,
    "alt_text": images[index].title,
  }]
};
It's meant to be simple, it uses the Block Kit builder to include the image title and the URL of the image. Slack automatically renders the image and posts it in the channel you called it in.
My full file for the g_image slash command is located on GitHub. It has everything you need to run the command, besides your Google API information.
How does it look?
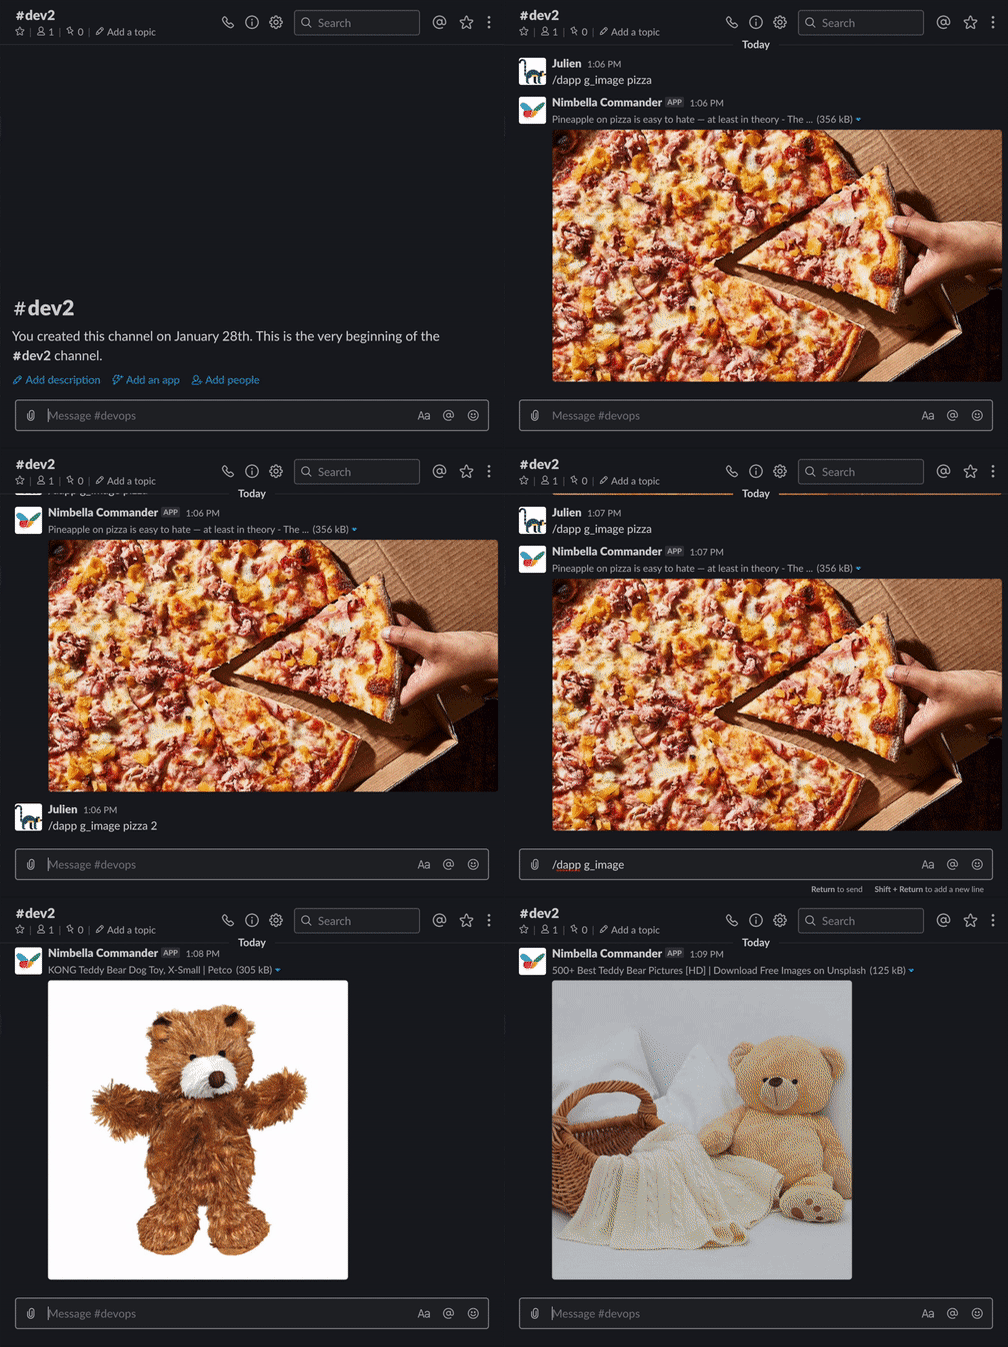
Here's an example of me running my g_image command in Slack with Nimbella Commander. I type the name of our app, the name of the command, and then our parameters.
I can choose the index of the image I want, so I don't get the same first image every time. A next step would be to allow randomization of results as well!
I'd love to see what type of serverless integrations you can create with Slack.

Posted on February 10, 2020
Join Our Newsletter. No Spam, Only the good stuff.
Sign up to receive the latest update from our blog.

