Accessing Salesforce from apps built with Lightning Web Components Open Source

Aditya Naag
Posted on June 17, 2020
Lightning Web Components (LWC) is Salesforce’s Open Source (OSS) UI framework that leverages the web standards breakthroughs of the last 5 years. You can use it to build enterprise-scale apps with your favorite tools like Webpack, TypeScript, and Babel, and run them on Heroku, Google Cloud Platform, Salesforce or anywhere else.
When running these apps on different platforms, you can choose your own backend stack and data source, or you may want surface data from Salesforce in them. In this post, we will explore some options and considerations when using Salesforce as the data source. You’ll find code snippets and links to relevant resources through out this post. You can also refer to this sample code for a fully functional example.
Authentication
Salesforce provides a comprehensive set of REST and SOAP APIs that can be used to access its data and services from a client or server. The first step before accessing the APIs, is to establish a session with Salesforce. You can either use a username and password, or any of the OAuth 2.0 flows listed here. Depending on your use case, these flows can be executed by client-side or server-side JavaScript. You can either build this logic from scratch or use external libraries like JSforce. Here are some considerations when deciding on an authentication flow for your app.
Client Side Authentication
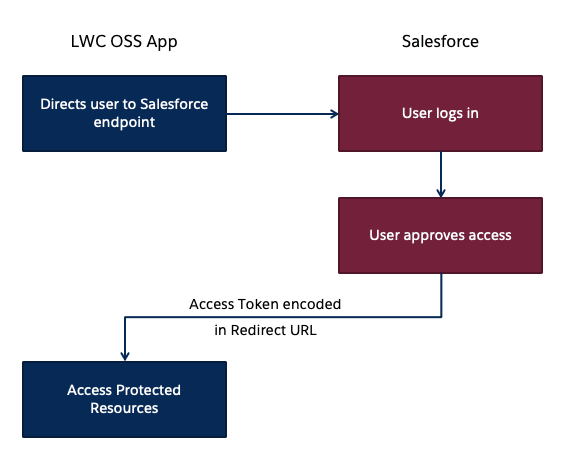
You can use the OAuth 2.0 User-Agent Flow to execute the handshake process using client side JavaScript alone. It involves a simple redirection to the /oauth2/authorize endpoint and takes in the Consumer Key of a Connected App as a parameter. Once the authorization is successful, the access token is encoded in the redirection URL.
Here is a sample code snippet to redirect users to the Salesforce endpoint:
<a href="https://login.salesforce.com/services/oauth2/authorize?response_type=token&
                client_id=<INSERT_CLIENT_ID_HERE>&
                redirect_uri=<INSERT_REDIRECT_URI_HERE>">Login to Salesforce</a>
When you run client-side JavaScript, all the code is executed on the user's device, so sensitive data like passwords and client secrets are accessible and exploitable. For this reason, this flow doesn’t use the client secret. However, the access token is encoded into the redirection URL which is exposed to the user and other apps on the device. Hence, care must be taken to remove callbacks from browser history. You can call window.location.replace() to remove the callback from the browser’s history. It is best to use this type of Auth flow when building Lightning Web Components for desktop or mobile apps that have an embedded browser.
Once you have the access token, you can pass it in the header of any HTTP requests to access Salesforce APIs. Building and sending a request from client-side JavaScript poses a risk, because the access token becomes available to the client and can be exploited. Therefore, sensitive business logic involving access tokens, usernames and passwords must never be written in client side JavaScript, because they can be inadvertently exposed.
To increase security and provide a better level of abstraction between your custom application and the APIs, you should use a middleware like Express, MuleSoft or any other ESB of your choice.
Server Side Authentication
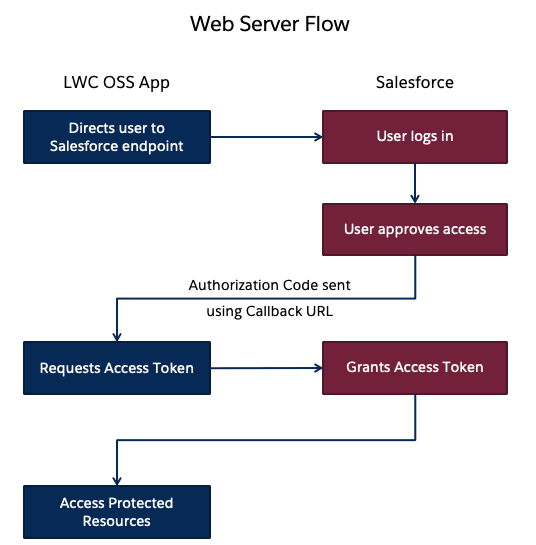
You can use the Web server flow or the JWT Bearer flow to execute the handshake process using server side JavaScript like Node.js or any other stack of your choice. When creating an LWC project, the create-lwc-app tool provides an option to create and use an Express server as a backend. You can choose an OAuth flow that suits your requirements. For instance, you can use the JWT Bearer flow when you want to use a single integration user to access data on behalf of all users. Use cases include showing read-only data (e.g. product catalog) to unauthenticated users. The web-server flow on the other hand can be used for individual user authorization. Use cases include websites where data relevant to the logged in user is shown (e.g. history, favorites, preferences etc.). It is also important to note that both the OAuth flows require a Connected App to be configured in Salesforce.
When running authentication flows on a server, it is expected that the server protects and securely stores all the secrets. In the case of Web Server flow, the client secret that prevents a spoofing server must be stored securely. In the case of JWT Bearer flow, an X509 Certificate that corresponds to the private key of the app must be created and stored in a keystore.
These secrets and certificate aliases also have to be configurable (generally using Environment Variables) and should never be hardcoded into your codebase. This also allows you to change them without rebuilding the app and to deploy instances of your app in different environments with ease.
When developing locally, for example with Node.js, these can be stored in a .env file, which can then be accessed in your code by using libraries like dotenv, saving you the trouble of setting them manually every time. You should exclude sensitive configuration files like .env from version control by referencing them in specific ignore files like .gitignore for git.
Here is a code snippet that lets you connect to Salesforce using the Web Server flow. This code leverages Express server as the backend and also uses the JSforce and dotenv libraries mentioned earlier.
// Initialize Express Instance
const app = express();

//Read Environment Variables
const {
    SALESFORCE_LOGIN_DOMAIN,
    SALESFORCE_CLIENT_ID,
    SALESFORCE_CLIENT_SECRET,
    SALESFORCE_CALLBACK_URL
} = process.env;

// Initialize OAuth2 config
const oauth2 = new jsforce.OAuth2({
    loginUrl: SALESFORCE_LOGIN_DOMAIN,
    clientId: SALESFORCE_CLIENT_ID,
    clientSecret: SALESFORCE_CLIENT_SECRET,
    redirectUri: SALESFORCE_CALLBACK_URL
});

// Login to Salesforce
app.get('/oauth2/login', (req, res) => {
    res.redirect(oauth2.getAuthorizationUrl({ scope: 'api' }));
});

// Callback function to get Auth Token
app.get('/oauth2/callback', (req, res) => {
    const conn = new jsforce.Connection({ oauth2 });
    const { code } = req.query;
    conn.authorize(code, (error) => {
        if (error) {
            res.status(500).send(error);
            return;
        }
       //Saving the access token and instance URL in a Node Session for later access
        req.session.sfdcAccessToken = conn.accessToken;
        req.session.sfdcInstanceUrl = conn.instanceUrl;
    });
});
The listener to the /oauth2/login endpoint redirects a user to the Salesforce endpoint. Once the user logs in, Salesforce redirects them back to the /oauth2/callback endpoint. The listener then retrieves the code parameter from the request, and calls the conn.authorize function to retrieve the access token.
Data Residency
Securing access to Salesforce data doesn’t stop with authentication. Data must be stored and transmitted securely as well. Data on the Salesforce Platform is secured with its core security capabilities like Sharing Model, Object and Field Level Security and optionally Salesforce Shield for encryption and high compliance. Using Salesforce APIs allows real time access to data without copying it. The data returned by the API is bound by the permissions of the user accessing the API.
Depending on your use case, you might want to replicate Salesforce data into a local/managed database. Since you can deploy LWC OSS apps on any platform, there are different options that each platform provides for data storage and replication. For example, Heroku Connect is a Heroku add-on that provides a data synchronization service between Salesforce and Heroku Postgres databases. Add-Ons/Connectors like these are built to securely store tokens, and establish a session with Salesforce when needed. It is important to remember that once data is replicated locally, it is not bound by the same Sharing Model that is present in Salesforce. It is therefore necessary to implement your own access control mechanism.
Never write the logic that queries for data or filters data based on access controls on the client side, because it can be easily tampered with. In the screenshot below, an if condition is being used by the component to only show the data relevant to the logged in user. This statement can be easily removed using browser tools which would then give the logged in user access to all the data that is being returned by the server.
As a best practice, you should always use a middleware to abstract sensitive logic from the client-side and make sure that the middleware returns only the data that’s relevant to the user and nothing more.
Summary
In this post, you’ve learned about different approaches to authenticate to Salesforce from an app built with LWC OSS and what factors determine the approach you take. You’ve seen drawbacks of accessing data from the client side, and how a server can help you secure your implementation. You've also seen how the responsibility of data security varies with choice of data residency. However, it is also important to note that this blog post doesn’t exhaustively list all of the options available for secure Salesforce data access, but instead provides general indication patterns and principles that are used.
Now it's time to get hands-on! Below are a few resources to help you get started.
Also, check out the below content from Trailhead, which is Salesforce’s learning experience platform that contains a library of educational content:
- Trailhead Project: Access Salesforce Data with Lightning Web Components Open Source
- Trailhead Module: Connected App Basics

Posted on June 17, 2020
Join Our Newsletter. No Spam, Only the good stuff.
Sign up to receive the latest update from our blog.
Related
June 17, 2020


