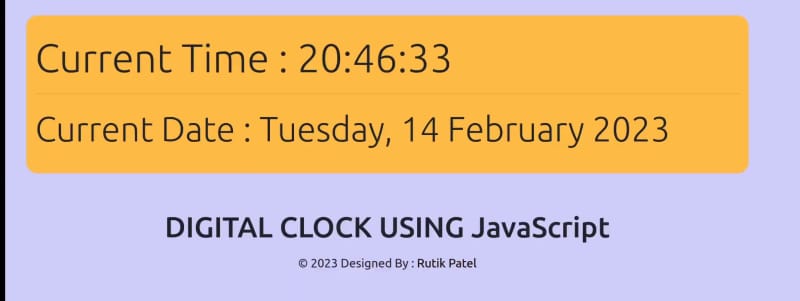
How to Create a Digital Clock Using JavaScript

Rutvik Patel
Posted on April 8, 2023
Digital Clock Using JavaScript
In this article, we’ll show you “How to create a digital clock using JavaScript” In this article, I will guide you through the process of building a simple digital clock that can display the current time on your webpage.
We will start by creating a basic HTML document and adding some CSS to style the clock. Then, we will use JavaScript to get the current time and update the clock every second.
Throughout the article, I will use the key concepts and functions of JavaScript, such as the Date object and setInterval() method. By the end of this blog, you will have a fully functional digital clock that you can use on your own website.
Whether you are a beginner or an experienced developer, this article is perfect for anyone who wants to learn more about JavaScript and create an interactive element for their website. So, grab your favorite code editor, and let’s get started!
Points to be discussed
Preview
YouTube Tutorial
HTML Code
CSS Code
JavaScript Code
References
Preview :
A live demo of the website can be viewed by clicking here.
YouTube Tutorial :
HTML CODE :
index.html
<!DOCTYPE html>
<html lang="en">

<head>
  <meta charset="UTF-8">
  <meta http-equiv="X-UA-Compatible" content="IE=edge">
  <meta name="viewport" content="width=device-width, initial-scale=1.0">
  <title>JavaScript Digital Clock</title>

  <link rel="stylesheet" href="style.css">
  <!-- Bootstrap CDN -->
  <link href="https://cdn.jsdelivr.net/npm/bootstrap@5.3.0-alpha1/dist/css/bootstrap.min.css" rel="stylesheet"
    integrity="sha384-GLhlTQ8iRABdZLl6O3oVMWSktQOp6b7In1Zl3/Jr59b6EGGoI1aFkw7cmDA6j6gD" crossorigin="anonymous">
  <!-- My JavaScript -->
  <script src="script.js"></script>
</head>

<body>
  <div class="container my-5 py-4 bg-warning">
    <div class="jumbotron">
      <h1 class="display-4">Current Time : <span id="time"></span></h1>
      <hr size=5px;>
      <h1 class="display-5">Current Date : <span id="date"></span></h1>
    </div>
  </div>

  <div class="text-center">
    <h1>DIGITAL CLOCK USING JavaScript</h1>
  </div>

  <footer>
    <p id="footer" class= "text-center">
      © 2023 Designed By : <a href="https://rutikkpatel.github.io/Portfolio1/" target="_block">Rutik Patel</a>
  </footer>
  <!-- Bootstrap Bundle Script CDN -->
  <script src="https://cdn.jsdelivr.net/npm/bootstrap@5.3.0-alpha1/dist/js/bootstrap.bundle.min.js"
    integrity="sha384-w76AqPfDkMBDXo30jS1Sgez6pr3x5MlQ1ZAGC+nuZB+EYdgRZgiwxhTBTkF7CXvN"
    crossorigin="anonymous"></script>
</body>

</html>
CSS CODE :
style.css
* {
  margin: 0;
  padding: 0;
}

body {
  background: rgba(162, 155, 254, 0.5) !important;
}

.container {
  border-radius: 15px;
}

#footer a {
  text-decoration: none;
  line-height: 34px;
  color: #000000;

}

#footer a:hover {
  color: red;
  font-weight: bold;
  text-decoration: underline;
}
JavaScript CODE :
script.js
let a;
let time;
let date;
const options = {
  weekday: 'long',
  year: 'numeric',
  month: 'long',
  day: 'numeric'
}

setInterval(() => {
  a = new Date();
  // Concate Hours, minutes and seconds
  time = a.getHours() + ":" + a.getMinutes() + ":" + a.getSeconds();
  document.getElementById('time').innerText = time;

  // For Current Date
  // 14-02-2023 Date Format
  // date = a.toLocaleDateString();

  // Display month day in string format - Wednesday, 20 December 2000
  date = a.toLocaleDateString(undefined, options)
  document.getElementById('date').innerText = date;
})
References :
GitHub Repository: https://github.com/rutikkpatel/JavaScript_Programs/tree/main/JS_Digital_Clock

Posted on April 8, 2023
Join Our Newsletter. No Spam, Only the good stuff.
Sign up to receive the latest update from our blog.
 ( [Rutik Patel](https://rutikkpatel.medium.com/) )](https://res.cloudinary.com/practicaldev/image/fetch/s--qeKOhVfu--/c_limit%2Cf_auto%2Cfl_progressive%2Cq_auto%2Cw_800/https://cdn-images-1.medium.com/max/2560/1%2AY24rG35gzAAGsCf0NesQWA.png)


