Implementing Spring Kafka in a Simple SpringBoot Application

Ruby Valappil
Posted on February 6, 2022
Apache Kafka is an event streaming platform where data flows from one system to another. Its use cases are but are not limited to, IoT, real-time data analytics, log aggregation and analysis, message broker, and so on.
In this article, we will learn how apache Kafka is used as a message broker. The role of a message broker is to pass data from one system or service to another system or service.
As microservices became popular in the software industry, Kafka became a useful tool to make asynchronous communication possible.
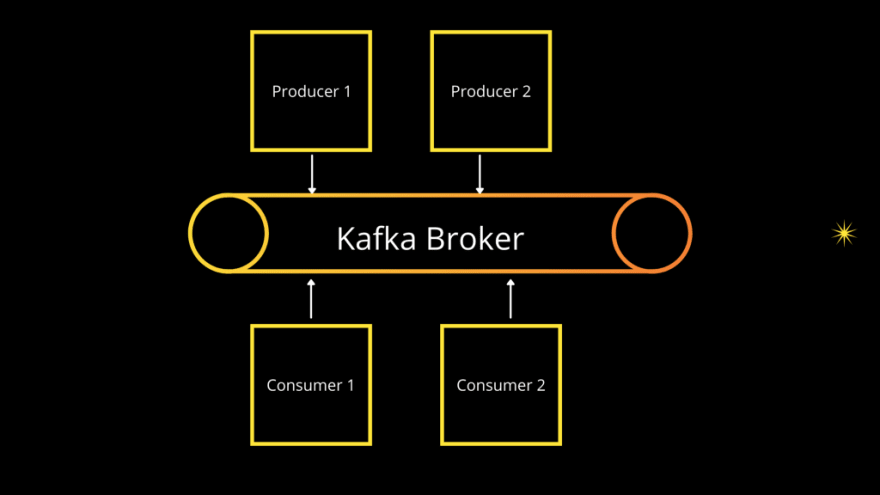
How Kafka works as a message broker is shown in the image below.

Simple representation of Apache Kafka as Message Broker
Spring Kafka is Spring’s implementation of adding an abstraction over Kafka java client. It comes with a template and message-driven POJOs, we will learn more about that in the implementation section.
To implement Spring Kafka, we would first need to set up Kafka in our local machine.
Few terms to remember
Producer-Consumer: Producer is the application that would write data to the Kafka topics and Consumer is the application that would read the data.
Events: Data read or written to Kafka is in the form of events. These are like files stored in the file system with basically three pieces of information — key, value, and timestamp. (we will see more on key and value in the implementation segment)
Topic: Events are organized as topics. A producer writes to a topic and consumer reads from a topic.
Partition: Topics are partitioned. Think of partitions like files and they are stored within a topic which we can think of like folders.
Segments: Segment is a collection of all the messages that are written to a topic. Each partition is actually stored in a sequence of segments that is instead of a single file, data is split into multiple segments.
Zookeeper: Zookeeper is not a part of apache Kafka but is required to maintain Kafka topics and messages in a distributed environment. We will have to run Zookeeper before we run Kafka.
Kafka Installation
Refer to the steps mentioned in https://kafka.apache.org/quickstart, the official Kafka website for the installation process.
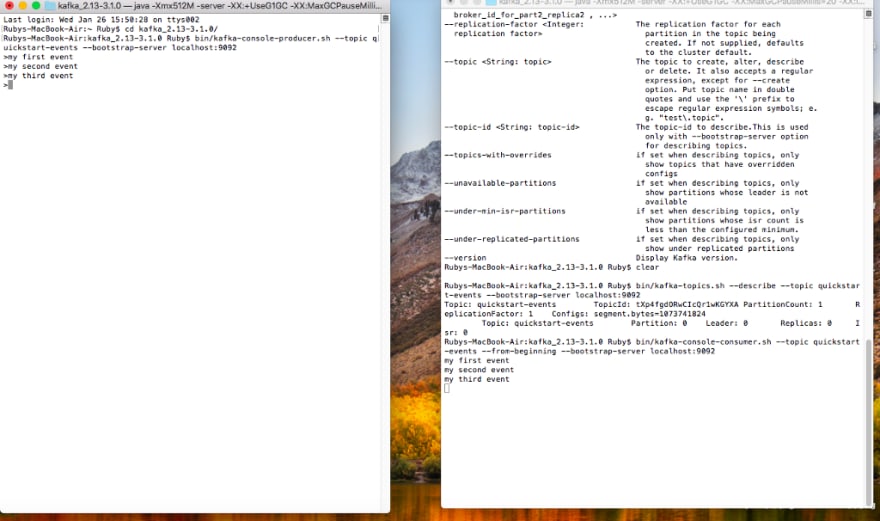
Once the installation is complete, you will be able to send and receive messages as shown below. At this point, we have ensured that the installation is working fine.
Please note that, for this tutorial to work we just need to follow steps 1 and 2 from the installation steps mentioned on the Kafka website. That is, download the Kafka zip file and extract it to your local, start zookeeper and Kafka servers. We do not need to manually create the topic or start the consumer or producer, that part we will do from our application. you can terminate the producer and consumer in your terminal using Ctrl+C if you have already started them.

messages are published and received
Implement Spring Kafka with Spring Boot
Now, let’s create a spring boot application from the spring initilzr web application. Make sure to add web and Kafka dependency.
We will start with configuring KafkaTemplate for the producer and also explicitly implement the deserialization technique for the consumer.
Here, the key is automatically assigned by Kafka and value is the record that we publish to a Kafka topic. If both key and value are String then we can provide StringDeserializer instead of a JsonDeserializer (Check the complete code in Github for more).
In this configuration, we also create a topic named sample-topic4. We are using default Kafka properties here, this can be modified by adding the properties in the applciation.yml file.
Next, let’s write the consumer class that will read data from the “sample-topic4” topic.
@KafkaListener(id = "sampleGroup", topics = "sample-topic4", containerFactory = "jsonKafkaListenerContainerFactory")
Here, id represents the groupid. multiple consumers can read from a single topic, this is made possible by assigning each consumer to a different groupid. one consumer from each groupid will read the message from a given topic.
If we are implementing a deserialization behavior then we will have to explicitly mention that in the KafkaListner annotation, else the default deserialization technique will be used.
Next, let's create an API which upon being called will write a message to the Kafka topic.
@PostMapping(path = "/send/{name}")

**public**  **void** sendFoo(@PathVariable String name) {

**this**.template.send("sample-topic4", **new** Sample(name));

}
Now, that we have most of the pieces in place, let’s create a POJO and then build and run this app.
Testing
Test the app using the below curl
curl --location --request POST 'localhost:8080/send/test' \

--header 'Content-Type: application/json' \

--data-raw '{}'
we can verify the console logs to check the messages
[2m2022-01-28 15:49:51.739[0;39m [32m INFO[0;39m [35m88907[0;39m [2m---[0;39m [2m[nio-8080-exec-2][0;39m [36mo.a.kafka.common.utils.AppInfoParser [0;39m [2m:[0;39m Kafka version: 3.0.0

[2m2022-01-28 15:49:51.740[0;39m [32m INFO[0;39m [35m88907[0;39m [2m---[0;39m [2m[nio-8080-exec-2][0;39m [36mo.a.kafka.common.utils.AppInfoParser [0;39m [2m:[0;39m Kafka commitId: 8cb0a5e9d3441962

[2m2022-01-28 15:49:51.740[0;39m [32m INFO[0;39m [35m88907[0;39m [2m---[0;39m [2m[nio-8080-exec-2][0;39m [36mo.a.kafka.common.utils.AppInfoParser [0;39m [2m:[0;39m Kafka startTimeMs: 1643406591739

[2m2022-01-28 15:49:51.757[0;39m [32m INFO[0;39m [35m88907[0;39m [2m---[0;39m [2m[ad | producer-1][0;39m [36morg.apache.kafka.clients.Metadata [0;39m [2m:[0;39m [Producer clientId=producer-1] Cluster ID: G6ipFFHMTKqR9YoeXBHeIA

Received: hello

Received: test
Conclusion
That’s it.
We have developed and tested Kafka messaging using spring-kafka.
Complete code is available on Github. Leave a star on the repository if you find the code useful.

Posted on February 6, 2022
Join Our Newsletter. No Spam, Only the good stuff.
Sign up to receive the latest update from our blog.
