How To Create 3D Characters For Your Unreal Engine 4 Game With Our Avatar SDK

Daniel Marcinkowski
Posted on April 26, 2021

Make a game with 3D avatars using the free Ready Player Me Unreal Engine 4 Avatar SDK
Ready Player Me is a cross-game avatar platform that lets you add a 3D avatar creator to your game. Up until now, we supported only Unity-based applications. That changes with our new Unreal Engine 4 Avatar SDK.
Ready Player Me avatars are compatible with over 700 apps and games, including VRChat, LIV, and Mozilla Hubs. There are also countless indie developers who use our avatar SDK for their projects.
Implementing Ready Player Me avatars is simple. It took one to two days for most of our partners to integrate our Unity-based avatar creator into their products. It's no different with our UE4 character SDK.
In this guide, you will learn how to import and set up the Ready Player Me Unreal Engine 4 Avatar SDK and import our avatars from the web at runtime.
Using Ready Player Me avatars for commercial projects
Ready Player Me avatars are free to use. All avatars created directly on our website are under the Creative Commons 4.0 license, which means that they can be used for non-commercial projects as long as Ready Player Me is credited.
If you’re looking to integrate Ready Player Me avatars into your commercial app or game, you can continue using our avatars for your project for free as a registered Partner. To become a Ready Player Me Partner, follow the steps here.
Requirements
For the Ready Player Me Unreal Engine 4 SDK to work properly, you'll need:
- Unreal Engine 4.25 or 4.26. Our plugin is compatible only with these versions due to a third-party plugin glTFRuntime. It is required for loading glTF files. The plugin is included in the ZIP file.
- A valid avatar URL created from Ready Player Me to import an avatar into a Unity scene.
Dependencies
Dependencies are included in the ZIP file. If you are using an older or newer version of these dependencies, please backup your project before making changes.
- glTFRuntime
For further information on the glTFRuntime plugin, you can find their documentation here.
Acknowledgments
A big thank you to Roberto De Ioris, for creating the glTFRuntime plugin and providing support to all users. We encourage anybody using this plugin to consider purchasing glTFRuntime from the Unreal Marketplace and help support its development.
Getting started with the Ready Player Me Unreal Engine 4 SDK
To get started, download the latest version of the Ready Player Me Unreal Engine 4 plugin. There are two ways to install it:
1. Project Install
You can add the plugin to a particular project. This means that you will need to add the plugin to all projects individually. To add the plugin to an Unreal project, navigate to [PROJECT_NAME]/Plugins folder. If there is no Plugins folder, you need to create it. Unzip the Ready Player Me Unreal plugin archive inside of the Plugins folder. You should see two new folders: ReadyPlayerMe, and glTFRuntime.
2. Engine Install
Alternatively, you can add the Ready Player Me plugin to a particular engine version installed on your computer. That will make it available to any Unreal project you open using that engine version. To do this, navigate to Program Files/Epic Games/[ENGINE_NUMBER]/Engine/Plugins. Once there, unzip the Ready Player Me plugin archive. You should see two new folders: ReadyPlayerMe, and glTFRuntime.
Important – the Unreal Engine SDK was created using Unreal Engine 4.25. If you are doing an engine install for Unreal Engine 4.26, the plugin modules will need to be recompiled to work. To do this, you will need to do a Project Install first and, when you open the project, it will give you the option to rebuild these plugins. Once that's done you can then move them into the Program Files/Epic Games/[ENGINE_NUMBER]/Engine/Plugins folder to make it available for all projects using that engine version.
Enable Plugins
After installing the plugin, you can open your Unreal project. You'll need to restart Unreal if you had an opened project while installing the plugin.
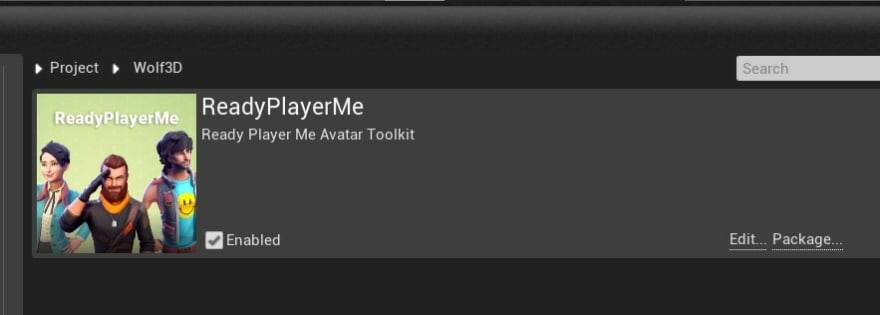
To enable the plugins, navigate to Edit > Plugins in the top toolbar. You should see the ReadyPlayerMe and glTFRuntime plugins. Tick the Enabled option for each of them. The plugins are now ready to use.
Show Plugin Content In Editor
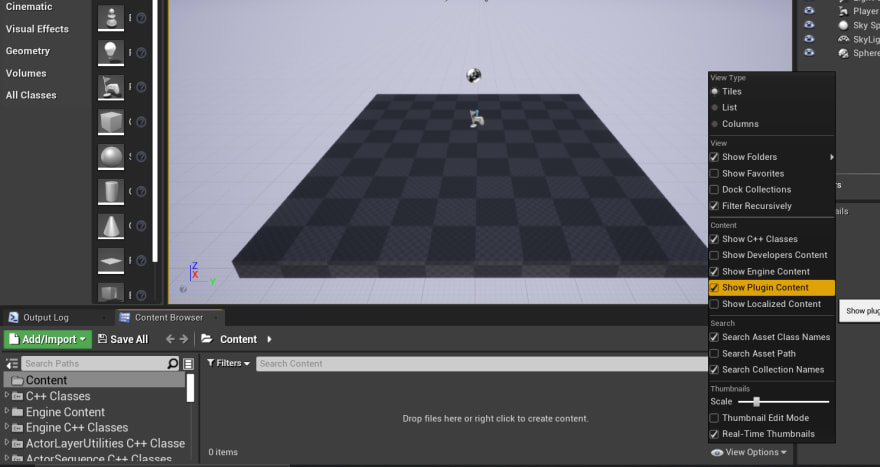
If you don't see the ReadyPlayerMe plugin content in the Content Browser, click the View Options button in the bottom corner and then click Show Plugin Content as shown in the picture below:
How to use the Demo Map
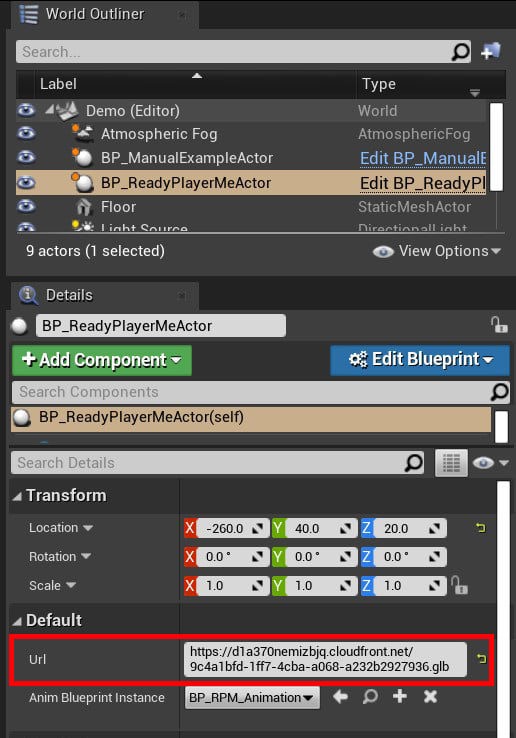
To get you started with Ready Player Me, our plugin comes with a pre-made map called ReadyPlayerMeDemo. It features a basic scene with an actor called BP_ReadyPlayerMeActor.
To load your avatar into this map, you have to paste a URL to a Ready Player Me avatar from our web platform. To do this, click BP_ReadyPlayerMeActor and look for the property named Url.
When done, hit Play. After a few seconds, your avatar should appear in the scene. If it's a full-body avatar, then it will be playing an animation.
Congratulations, you have loaded a Ready Player Me avatar into the Unreal engine!
Inside the Ready Player Me Unreal Engine 4 SDK blueprints
Now let's dive into how the Ready Player Me SDK works and how you can implement it into your games and other applications. To get started, open the BP_ReadyPlayerMeActor blueprint. Let's look at the first three nodes connected to the BeginPlay node.
As the name suggests, this runs as soon as you hit Play. We need to get a pre-configured runtime config using RPM Get Full Body Runtime Config. This is a custom helper function to save you from having to create the config yourself. However, we will also cover how to do that later on in this guide. This config handles some of the loaded .gltf scene scale and 3D transform properties.
Once we have the config, we can pass it to the most important node of all glTF Load Asset From Url. This node is part of the third-party Unreal editor plugin glTFRuntime. As you can see, it is passed the public Url property as a parameter and the LoaderConfig parameter that we specifically need for ReadyPlayerMe avatars to load correctly for animation purposes.
Important – while glTF Load Asset From Url loads the asset, it does not spawn it in the scene. It loads the data from the URL and stores it in a format we can then use.
Lastly, it has a Completed callback function which we will use to actually load the avatar model assets into the scene.
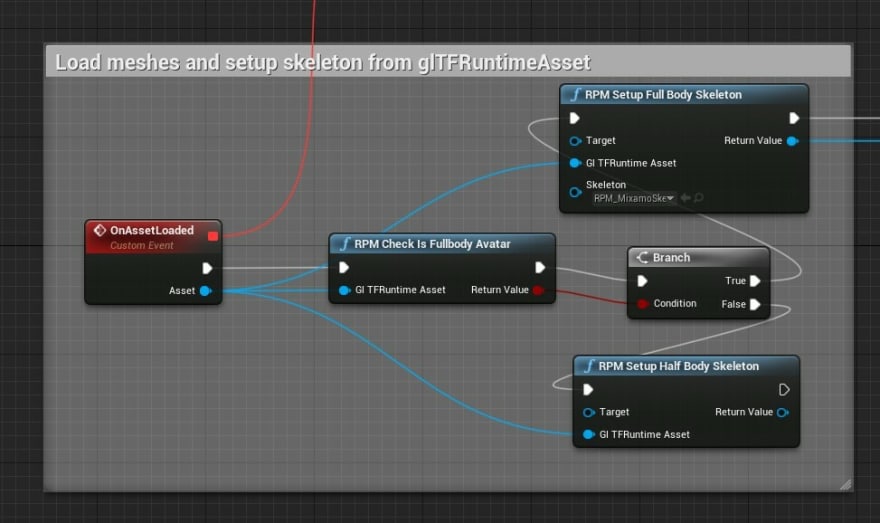
The OnAssetLoaded function below is connected to the Completed callback function parameter mentioned above. This is run once the avatar has finished loading from the web and returns a custom type of asset called a glTFRuntimeAsset which contains all the data loaded from the ReadyPlayerMe .gltf file.
Once the asset has been loaded, we can check whether the loaded asset is a full-body or half-body avatar. If it's a half-body avatar, it loads in with the helper function RPM Setup Half Body Skeleton node. If it's a full-body avatar, it loads the model with the RPM Setup Fullbody Skeleton node. Both of these nodes handle the loading of all the meshes, materials, and skeleton and adding it to the Target actor, which defaults to self if nothing is assigned.
Important – the RPM Setup Full Body Skeleton node has a Skeleton parameter. This must be set to RPM_MixamoSkeleton as this is used for retargeting from our reference skeleton we have included in the plugin. Without this, the animations won't work correctly.
After loading the full-body skeleton, we can set the avatar up for animation with the RPM Set Full Body Animation Blueprint. This is another helper function, and it takes in the public property AnimBlueprintInstance, which can be set in the inspector of the actor.
If you want to see exactly what our RPM helper functions do, you can find the C++ class files in [PROJECT_NAME/Plugins/ReadyPlayerMe/Source/ReadyPlayerMe/Private.
Further Learning
If you would like to understand the avatar loading function logic further in blueprint format, there is also a BP_ManualExampleActor you can reference. In this event graph, you will see how the logic behind our ReadyPlayerMeFunctionLibrary helper functions can be applied manually via the Blueprint system.
How to load Mixamo animations for the Ready Player Me avatars
Full-body Ready Player Me avatars are compatible with Adobe's Mixamo animations. Here's what you have to do to use the animations with our avatars:
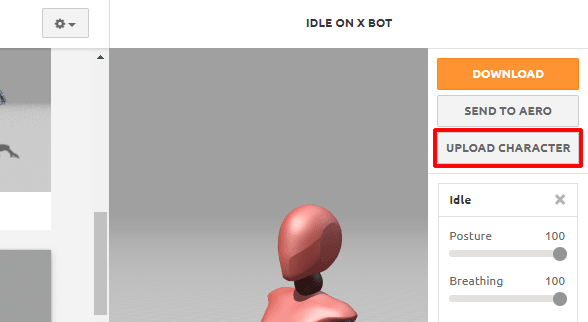
Step 1: Go to Mixamo's website and sign up or log in
Step 2: Upload RPM_Animation_Target.fbx from [PROJECT_NAME]/Plugins/ReadyPlayerMe/Resources/RPM_Animation_Reference.zip to Mixamo.
Important – RPM Animation Reference FBX is in a ZIP file. Otherwise, it would be imported into Unreal and converted into a .uasset file. That would make it impossible to upload to Mixamo.com.
Step 3: After Mixamo completes processing the animation target, pick an animation that you want to use. Then click Download.
Step 4: When the download settings dialogue shows up, select format as FBX binary and skin as Without Skin. Finally, click "Download."
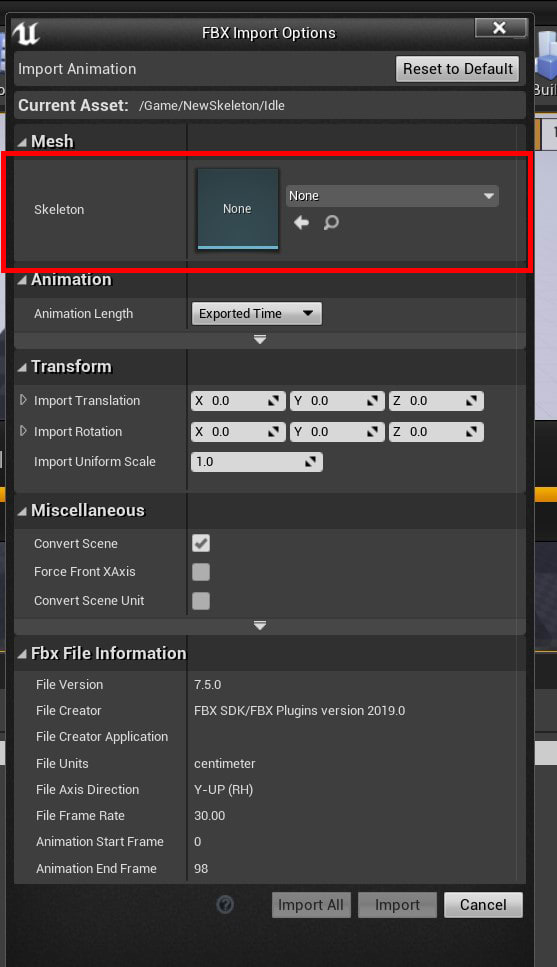
Step 5: Import the animation FBX file into your Unreal Engine Project and in the FBX Import Options window, click on the Skeleton property.
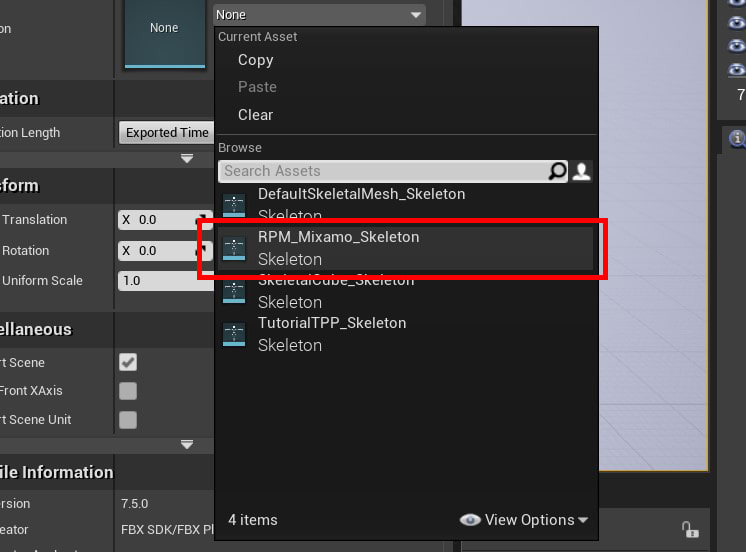
Step 6: Set the skeleton to the preconfigured RPM_Mixamo_Skeleton.
Step 7: Hit Import to load the animation into the project.
Once imported, you can add it to an animation blueprint of your own or to our example blueprint – BP_RPM_Animation.
That's all you have to know to get started with Ready Player Me Unreal Engine 4 SDK. For more, including our Unity SDK, check our developer documentation. Feel free to join our Discord server and chat with our team on the #developer-discussion channel.
If you would like to use Ready Player Me for a commercial product, reach out to our team.

Posted on April 26, 2021
Join Our Newsletter. No Spam, Only the good stuff.
Sign up to receive the latest update from our blog.

