Beginner IoT project: LED Web trigger

Rafael Levi Costa
Posted on January 8, 2024
Complete project for beginners: AWS EC2, RDS, MQTT
Summary:
We have been assigned to create the prototype of such an application that will require:
• cxWeb service (backend and frontend)
• LED
• Hardware/Microcontroller (NodeMcu ESP8266)
• Interface between web service and hardware (Dashboard that allows customer interaction with the system).
Requirements Analysis:
- The system should send commands to control an LED (on/off).
- The system should provide a management interface dashboard.
- The system should be developed using C++ for the embedded part, NodeJS with TypeScript for the backend, and React with TypeScript for the frontend.
- Brief written summary about the technologies used to solve the problem.
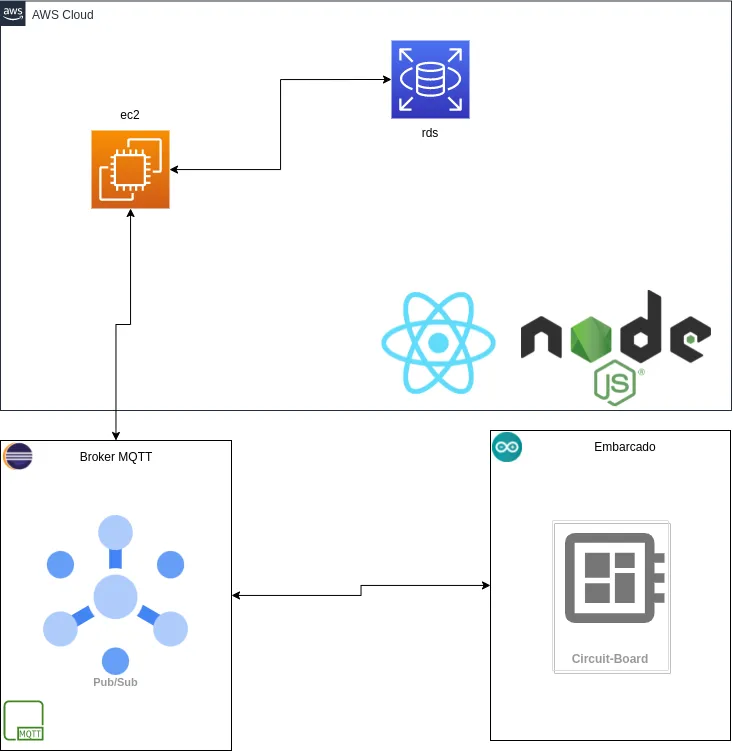
We have divided the project into three parts: electronics, programming (embedded and web), and infrastructure. The electronics part will take care of the circuit diagram, component connections, microcontroller, and the LED. The programming part is further divided into embedded, backend, and frontend. We will have a C++ code base that will be embedded in the NODE ESP8266 microcontroller. The web project will be developed using JavaScript, using the NodeJS/Adonis and ReactJS frameworks for the backend and frontend, respectively, both with the use of TypeScript. Between the embedded code and the web project, we will have a network communication protocol, which covers the network infrastructure aspect.
Electronics:
Regarding the electronics, we used a 220-ohm resistor (not mandatory) connected to the LED to provide the necessary resistance (or power dissipation) to safely illuminate the LED, thus limiting the current to only what is required for this component.
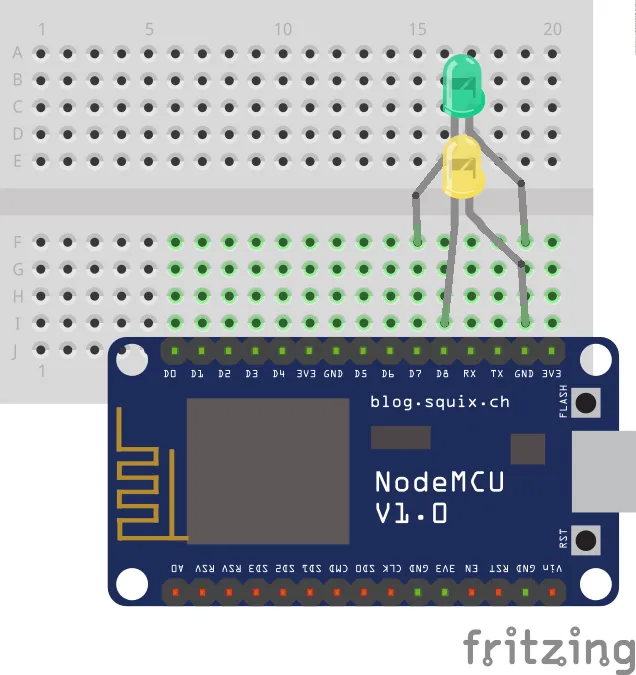
The schematic diagram is as follows:
We connect the LED (Light Emitting Diode) to the GPIO13 pin of the NODE MCU ESP8266, which is responsible for emitting the high pulse to activate it. As an optional component, we placed another LED on GPIO15 pin just to indicate if there was a connection to the network.
We used a circuit modeling software called Fritzing, and the file is included in the embedded source code.
Programming:
Embedded — The programming for the microcontroller was done using the Arduino IDE, which uses a programming language based on C++.
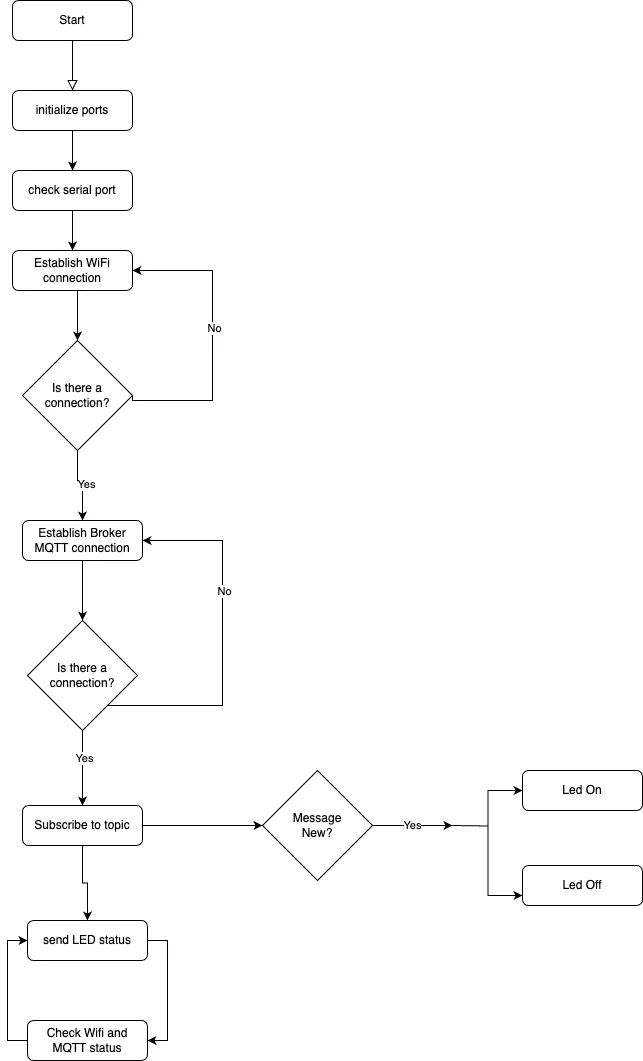
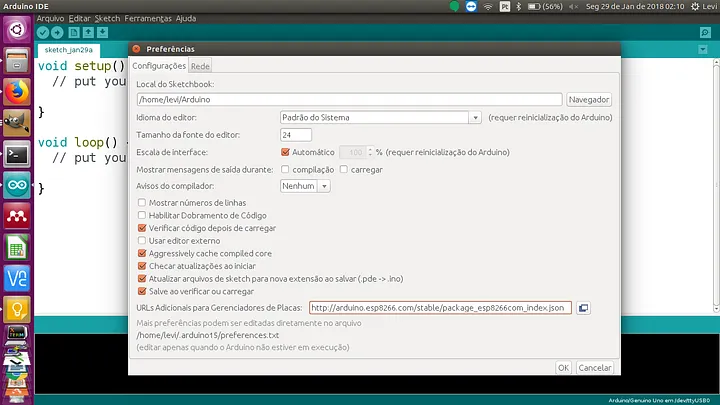
The code basically connects to Wi-Fi, connects to the MQTT Broker, subscribes to a topic to listen, and publishes the status of the LED. Let’s now break down the entire code and explain each part of it. But before that, there are some necessary details in the Arduino IDE. We need to install the ESP8266 driver on our platform by clicking on the File menu -> Preferences, and in Additional Board Manager URLs, enter the library link (http://arduino.esp8266.com/stable/package_esp8266com_index.json), as shown in the image below:
Now let’s get to the code itself.
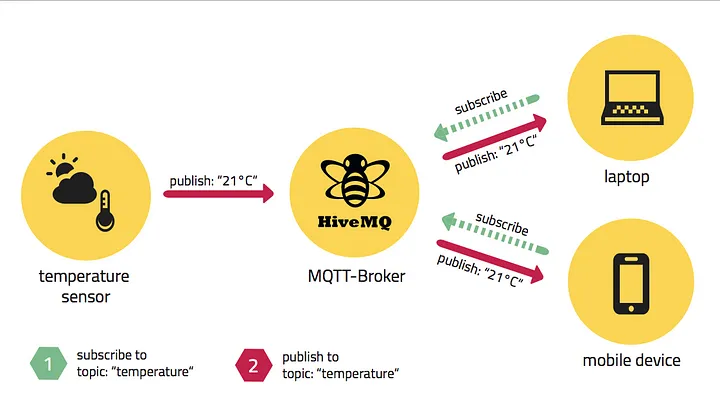
First, we include the libraries for Wi-Fi access and for accessing the classes responsible for configuring an MQTT client. We define the two methods provided by the MQTT protocol for communication: Publish and Subscribe. As shown in the image below, we can receive and send data between the MQTT client and what we call the MQTT Broker or MQTT Server.
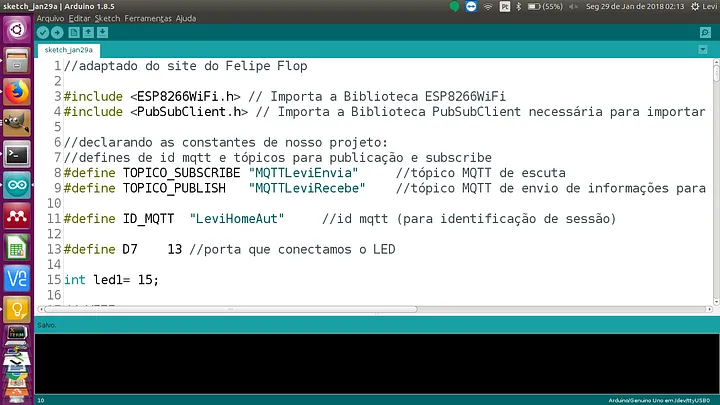
In line 11 of the code, in Figure 3, we can see the definition of the constant that will give the name to the MQTT session ID because in our case, we chose the Eclipse server (test.mosquitto.org) for the Broker connection. Therefore, we have the same open MQTT server for everyone to connect to, so the only identification that differentiates the projects is this ID to avoid conflicts. For testing and demonstrating mastery of the technology, we created two other versions of the code where we don’t need to worry about putting a unique ID name in the world. We used a CloudMQTT server in the first version, and in the second version, we installed our own MOSQUITTO server on our AWS (Amazon Web Service) server. To avoid confusing the reader, the differences between the codes will be provided in video format and directly on GitHub.
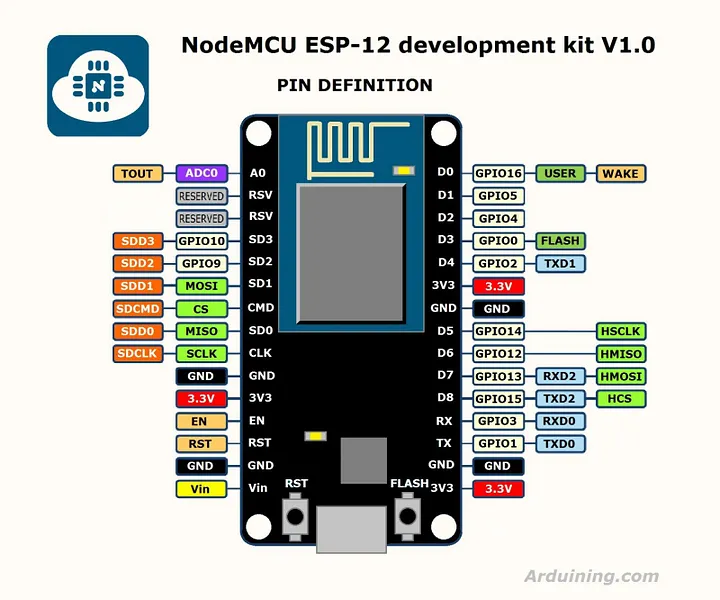
Finally, in line 13, we define the constant that maps to port D7, as shown in Figure 1. We can see that the LED is connected to port D7, which, according to the electronic schematic (datasheet) of the ESP8266, corresponds to port 13 (see Figure 5).
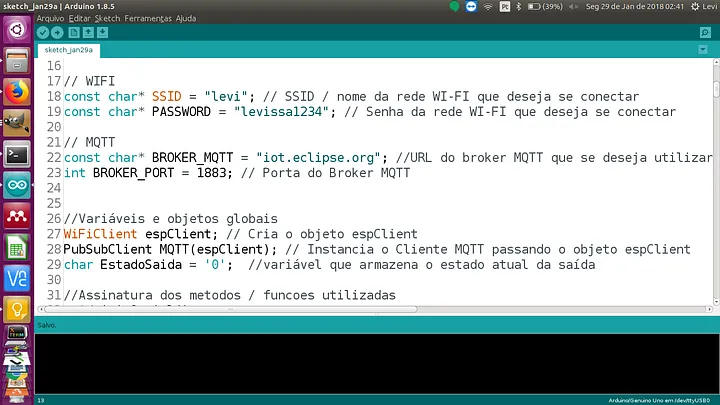
Now let’s move on to the embedded code, let’s see the next figure that will present the sequence.
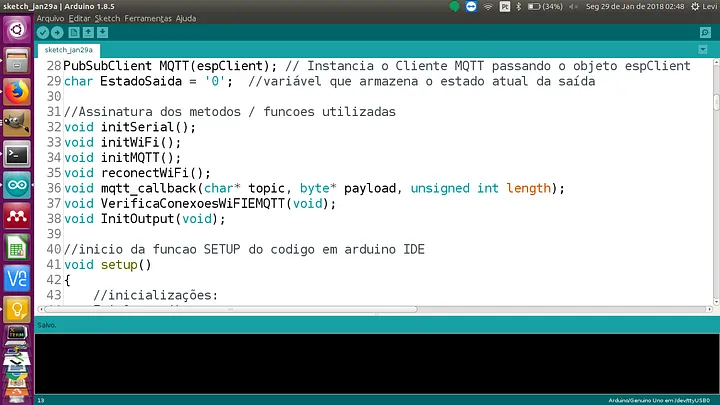
In lines 18 and 19, we input the credentials for the internal network access. In lines 22 and 23, we provide the IP or URL of the MQTT Broker and the access port. In lines 27 to 29, we declare variables and create instances, or objects as preferred, of the classes that are used and declared in lines 3 and 4.
Now let’s discuss the concept of method signature or function signature. We need to declare which functions/methods we can use throughout our code, and this combination of function return, name, and parameters is called a signature. As we can see, from line 32 to 38, these signatures are declared. Starting from line 41, we begin the Setup() function, where we put everything that will be executed only once during the system initialization.
Now I will briefly explain the purpose of each function declared after Setup(). The initSerial function initializes the serial communication with the ESP, which, by default, operates at 115200 Hz, unlike the Arduino, which operates at 9600. The initWiFi function connects the ESP to the specified SSID in line 18 (const char* SSID = “”;) along with the Wi-Fi access point password, which can be an AP (Access Point) or a router. The initMQTT function opens a connection to the MQTT Server using the desired port. Later on, we will see that the connection function to the Broker can be overloaded, allowing the IP and port of the server to be passed as parameters, or in other cases, a user and password as well. The mqtt_callback function is responsible for managing the subscribe and publish methods to exchange information between the client and the Broker. Within this function, we check if the message is to turn the LED on or off, using “L” for on and “D” for off, thereby turning on or off the LED connected to GPIO pin D7. The reconnectMQTT function is responsible for attempting to keep the ESP connected to the Broker. The reconectWiFi function does the same as the previous one, but only focuses on maintaining the connection with the wireless access point. The VerificaConexoesWiFIEMQTT function is responsible for establishing the connection by calling the other connection functions for the Broker and Wi-Fi. The EnviaEstadoOutputMQTT function sends the LED output state to the Broker. The InitOutput function initializes the LED as OUTPUT (a common mistake is forgetting to declare the LED as an actuator) and keeps the initial state of the LED as off (a standard practice in IoT projects).
Finally, we have the loop function, which is native to the Arduino IDE and keeps the ESP connected, continuously checking connections and sending the output state to the Broker.
Now let’s go to the WEB Project
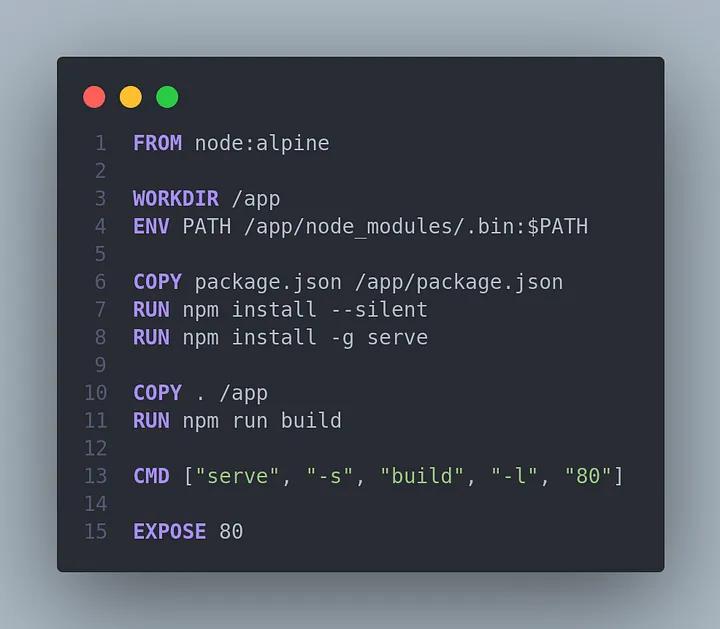
The web project was developed using React.js on the frontend and Adonis.js on the backend, both with TypeScript. The backend serves as a REST API with authenticated routes protected by an OAuth guard. To facilitate project execution, it can also be run within a Docker container, where all the necessary requirements are configured and installed. Both the frontend and backend have a Dockerfile to create the Docker images.
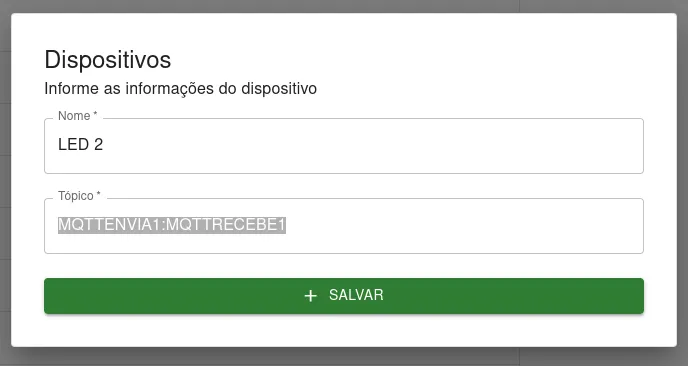
In addition to the user authentication functionality, a device CRUD (Create, Read, Update, Delete) was also implemented. When registering a device, it is necessary to provide its name and topic. The name is simply a way to facilitate device identification, while the topic is required to know where to send and receive messages via WebSocket. The topic field consists of two main pieces of information. The first is the topic where the system should publish messages, that is, send commands to turn the device on or off. Following that, separated by a colon “:”, we need to specify the topic to listen to messages being sent by the embedded system. This topic is used to identify the current state of the device, whether it is on or off.
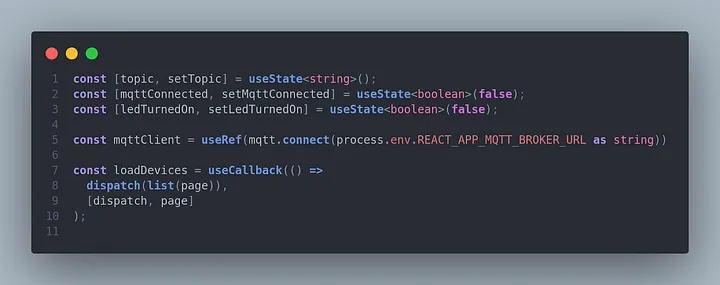
We are using a Node.js MQTT library to establish the connection with the broker and perform publications and subscriptions to device topics. The InteractiveDevice component, which can be found at src/pages/Devices/InteractiveDevice/index.tsx, is responsible for this logic. Once the component is called, we establish a connection with the broker by providing a WebSocket connection URL for MQTT, which can be found in the .env file located at the root of the project, as shown in line 5 of the figure below.
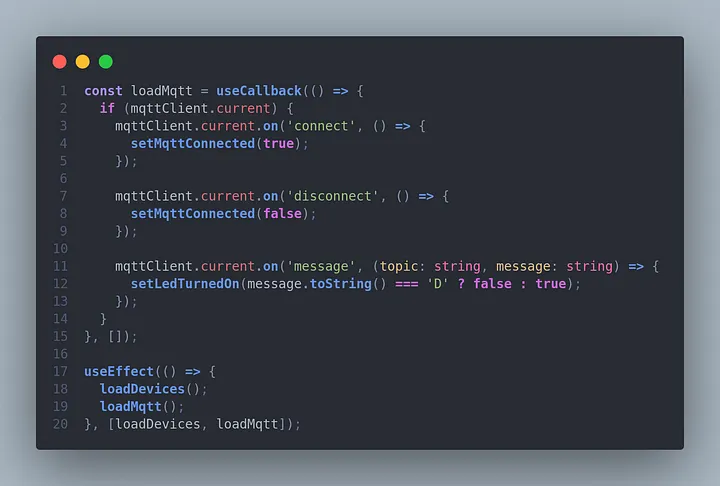
Once the broker is connected, we load the connect, disconnect, and message events in the loadMqtt function within the useEffect hook. When connected, we update the mqttConnected state to true, and when disconnected, we update it to false. In the message event, we intercept the messages being received from the embedded device to determine whether the LED is on or off.
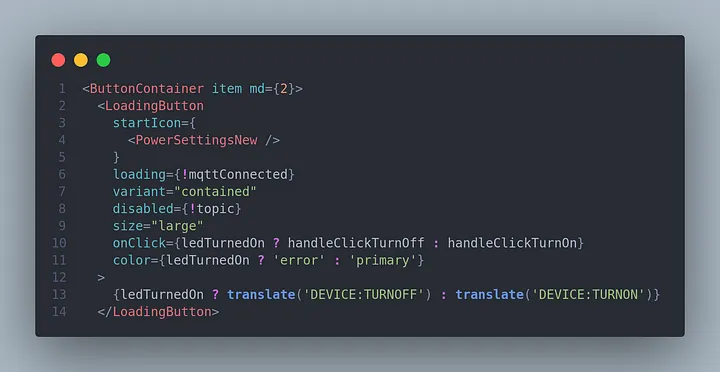
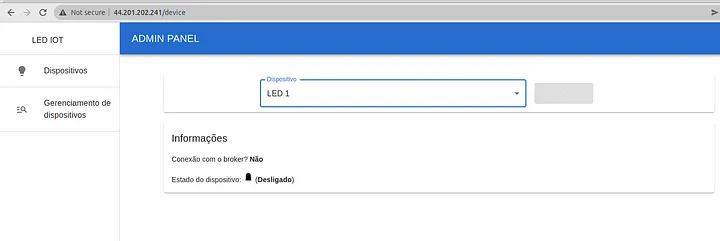
In the same component, there is a button to turn the device on or off. This button has a function that is executed every time the button is clicked. Depending on whether the device is on or off, the function can publish a string “L” to turn on the device or “D” to turn it off. After publishing to the topic, a subscription is made to the same topic to determine if the device’s state has changed. In the image below, you can see the button and the function that is called on the onClick event. It can also be observed that the click event changes depending on whether the LED is on or off.
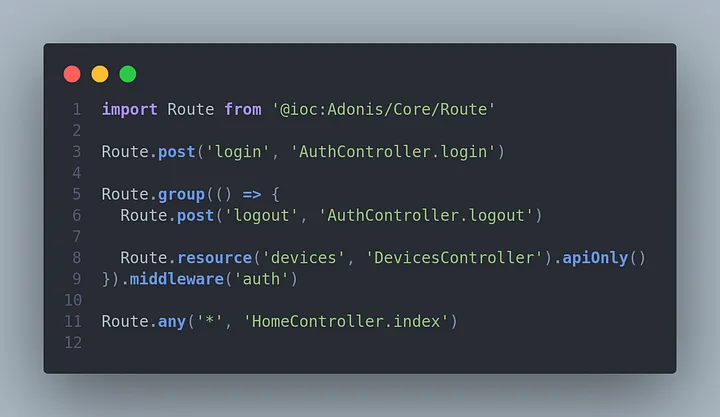
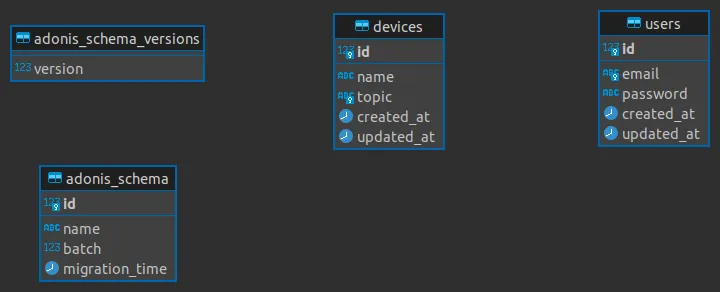
In the backend, we created the database using migration schemas. Therefore, we have two migrations: one for the “users” table and another for the “devices” table, located in the “database/migrations” directory. Similarly, we are using two models to represent the “users” and “devices” entities, along with the Lucid ORM in the “app/Models” directory. Since the system has routes that require authentication, we created a root user to access the system through a user seed, which can be found in “database/seeders/User.ts”. This seed should be executed after the system is run for the first time. All API routes are located in the routes file at “start/routes.ts”. Routes inside the “group” method require an authentication token, unlike those outside it. Each route calls a controller, which in turn calls the request validation file and the corresponding model when necessary.
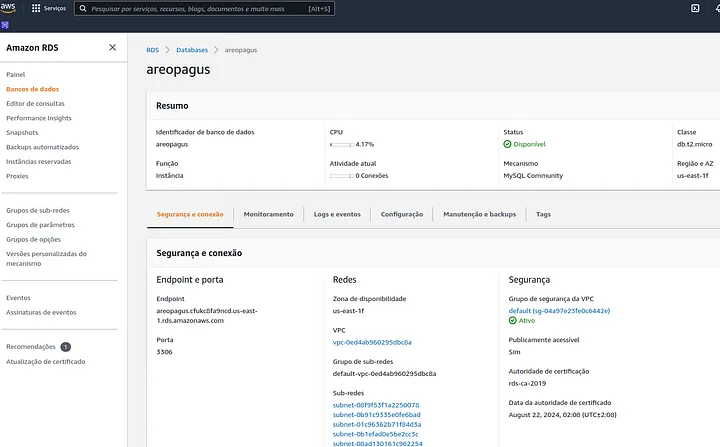
For the database we chose mysql which is running on an instance of rds in AWS.
The database diagram can be seen below:
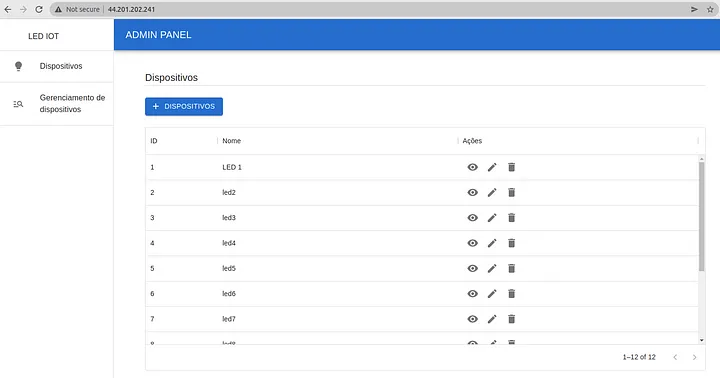
At the end follows the image that appears to the end user.
Infrastructure:
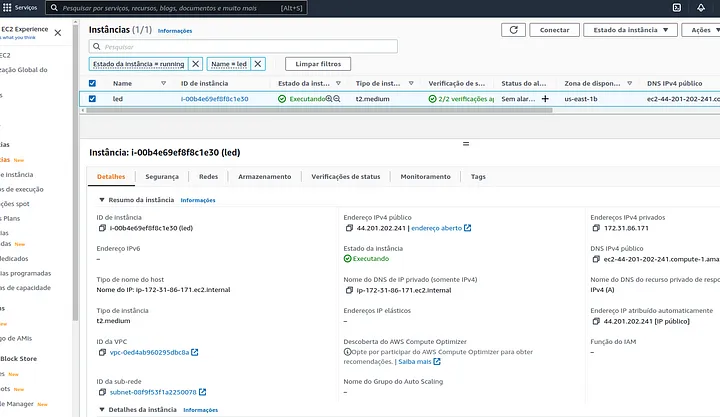
We used an AWS EC2 server to host our web project. We created a t2.medium instance with Ubuntu Server without a graphical interface (to save space) and installed the Docker environment to generate a project image and run it on the server. We accessed the server’s terminal via SSH (Secure Shell) using Putty as the remote access client. For the database, we used MySQL on AWS RDS.
To access the services used, you can use the following information:
IP: 44.201.202.241
Ports: 80 (frontend) and 3333 (API)
Username: led@areopagus.com
Password: password
The web project can be tested by accessing http://44.201.202.241/login or led.areopagus.tech (It is no longer available). Simply enter the username and password. To access the server and check the project on the hosting location, you can use Putty (server password not provided). Please note that we used a DNS (Domain Name Service) to map the IP to a domain name, and for this purpose, we used the AWS Route53 domain management service.
References:
Felipe Flop’s website https://www.filipeflop.com/blog/controle-monitoramento-iot-nodemcu-e-mqtt/ accessed on 01/27/2018.
Eclipse server for MQTT Broker https://iot.eclipse.org/ accessed on 01/27/2018.
Mosquitto https://mosquitto.org/ accessed on 01/27/2018.
Cloud MQTT https://www.cloudmqtt.com/ accessed on 01/27/2018.
DuckDNS https://www.duckdns.org/ accessed on 01/27/2018.
Proftpd http://www.proftpd.org/ accessed on 01/27/2018.
Filezilla https://filezilla-project.org/ accessed on 01/27/2018.
Fritzing https://fritzing.org/ accessed on 05/25/2022.
Appendices:
Video posted on youtube — LED with Eclipse.iot server:
https://www.youtube.com/watch?v=PkhwomjHw2U
Video posted on youtube — LED with Cloud MQTT server:
https://www.youtube.com/watch?v=E49EA3nY-Vo
GitHub repositories:

Posted on January 8, 2024
Join Our Newsletter. No Spam, Only the good stuff.
Sign up to receive the latest update from our blog.
