Yulia Kondrashova
Posted on April 22, 2022
When developing mobile applications, you may want to generate revenue with your app. According to the latest Sensor Tower report, consumable and non-consumable in-app purchases are some of the most commonly used monetization mechanics — especially in games with Ad Removal. Games with this monetization method account for 90% of all games. In this article, we’ll take a closer look at features of in-app purchases, what’s the difference between consumable and non-consumable IAPs, and how to set it up with Qonversion.
Types of In-app Purchases
IAPs can be used in a number of ways. For example, to add features, remove ads, or purchase in-game currency. But which type of purchase should you use for each purpose?
There are two types of in-app purchases that can be used for iOS and Android mobile apps:
Non-consumable items. The idea is that they could be purchased only once. It is permanently associated with the user’s store account. Examples are purchasing game levels, race tracks, and extra app features, and yes – ad removal.
Consumable items can be purchased multiple times. It could be used up during the life of the application. Examples are in-game currency and extras.
Differences Between Google and Apple In-app Purchases
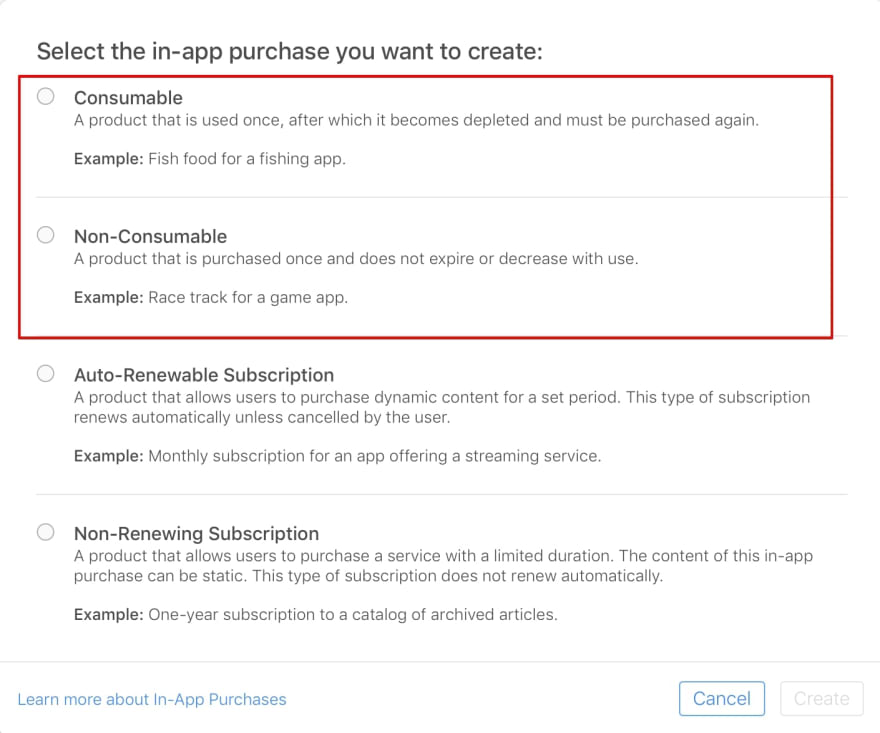
Google makes no difference between non-consumable and consumable in-app purchases when creating a product. However, Apple requires developers to specify the type of in-app purchase in App Store Connect:
How to Setup Consumable and Non-consumable In-app Purchases
Let’s assume we develop a racing game for iOS and Android. Our app allows users to unlock premium race tracks (non-consumable item, once a track is purchased, a user gets access to it forever) and purchase extra health for a car (consumable item, the user should be able to buy health every time he needs it). Qonversion allows handling all types of in-app purchases including non-subscription products.
The following example describes the process of integrating in-app purchases into mobile apps with Qonversion.
Before we get started with the creation of consumable and non-consumable purchases, make sure that you already have a Qonversion account and have created your project and register the app.
Preparation
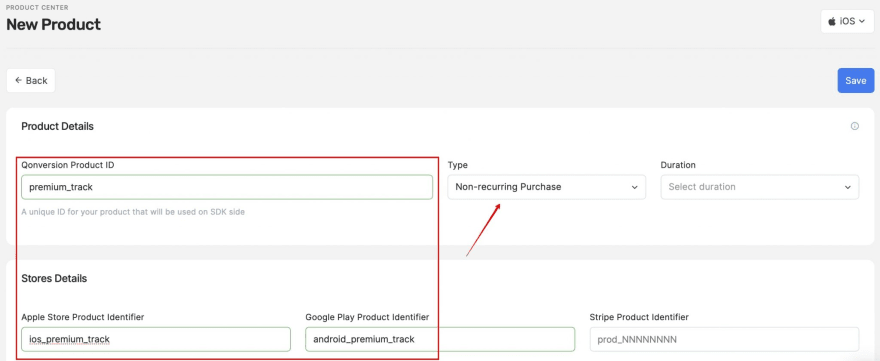
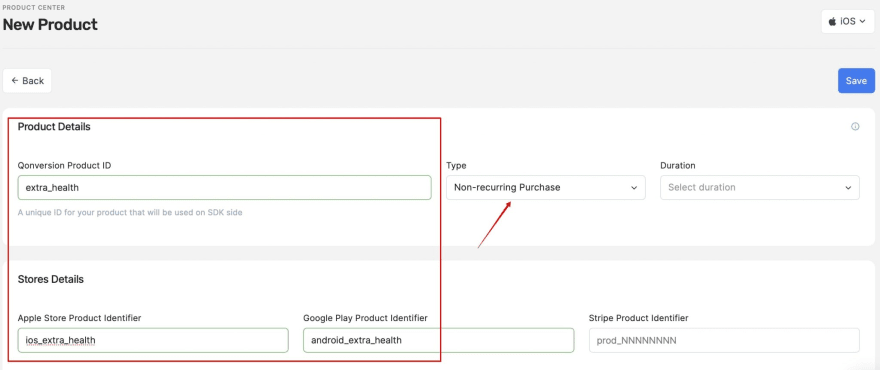
Suppose we have already created in-app purchases in Google Play Console and App Store Connect with the following IDs: android_premium_track, android_extra_health and ios_premium_track, ios_extra_health accordingly. Let’s create Products in the Qonversion dashboard:
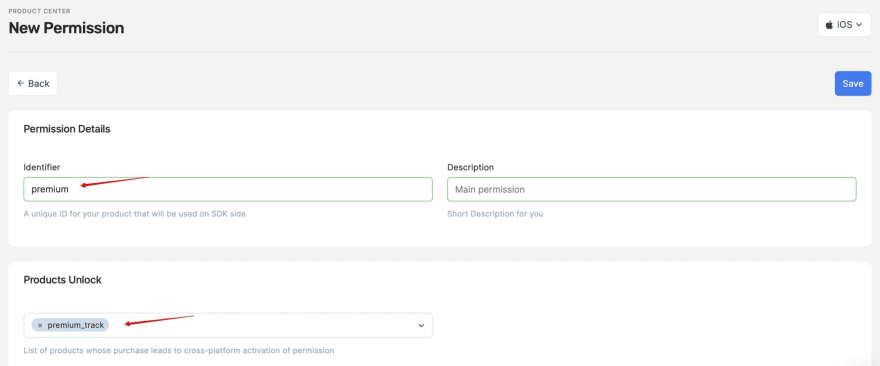
Then we should create a Permission and link it to the premium_track product. Premium permission will unlock access to the track after its purchase.
-
For the extra_health product, we don’t need to create a permission. Let’s also create an Offering to be able to change the products set remotely without releasing app updates. Attach created products to the offering:
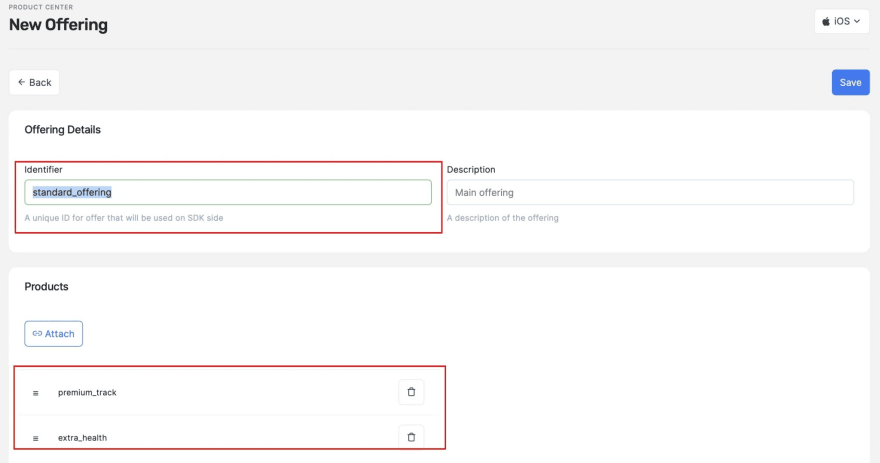
How to Provide a Lifetime Access With Non-consumable In-App Purchases
Displaying products
Display products for sale to the user:
iOS:
Qonversion.offerings { (offerings, error) in
  if (error != nil) {
    // Handle the error here
  }
  let offering = offerings?.offering(forIdentifier: "standard_offering")
  if let product = offering?.product(forIdentifier: "premium_track") {
    // Display the product for sale
  }
}
Android:
Qonversion.offerings(object : QonversionOfferingsCallback {
    override fun onSuccess(offerings: QOfferings) {
        val offering = offerings.offeringForID("standard_offering")
        offering?.productForID("premium_track")?.let { product ->
            // Display the product for sale
        }

    }

    override fun onError(error: QonversionError) {
        // Handle the error here
    }
}
Making Purchases
When the user is ready to purchase the product, start a purchase flow with the following method:
iOS:
Qonversion.purchaseProduct(product) { (permissions, error, isCancelled) in
  if let premium: Qonversion.Permission = permissions["premium"], premium.isActive {
    // Successful purchase
    // Unlock premium content
  }
}
Android:
Qonversion.purchase(context, product, callback = object: QonversionPermissionsCallback {
    override fun onSuccess(permissions: Map<String, QPermission>) {
        val premiumPermission = permissions["premium"]
        if (premiumPermission != null && premiumPermission.isActive()) {
            // Successful purchase
            // Unlock premium content
        }
    }

    override fun onError(error: QonversionError) {
        // Handle the error here
    }
})
Every time you want to know whether the user has access to the premium content, you should call the checkPermissions() method. Once the product has been successfully purchased and the permission has become active, you should not allow the user to purchase the product again: The user has a lifetime access since now.
Provide an Access With Consumable In-app Purchases
Displaying products
Display products for sale to the user:
iOS:
Qonversion.offerings { (offerings, error) in
  if (error != nil) {
    // Handle the error here
  }
  let offering = offerings?.offering(forIdentifier: "standard_offering")
  if let product = offering?.product(forIdentifier: "extra_health") {
    // Display the product for sale
  }
}
Android:
Qonversion.offerings(object: QonversionOfferingsCallback {
   override fun onSuccess(offerings: QOfferings) {
       val offering = offerings.offeringForID("standard_offering")
       offering?.productForID("extra_health")?.let { product->
           // Display the product for sale
       }

   }
   override fun onError(error: QonversionError) {
       // Handle the error here
   }
})
Making purchases
When the user is ready to purchase the product, start a purchase flow with the following method:
iOS:
Qonversion.purchaseProduct(product) { (permissions, error, isCancelled) in
      if(!error){
         // Successful purchase
         // Unlock premium content
      }
}
Android:
Qonversion.purchase(context, product, callback = object : QonversionPermissionsCallback {
    override fun onSuccess(permissions: Map<String, QPermission>) {
        // Successful purchase
        // Unlock content
    }

    override fun onError(error: QonversionError) {
        // Handle the error here
    }
})
To unlock content, you don’t have to check permissions. Instead, you should rely on a successful result i.e., when there is no error. Note: The app has to remember the state of the purchased product: how many units were purchased and give access accordingly. For instance, if the user purchased 50 units of extra_health,and then used 20, you should consider it and demonstrate the actual balance of 30 pieces of health within your app. So, just 30 remaining pieces will be available for your user to purchase.
Conclusion
In this blogpost, we took a closer look on how to set up consumable and non-consumable purchases. As you can see, the process is pretty simple. Once you’ve implemented in-app purchases, don’t forget to use the analytics tools to measure how much revenue each of your products brings.

Posted on April 22, 2022
Join Our Newsletter. No Spam, Only the good stuff.
Sign up to receive the latest update from our blog.
