pushpk
Posted on May 26, 2020
History
In mid-April 2019, Microsoft released Blazor, which allows client-side code with C# (no JavaScript required), allows Developers to build single-page apps using .NET and C# instead of JavaScript, the traditional nearly ubiquitous go-to programming language for the web.
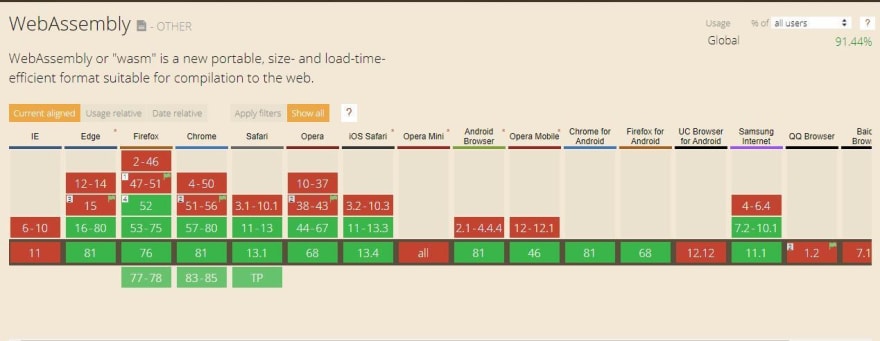
Now if you are like me and curious how can Browser understand C# for SPA (Single Page Application) to work? It does it thanks to WebAssembly
WebAssembly
Now, if this is first time you are hearing this term or still unsure What is it and how does it work, below are couple good sources that helped me to understand:
In Short:
WebAssembly is a way to take code in any programming language and run it within a web browser. It is generated by the compiler with a binary format which allows us to execute any language code on the browser.
It takes Code Written in any language and compile into what it called WebAssembly Module(Called WASM for short) and that module get loaded in Web Application.
Blazor: Browser-based Razor Pages
Blazor is a framework that sits on top of Web Assembly and gets its name from using Razor templates in the browser. Behind the scenes, .Net uses Mono .NET Runtime to run .Net binaries to Web Browser. Mono is the official .NET runtime for client platforms (e.g., native mobile apps and games) so another Client Platform (WebAssembly) makes sense to be run on Mono.
Blazor works by implementing Blazor UI components using a combination of .NET code and Razor syntax: an elegant melding of HTML and C#. Blazor components can seamlessly handle UI events, bind to user input, and efficiently render UI updates.
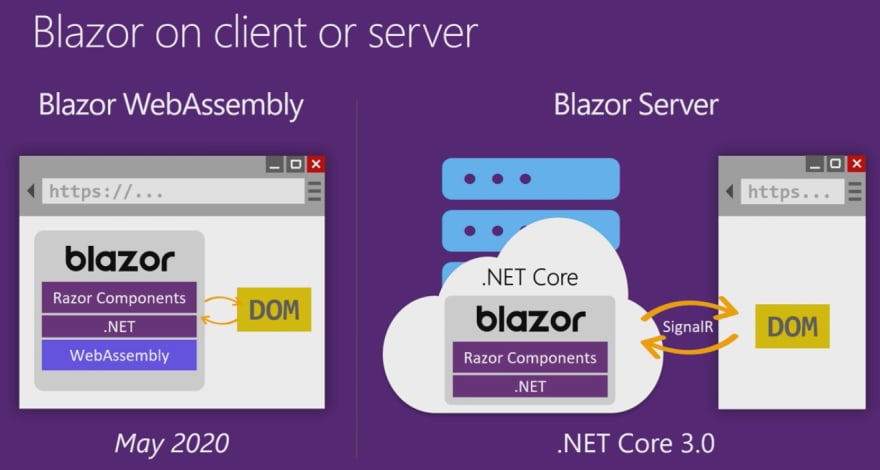
Blazor is designed to run client-side in the browser on a WebAssembly-based .NET runtime (Blazor WebAssembly) or server-side in ASP.NET Core (Blazor Server). Regardless of the hosting model, the app and component models are the same.
During the 2019 edition of .NET Conf, Microsoft demonstrated two different Blazor editions (Or two different ways of hosting Blazor App): Blazor Server and Blazor WebAssembly. Blazor Server, shipped together with .NET Core 3.0, allows web applications using Razor components to be hosted in ASP.NET Core servers. Users accessing the application act as thin clients, and the UI in the browser is updated through the use of asynchronous notifications (using the SignalR library).
And last week, during #MSBuild 2020, Microsoft announced Blazor WebAssembly. Blazor WebAssembly is now the second supported way to host your Blazor components: client-side in the browser using a WebAssembly-based .NET runtime.
In this post we will talk about Blazor WebAssembly, if you want to learn more about Blazor Server App, here are couple links that helped me
Blazor WebAssembly
Blazor WebAssembly is a direct competitor to JavaScript Frameworks such as Angular, VueJS, and React. Using this hosting model, we are able to write our UI logic using C# that executes within browser without any plugins or code transpilation required. Blazor WebAssembly includes a proper .NET runtime implemented in WebAssembly, a standardized byte-code for the web. This .NET runtime is downloaded with your Blazor WebAssembly app and enables running normal .NET code directly in the browser.
These apps can be deployed as completely standalone static sites without any .NET server component at all, or they can be paired with ASP.NET Core API services to enable full stack web development with .NET.
There are few things we need to get started on Blazor Web Assembly Project
Install the .NET Core 3.1 SDK.
Install Visual Studio Code.
Install the latest C# for Visual Studio Code extension and the JavaScript Debugger (Nightly) extension with
debug.javascript.usePreviewset totrue.After installing above tools, To Create Blazor WebAssembly, Open command/terminal to run following command:
dotnet new blazorwasm -o Hello-Blazor-WebAssembly
- Open the Hello-Blazor-WebAssembly folder in Visual Studio Code.
- The IDE requests that you add assets to build and debug the project. Select Yes.
- Run following command from VS Code terminal()
dotnet run
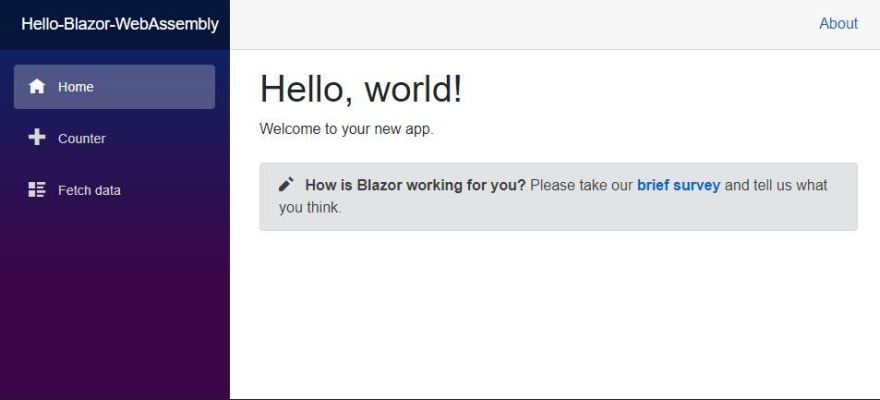
- Open the browser and navigate to http://localhost:5000 or https://localhost:5001. You should be able to see the application something like the following :
If we hop on to Developer Tools and check network tab, you should see dotnet.wasm, which is dotnet runtime compiled into WebAssembly so it can run into browser, and Hello-Blazor-WebAssembly.dll which is normal dll compiled by C# compiler to run into browser.
Great! Everything works!
Now, let's try to see how it works by surfing code
Components
Blazor is a component centric framework. That means everything in our app is made up of components.
Let's try to figure out how our app is made up. The root component is called App and can be found in the file App.razor. The content of that file is as follows:
<Router AppAssembly="@typeof(Program).Assembly">
    <Found Context="routeData">
        <RouteView RouteData="@routeData" DefaultLayout="@typeof(MainLayout)" />
    </Found>
    <NotFound>
        <LayoutView Layout="@typeof(MainLayout)">
            <p>Sorry, there's nothing at this address.</p>
        </LayoutView>
    </NotFound>
</Router>
The above is telling us two things.
Normal routing, Normal routing is taken care of by the Found component. It used the MainLayout component to set up a DefaultLayout
Not found, the component NotFound handles any non-defined routes and outputs an error text
MainLayout
Let's have a look at the MainLayout component. It can be found under Shared/MainLayout.razor and looks like this:
@inherits LayoutComponentBase

<div class="sidebar">
    <NavMenu />
</div>

<div class="main">
    <div class="top-row px-4">
        <a href="http://blazor.net" target="_blank" class="ml-md-auto">About</a>
    </div>

    <div class="content px-4">
        @Body
    </div>
</div>
It has couple things sidebar and Main
Sidebar renders Navigation menu using NavMenu Component
main renders content using @Body, if you are coming from asp.net mvc background, it's similar to @RenderBody() in _Layout.cshtml
All site content will be rendered under Main, let's try to see how Index and Count components are rendered there using Routes.
Index Component
@page "/"

<h1>Hello, world!</h1>

Welcome to your new app.

<SurveyPrompt Title="How is Blazor working for you?" />
At the top of the file we @page that tells us what route it handles, in this case, /, the default route. Then we have a portion of HTML.
This page has another component SurveyPrompt component, and we are passing Title to that component, which means Components can be nested and rendered in each other.
Main component will load Default Route when we load application and will show index component.
Counter Component
Now, Let's try to Look at Counter Component. Here is how it looks in UI:
<div class="language-csharp line-numbers-mode">

    @page "/counter"

    <h1>Counter</h1>

    <p>Current count: @currentCount</p>

    <button class="btn btn-primary" @onclick="IncrementCount">Click me</button>

    @code {
        int currentCount = 0;

        void IncrementCount()
        {
            currentCount++;
        }
    }
This component can be found under Pages/Counter.razor and looks like this
This has code and event involved and reacts on click event. At the top, we can see that it handles the route /counter.
It has variable called currentCount using the Razor Directive @, in component we can write code blocks using @code,
In above counter component, We have local variable and Function IncrementCount() which we are binding to button click using @onclick which increases currentCount variable by 1 each time we click and that value is bound to p tag.
These Components are re-usable piece of code blocks which we can render on any page, for example if I define <Counter /> on index page, it will show same output like as above with other index page text.
FetchData Component
Now let's try to understand FetchData Component, which is a bit complex one, here is how looks in UI:
By looking at it, its pulling Weather Data from Some API, is it? Let’s look into code,
@page "/fetchdata"
@inject HttpClient Http

<h1>Weather forecast</h1>

<p>This component demonstrates fetching data from the server. </p>

@if (forecasts == null)
{
    <p><em>Loading...</em></p>
}
else
{
    <table class="table">
        <thead>
            <tr>
                <th>Date</th>
                <th>Temp. (C)</th>
                <th>Temp. (F)</th>
                <th>Summary</th>
            </tr>
        </thead>
        <tbody>
            @foreach (var forecast in forecasts)
            {
                <tr>
                    <td>@forecast.Date.ToShortDateString()</td>
                    <td>@forecast.TemperatureC</td>
                    <td>@forecast.TemperatureF</td>
                    <td>@forecast.Summary</td>
                </tr>
            }
        </tbody>
    </table>
}

@code {
    private WeatherForecast[] forecasts;

    protected override async Task OnInitializedAsync()
    {
        forecasts = await Http.GetFromJsonAsync<WeatherForecast[]>("sample-data/weather.json");
    }

    public class WeatherForecast
    {
        public DateTime Date { get; set; }

        public int TemperatureC { get; set; }

        public string Summary { get; set; }

        public int TemperatureF => 32 + (int)(TemperatureC / 0.5556);
    }
}
It has route /fetchdata and we are injecting HttpClient to call API, The @inject allows injecting services. The HttpClient is registered by default and doesn’t require an explicit entry in Startup.cs, three things that are going on in code block:
- Injecting HttpClient, this a service that helps us do HTTP calls
- Invoking HttpClient, we use the method GetJsonAsync() to fetch a JSON from the defined endpoint
-
Creation of a result type, we are creating the type
WeatherForecastthat based on the incoming JSON structure is able to pick out the relevant data found on the property results
When we navigate to /fetchdata, OnInitializedAsync method gets called and it get array of WeatherForecast and passes to Html which then loop through it and generates output.
Currently, it is pulling data from JSON file but it can be URL of API service,
What if we want to add new component and start building something more realistic? We can do that easily by start adding new file with extension .razor and defining route on top using @page
Here is link to Project we used in this Post: Hello-Web-Assembly
Steve Sanderson Developer at Microsoft from Asp.net Team shows Real-world Car Checker Demo during Microsoft Build 2020, here is the link of it:
Modern Web UI with Blazor WebAssembly
If you want to learn more about Blazor WebAssembly here are couple good sources:
Happy coding!

Posted on May 26, 2020
Join Our Newsletter. No Spam, Only the good stuff.
Sign up to receive the latest update from our blog.
Related

September 23, 2022


