How we improved the load time of our VueJS app from 15s to 1s

Tarun Pai
Posted on August 8, 2021

📝 Context
Livspace is a three-way platform for homeowners, designers, and contractors. Our homeowner facing web application is the Livspace Hub. We’ll discuss the performance improvements we made on Hub in this article.
Livspace Hub is a web-app we’ve developed for homeowners to track all of their project-related updates and documents in one place. It is a single stop shop for tracking the progress of their project. Homeowners who design their homes through Livspace are internally called “customers”, and their projects are internally called “projects” (seems obvious, but terminologies matter, and we like to keep nomenclature simple but clear). In the rest of the article, I will refer to Livspace Hub as “Hub”.
🗓 History
Hub was initially architected as a Laravel app, serving the UI and the backend server. The UI was then later split to be a Vue SPA, while the Laravel server remained and served as our proxy layer.
Our main goal for the initial re-architecture (splitting our UI to an SPA) was speed — we wanted to get the SPA version of our app to our customers as soon as possible. Then we could focus on improving the overall architecture.
This obviously (and unfortunately) came with some trade-offs in the HOW’s of our implementation.
This is what our initial high-level architecture diagram for Hub looked like after splitting the UI into a Vue SPA:
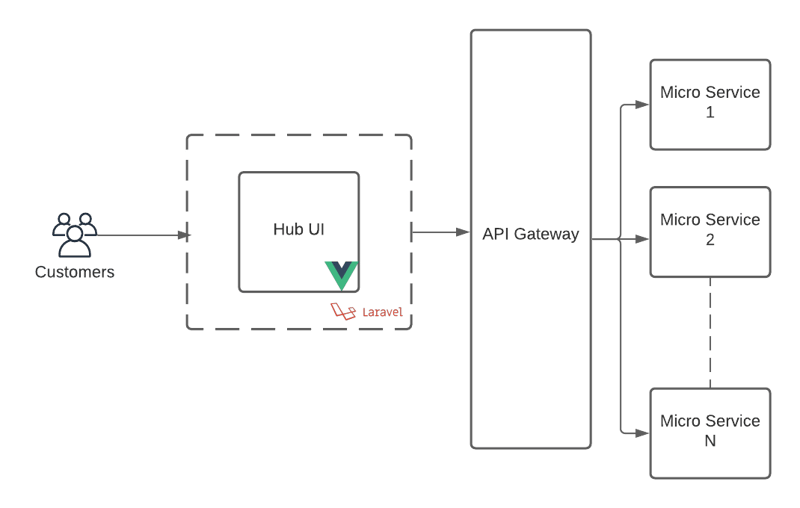
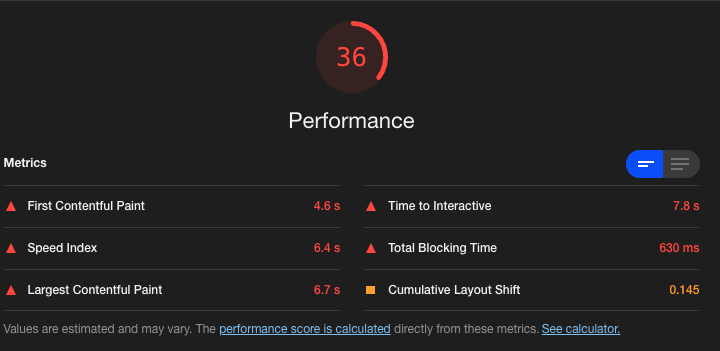
This speed to market approach resulted in a SPA that was (in essence) hacked up together. The average load times our customers faced was about 15 seconds (un-throttled)! 🤯
Here’s what our lighthouse score looked like under simulated throttling,
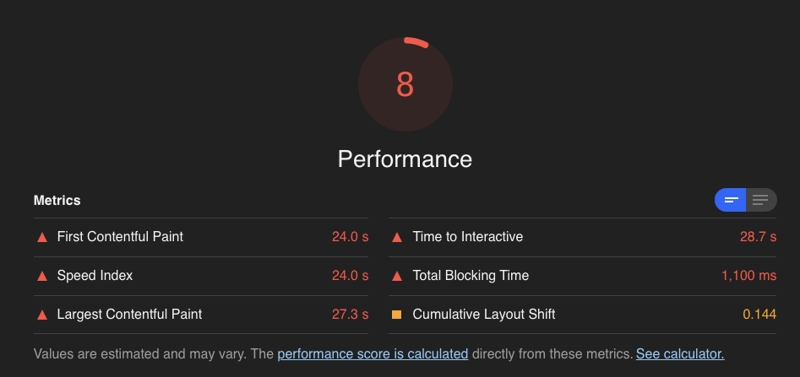
In this post, we will talk about the steps we took to improve that, and how we went from a load time of 15 seconds to under 1 second.
🏛 Incremental Improvements
Given now that our frontend and backend codebases were separate, it gave us the flexibility to incrementally and iteratively improve parts of our stack.
We set a roadmap to better the experience for our customers and classified this into 3 main goals,
1) Remove the dependency on Laravel
Tl;dr
The main reason for wanting to do this was maintenance difficulties — a mix of legacy code and lack of expertise around the tech with newer team-members joining us.
We’ve replaced this layer with a thin NodeJS express server.
2) Add a GraphQL layer
Tl;dr
Livspace has a (surprise surprise) micro-services architecture on the backend, and client-side apps have to make API calls to multiple services to fetch the data to render any given page.
With that in mind, it made (common) sense for us to add a GraphQL layer that can aggregate this data for us (from the different services) while also stripping out the unnecessary bits from the response.
This also helped us serve smaller payloads to our 3 apps — Web, Android, and iOS.
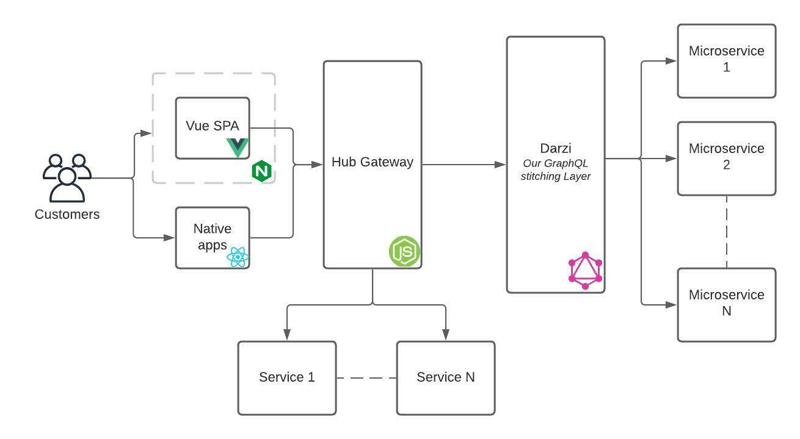
This is what our high-level architecture for Hub looks like now after implementing points 1 and 2,
Our customers can access Hub via the web-app(VueJS), or via the iOS and Android native apps(ReactNative).
For the rest of this article we’re going to focus on the improvements we’ve made to our web app. Our VueJS app is built with an Nginx docker image and deployed to a Kubernetes cluster hosted on AWS.
The web-app primarily talks to Hub gateway — our NodeJS proxy layer — the gateway in-turn talks to multiple services, primarily Darzi — our data-stitching graphql layer — which is responsible for aggregating data from a whole host of micro-services.
3) Reduce Front-End Load Times
Tl;dr
On the front-end side, a SPA for Hub seemed adequate as it served the purpose well for our users. We consciously decided to not use something like Nuxt (with SSR/SSG) as the effort to “rewrite” with Nuxt wouldn’t really give us a significantly better app over a well-optimized SPA, and also since SEO isn’t a necessity for Hub.
We’re going to focus on point 3 for the rest of this post and discuss in detail how we went about identifying and fixing performance bottlenecks on the front-end.
👀 Identifying Performance Bottlenecks
Identifying performance bottlenecks is far easier than it may seem, thanks to some amazingly wonderful tools that have been developed in the past few years.
Analyzing issues
We used VueCLI, Chrome Devtools, and Lighthouse for this, which is a fairly standard toolset.
Some of the steps mentioned might be specific to Vue, but these could easily be applied to your app in any other UI framework with alternative tools.
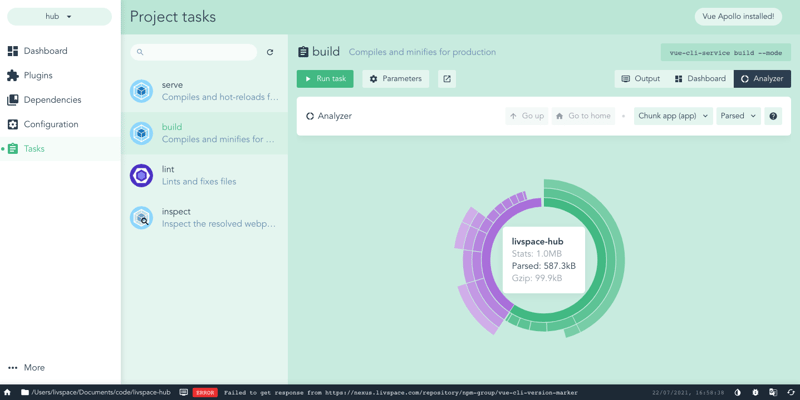
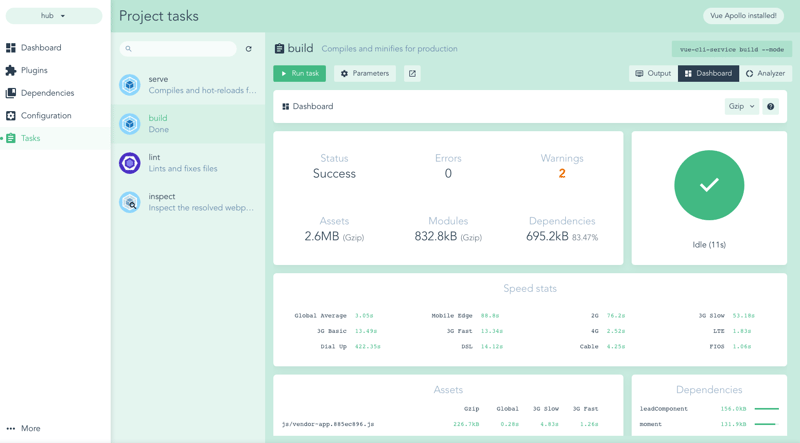
VueCLI3 comes with some amazing features, one such is vue ui which gives a GUI for developers to visualise and manage projects configurations, dependencies, and tasks.
The simplest way to analyse your production build is to go to,
Task > build > Run Task | Run Analyzer
Here's a point-in-time snapshot of what the analyzer looks like,
If you've used Webpack Bundle Analyzer, this may seem familiar, just has a (much) nicer UI.
With vue ui, we were able to get an easy-to-read view of what parts of our app and dependencies were bloated as it gave a handy table view to analyze stats, parsed, and gzipped aspects of our build.
We identified the problematic parts of our app to be,
Vendor files
- Bootstrap Vue
- MomentJS
- Unused packages and assets
- Our build chunk files were massive — in the order of MBs.
🛠 Putting Fixes In Place
1) Bootstrap Vue
Our initial codebase had bootstrap-vue imported as a whole,
// Don't do this!
import { BootstrapVue, IconsPlugin } from 'bootstrap-vue'
This obviously becomes problematic in the sense that we end up using a lot more than we need, which results in a really large chunk-vendor file.
Thankfully, Bootstrap Vue has an ESM build variant which is tree-shakable, which allows us to import only what we need, and reduce our bundle size, you can read more about it here.
Our imports then changed to,
// --
// This sort of a "single export" syntax allows us to import
// only the specifics while bundlers can tree-shake
// and remove the unnecessary parts from the library.
// --
// Snippet is trimmed down for brevity.
import {
  .
  .
  LayoutPlugin,
  CardPlugin,
  ModalPlugin,
  FormPlugin,
  NavPlugin,
  NavbarPlugin,
  .
  .
} from "bootstrap-vue";
Takeaway point: Whenever you're looking to add a new plugin to your app, always look for plugins that allow for tree-shaking.
2) MomentJS
Moment is/was a fantastic library but unfortunately it has reached end of life at least in terms of active development.
It also does not work well with tree-shaking algos, which becomes problematic since you end up with the whole lib.
As a replacement option, we went ahead with date-fns, which gave us everything we wanted and also had a small footprint.
3) Removing Unused Packages and Assets
This was mostly a manual effort, we couldn't find any tools that could reliably tell us which of our packages and assets were going unused.
After spending sometime in vscode and excessive use of some find-replace, we were able to eliminate unnecessary font-files, images, and some script files and the rest are deleted.
For packages, a thorough review of our package.json file and our file structure gave us enough insight to identify packages and application code that weren't used and these were mostly features that were in active development at one point but are now pushed to the backlog.
4) Reducing application bundle file size.
4.1) Optimizing Vue Router Performance
Vue gives some out-of-the-box ways to optimize and lazy-load routes and route-related assets. Lazy-loading routes helps optimize the way webpack generates the dependency graph for your application and hence reduce the size of your chunk files.
Our initial codebase did not have any lazy-loading on our routes, so a simple change fixed our main bundle size by a significant amount. Here's a snippet of what lazy-loading your vue-router config looks like,
// router/index.js
// --
// Adding webpackChunkName just gives a nicer more-readable
// name to your chunk file.
// --
{
    path: "/callback",
    name: "OidcCallback",
    component: () =>
      import(
        /* webpackChunkName: "auth-callback" */ "../views/AuthCallback.vue"
      ),
  },
  {
    path: "/",
    name: "Home",
    component: () => import(/* webpackChunkName: "home" */ "../views/Home.vue"),
    children:[{...}]
  }
}
4.2) Pre-compress static assets
As seen in our high-level architecture diagram, we serve our application from an nginx server built via docker.
Although Nginx provides dynamic compression of static assets, through our testing we found that pre-compressing assets at build time resulted in better compression ratios for our files and helped save a few more KBs!
4.3) Pre-loading important assets
This is a tip from lighthouse that we decided to incorporate into our build step. The basic idea is to preload all important assets that your (landing) page will need.
4.4) Split chunks
The easiest way to do a split chunks is just by adding the following config,
optimization: {
  splitChunks: {
    chunks: "all"
  }
}
But we gained the best result by splitting chunks for certain important libraries and the rest of our 3rd party packages went into a common chunk.
Here's what our config files look like,
// vue-config.js
const path = require("path");
const CompressionPlugin = require("compression-webpack-plugin");
const PreloadPlugin = require("@vue/preload-webpack-plugin");

const myCompressionPlug = new CompressionPlugin({
  algorithm: "gzip",
  test: /\.js$|\.css$|\.png$|\.svg$|\.jpg$|\.woff2$/i,
  deleteOriginalAssets: false,
});

const myPreloadPlug = new PreloadPlugin({
  rel: "preload",
  as(entry) {
    if (/\.css$/.test(entry)) return "style";
    if (/\.woff2$/.test(entry)) return "font";
    return "script";
  },
  include: "allAssets",
  fileWhitelist: [
    /\.woff2(\?.*)?$/i,
    /\/(vue|vendor~app|chunk-common|bootstrap~app|apollo|app|home|project)\./,
  ],
});

module.exports = {
  productionSourceMap: process.env.NODE_ENV !== "production",
  chainWebpack: (config) => {
    config.plugins.delete("prefetch");
    config.plugin("CompressionPlugin").use(myCompressionPlug);
    const types = ["vue-modules", "vue", "normal-modules", "normal"];
    types.forEach((type) =>
      addStyleResource(config.module.rule("stylus").oneOf(type))
    );
  },
  configureWebpack: {
    plugins: [myPreloadPlug],
    optimization: {
      splitChunks: {
        cacheGroups: {
          default: false,
          vendors: false,
          vue: {
            chunks: "all",
            test: /[\\/]node_modules[\\/]((vue).*)[\\/]/,
            priority: 20,
          },
          bootstrap: {
            chunks: "all",
            test: /[\\/]node_modules[\\/]((bootstrap).*)[\\/]/,
            priority: 20,
          },
          apollo: {
            chunks: "all",
            test: /[\\/]node_modules[\\/]((apollo).*)[\\/]/,
            priority: 20,
          },
          vendor: {
            chunks: "all",
            test: /[\\/]node_modules[\\/]((?!(vue|bootstrap|apollo)).*)[\\/]/,
            priority: 20,
          },
          // common chunk
          common: {
            test: /[\\/]src[\\/]/,
            minChunks: 2,
            chunks: "all",
            priority: 10,
            reuseExistingChunk: true,
            enforce: true,
          },
        },
      },
    },
  },
};

function addStyleResource(rule) {
  rule
    .use("style-resource")
    .loader("style-resources-loader")
    .options({
      patterns: [path.resolve(__dirname, "./src/styles/sass/*.scss")],
    });
}
And our nginx config only required the following lines,
# Enable gzip for pre-compressed static files
gzip_static on;
gzip_vary on;
🎉 End Result
Desktop - [No] Clear Storage - [No] Simulated Throttling
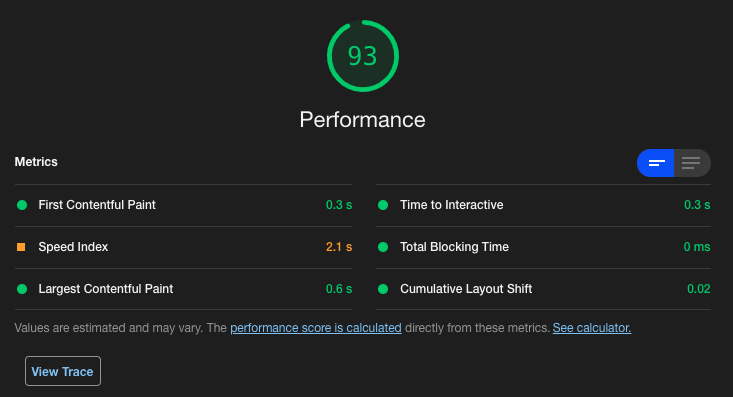
Mobile - [No] Clear Storage - [No] Simulated Throttling
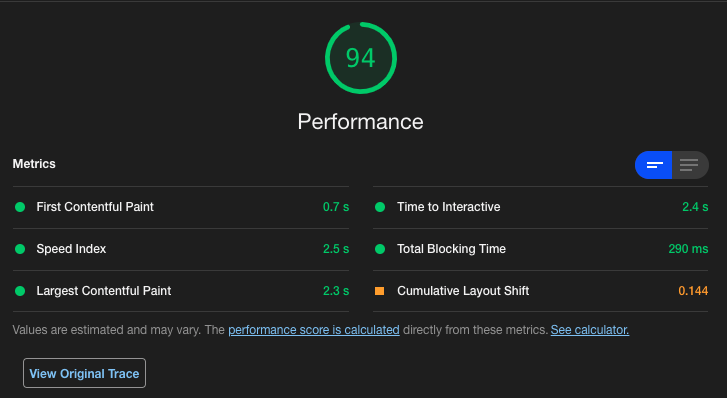
Desktop - [Yes] Clear Storage - [Yes] Simulated Throttling
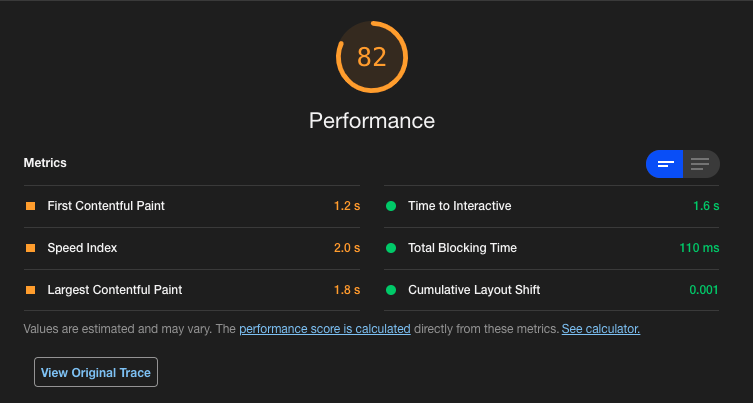
Mobile - [Yes] Clear Storage - [Yes] Simulated Throttling
🔮 Future Plans
We plan to reduce our mobile load times under simulated throttling, the goal is to get as low as possible! This will require us to revisit our gateway and GraphQL layers, and we’ll definitely share a part 2 blog discussing details of our upgrades.
We are also exploring Brotli compression, caching, http2/3 as these will definitely help add some level of network level optimizations. Of course, this is not merely for Hub, but for the designer-facing and vendor-facing web-apps as well.
💻 We're hiring!
We’re always on the lookout for amazing talent, do check out the work we do at Livspace Engineering here. We are hiring across roles, details of which you will find here.

Posted on August 8, 2021
Join Our Newsletter. No Spam, Only the good stuff.
Sign up to receive the latest update from our blog.
