Osman Elaldı
Posted on March 9, 2020
In this tutorial, I will show you how to create a ViewPager with a parallax effect.
I'll use ViewPager2 because it's based on RecyclerView. RecyclerView is so robust and brings a lot of advantages for building scrollable views.
In order to use ViewPager2 in your application add the following dependency in the build.gradle.
dependencies {
    implementation "androidx.viewpager2:viewpager2:1.0.0"
}
Firstly, we need to create an Activity that hosts ViewPager.
<androidx.constraintlayout.widget.ConstraintLayout
        xmlns:android="http://schemas.android.com/apk/res/android"
        xmlns:app="http://schemas.android.com/apk/res-auto"
        xmlns:tools="http://schemas.android.com/tools"
        android:layout_width="match_parent"
        android:layout_height="match_parent"
        android:background="@drawable/ic_space"
        tools:context=".MainActivity">
    <androidx.viewpager2.widget.ViewPager2
            android:id="@+id/vp_pager"
            android:layout_width="match_parent"
            android:layout_height="match_parent" />
</androidx.constraintlayout.widget.ConstraintLayout>
Now that we have the Activity layout that hosts ViewPager. We need to create another XML layout for page content. I'll use planets for this tutorial for the page content. The XML layout is shown below.
<androidx.constraintlayout.widget.ConstraintLayout
        xmlns:android="http://schemas.android.com/apk/res/android"
        xmlns:app="http://schemas.android.com/apk/res-auto"
        android:orientation="vertical"
        android:layout_width="match_parent"
        android:layout_height="match_parent">
    <TextView
            android:id="@+id/tv_planet_name"
            android:layout_width="wrap_content"
            android:layout_height="wrap_content"
            app:layout_constraintStart_toStartOf="@id/iv_planet_pic"
            app:layout_constraintBottom_toTopOf="@id/iv_planet_pic"
            android:layout_marginBottom="50dp"
            android:textColor="@color/white"
            android:textSize="27sp"
            android:textStyle="bold"/>
    <ImageView
            android:id="@+id/iv_planet_pic"
            android:layout_width="200dp"
            android:layout_height="200dp"
            app:layout_constraintStart_toStartOf="parent"
            app:layout_constraintEnd_toEndOf="parent"
            app:layout_constraintTop_toTopOf="parent"
            app:layout_constraintBottom_toBottomOf="parent"/>

</androidx.constraintlayout.widget.ConstraintLayout>
So we have an XML layout for pages. After that, I will crate Planet class to hold some data to display on the screen.
data class Planet(
    val imgRes : Int,
    val nameRes : Int)
Let's create an adapter to pass some data to the layout. I'll use Recyclerview.Adapter for this.
class PagerAdapter(private val planets: List<Planet>) : RecyclerView.Adapter<PagerAdapter.PagerViewHolder>() {

    override fun onCreateViewHolder(parent: ViewGroup, viewType: Int): PagerViewHolder =
        PagerViewHolder(LayoutInflater.from(parent.context).inflate(R.layout.item_page, parent, false))

    override fun getItemCount() = planets.size

    override fun onBindViewHolder(holder: PagerViewHolder, position: Int) {
        val planet = planets[position]
        holder.itemView.tv_planet_name.text = holder.itemView.context.resources.getString(planet.nameRes)
        holder.itemView.iv_planet_pic.setImageDrawable(
            ContextCompat.getDrawable(holder.itemView.context, planet.imgRes))

    }

    class PagerViewHolder(itemView: View) : RecyclerView.ViewHolder(itemView)
}
Now that we have the adapter for display planets. Next, we need to get some data and load in our Activity.
val contents = listOf(
            Planet(R.drawable.ic_mercury,R.string.mercury),
            Planet(R.drawable.ic_venus,R.string.venus),
            Planet(R.drawable.ic_earth,R.string.earth),
            Planet(R.drawable.ic_mars,R.string.mars),
            Planet(R.drawable.ic_jupiter,R.string.jupiter),
            Planet(R.drawable.ic_saturn,R.string.saturn),
            Planet(R.drawable.ic_uranus,R.string.uranus),
            Planet(R.drawable.ic_neptune,R.string.neptune),
            Planet(R.drawable.ic_pluto,R.string.pluto)

        )

        val pageAdapter = PagerAdapter(contents)
        vp_pager.adapter = pageAdapter
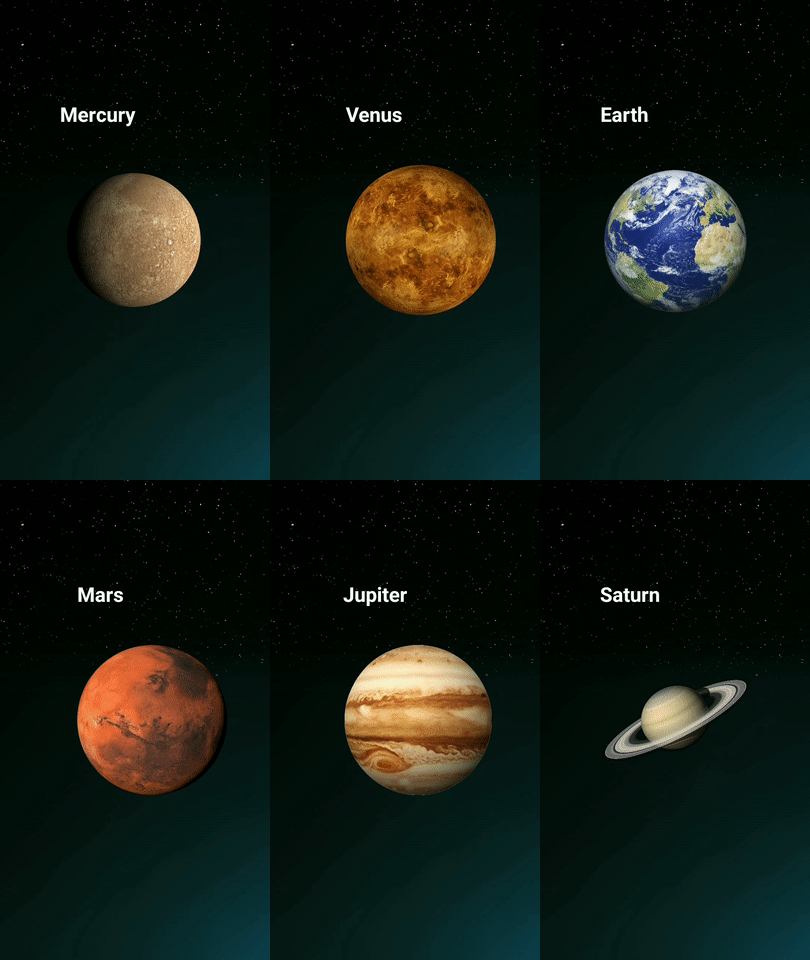
After that, we have layout like this.
Parallax Effect
So we have the ViewPager, our next step is adding a parallax effect. To achieve the parallax effect, we need to use the ViewPager2.PageTransformer interface. PageTransformer is invoked whenever a visible/attached page is scrolled. So when the page is scrolled, we need to use some translations to supply the parallax effect.
override fun transformPage(view: View, position: float)
Pagetransformer listens scroll event with this function.
View : Represents the page content layout.
Position : The position of the page.
We have 3 intervals for page positions.
[-Infinity,-1): This page is way off-screen to the left. No need for translation.

(1,+Infinity]: This page is way off-screen to the right. No need for translation.

[-1,1]: A certain part or the whole of the page is visible. Translation will be applied there.
So the PageTransformer class is like this.
class PageTransformer : ViewPager2.PageTransformer {
    private lateinit var planet: View
    private lateinit var name: View
    override fun transformPage(page: View, position: Float) {
        planet = page.iv_planet_pic
        name = page.tv_planet_name
        page.apply {

            if (position <= 1 && position >= -1) {
                planet.translationX = position * (width / 2f)
                name.translationX = - position * (width / 4f)
                /* If user drags the page right to left :
                   Planet : 0.5 of normal speed
                   Name : 1.25 of normal speed

                   If the user drags the page left to right :
                   Planet: 1.5 of normal speed
                   Name: 0.75 of normal speed
                 */
            }
        }
    }

}
We have the PageTransformer class but we need to apply this page transformer to our ViewPager. In MainActivity, PageTransformer has been applied to ViewPager like this.
val pageTransformer = PageTransformer()
vp_pager.setPageTransformer(pageTransformer)
After that, we have a layout like this. You can see the planets and their names moving separately when we use our custom PageTransformer.
You don't have to make translations the horizontal. A vertical example is shown below.
 page.apply {
            if (position <= 1 && position >= -1) {
                planet.translationX = -position * width
                name.translationX = -position * width
                name.translationY = position * height / 5
                /*
                    Planets and their names move in the opposite direction. So they are stable
                    If the user drags the page right to left :
                    Name: Goes up
                    If the user drags the page left to right :
                    Name: Goes down
                 */
            }
        }
The result is shown below.
Conclusion
PageTransformer is a powerful tool to create parallax effects. You can try different animations with this interface.
Thank you for reading.

Posted on March 9, 2020
Join Our Newsletter. No Spam, Only the good stuff.
Sign up to receive the latest update from our blog.
Related

November 21, 2024


