Fortifying your DigitalOcean Droplet

Neel
Posted on February 8, 2020
Ever since I started working with node js, I always wanted to have my own server instance run my creation instead of deploying it to a pre-orchestrated platform such as heroku. Believe me, having your own server will help you learn a lot. You will get to learn how to efficiently manage resources, how to handle failures, how to make your code fault tolerant and so on.
I was using AWS lightsail for the past 6 months and recently wanted to get my hands on DigitalOcean as whichever articles I read or tutorials videos I see, the person on the other end talks about "droplets". So, I finally got my own basic droplet a few weeks back to test it out.
Once you get a droplet allocated to you, its like having a plain server which is all yours to manage and it is important that you manage it with care to run your workload without any hiccups or vulnerabilities. Talking about vulnerability, DO offers out of the box options to secure your server's inbound and outbound network connectivity to protect your droplet from unauthorised network access. This is what we will be covering in this topic.
Droplet Firewall
DigitalOcean offers options to create your own firewall for droplets under the "Networking" section.

Note : The firewalls created under this section are not dedicated for a single instance and you can reuse it for any number of droplets which you own. This makes it a handy feature to secure your network traffic with no headaches.
Creating s firewall is as simple as just clicking the "Create Firewall" button. You just give it a name which is mandatory and you define the "Inbound" and "Outbound" rules. Let me briefly define what these two options mean.
Inbound Rules - This section lets you define the incoming traffic allowed to enter your droplet.
Let's say, you are the only one who accesses your droplet from a specific network through SSH (PuTTY or some other way) and no other person from a different network should be allowed to do the same, then this feature will help you do that.
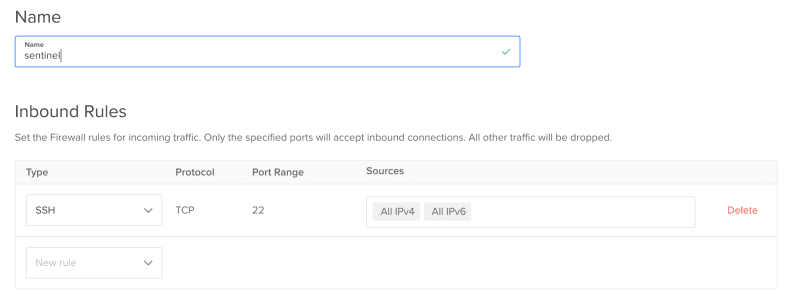
Select the Type you want from the dropdown list and for this sample, we will go with "SSH". The protocol will be "TCP" for SSH and we will set the "Port Range" to 22 which is the one we use for SSH.
Now, the section named "Sources" is the most important one. By default, DigitalOcean will fill "All IPV4 and All IPV6" in this section. Leaving this as such means, any one can SSH into your droplet which is not a good thing if you ask me. To restrict this, you can remove the existing entries by pressing backspace.
The entry you must specify here is your own IP address or a set of IPs which you want to have access to the droplet. You can find your IP easily by just googling "ip" or there are websites like whatismyipaddress.com to find your IP address. Once you save it, no one other than you or the allowed users connecting from the defined IP address will be able to SSH into your droplet.
In the same way you can restrict incoming network traffic to any port. Let's say you have elasticsearch and kibana installed on your droplet then it is ideal that you do not let anyone access these services. To do this you can simply allow connection to ports 9200 and 5601 for the desired IPs alone. Let me stress this one more time. If you do not set appropriate inbound restrictions, then you are willingly let an intruder cripple your workflow.
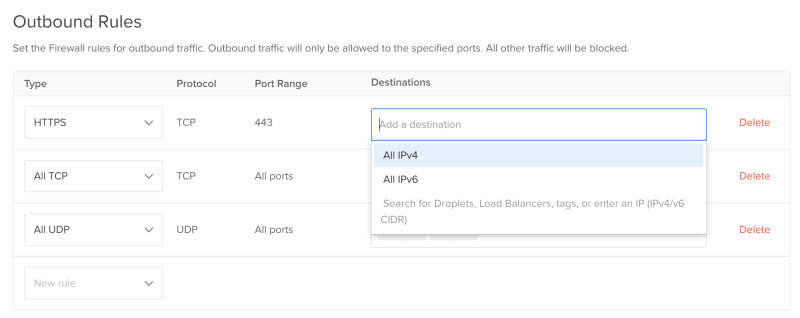
Outbound Rules - This section lets you define outgoing traffic originating from your droplet.
If you are the only one accessing your droplet and if you clearly know what you are doing, then this will not be that helpful for you. On the other hand, if you are working among a team and you are given the responsibility to manage the droplet, then this section will let you restrict the outgoing traffic from your droplet.

Setting outbound rules are same as we did for the Inbound one. The only change here is that, you define the IP addresses of the destination to which your droplets are allowed to send data.
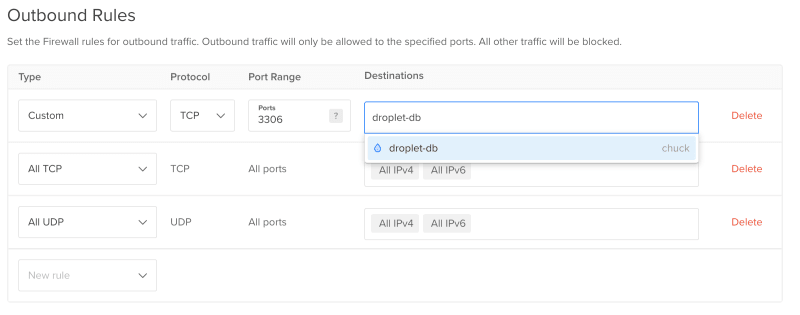
Assume that you have a droplet named "droplet-db" which hosts your MYSQL Database and you are managing a different one named "droplet-app" which is your application server. If you want droplet-app to have communication only with droplet-db and no other destination other than that, then you can delete all the existing outbound rules and include a TCP rule setting the port range to 3306 (default mysql port) for "Destination" droplet-db alone.
This also requires you to set appropriate inbound rules for droplet-db to accept connections from droplet-app.
The outbound rules will ensure that your server is not hooked up to an unauthorised or malicious web server which is vital if you are running a business. What if some one from your team turns rogue and starts sending sensitive data to an unauthorised party. This rule will save you in such scenarios.
And the Final Step...
The final step is to hookup this firewall to your droplet(s).
This step is very simple. You just have to scroll down and find the textbox with the heading "Apply to Droplets" and search and select your droplet
Additional Tips
It is very important to have a firewall for your DO droplet. Your droplet is nothing but a server which is on the cloud which means it can be accessed from anywhere by anyone if there is no wall around it. These restrictions make sure that no one is illegally using your droplet resources for mining crypto or for sniffing data going out of your servers.
I have some additional tips which are as follows,
The End...
and, that's it. This is my first dev post. I hope you make use of this and if you have any kind of feedback then feel free to pass on your comments. Happy hacking!

Posted on February 8, 2020
Join Our Newsletter. No Spam, Only the good stuff.
Sign up to receive the latest update from our blog.


