Nate-Grey
Posted on May 19, 2020

Performing Selenium test automation is not a luxury in agile development anymore, with increasing number of features to test, the workload on testers keeps piling up. To keep up with this pace, testers need to automate their tests. But, even while automating tests, a poor implementation can lead to wasted or increased efforts.
Poor implementation can happen in cases, such as when your web application’s UI keeps changing, and you struggle to keep up with them while writing Selenium test automation scripts. For example, If you had different scripts using the same web element, whenever there is a change in the element you’d have to make the change in every script. This can not only be tedious and time-exhausting, but also takes up bandwidth, which the team could have used elsewhere.
In this Selenium Java tutorial, I’ll explain how page object model (POM) can help in better script maintenance for ever increasing UI changes for Selenium test automation in Java.
What is a Page Object Model?
Page object model is an object design pattern in Selenium test automation used to make a repository of Web UI elements. POM improves test readability and reduces code duplication, by acting as an interface for the page under test. In the Page object model, all the webpages have individual page classes. These page classes find the web elements on the page, and contain all the relevant page methods.
clickLoginButton();
enterCredentials(user_name,user_password);
checkIfImageIsDisplayed();
So, while performing Selenium test automation, the test case uses the object of this Page class to call the various methods to perform actions on the web page. Since all the web elements related to a page are present at a common location, it becomes easy to implement Selenium Java testing routines, and update them when required.
Why Do We Need a Page Object Model For Selenium Java Testing?
We now know in this Selenium Java tutorial, as the UI of your webpage changes, so does the need of changing your Selenium test automation scripts. But, by implementing Page Object Model for Selenium Java testing, you only have to change the page objects, as all the changes needed for tests are in one location.
This makes the project more reliable as you don’t have to update your tests with any change in UI. Now, a single locator change won’t have the developer walk to through the code to fix it.
Let’s take a Selenium automation test scenario, where we look for the zipcode, ”12345” among the complete list on a webpage, then we click on it to find the city and match it to the city name, “MyCityName”.
List<WebElement> zipCodes = driver.findElements(By.id("zipCodes"));
for (WebElement zipCode : zipCodes) {
     if (zipCode.getText().equals("12345")){
          zipCode.click();
          break;
     }
}
WebElement city = driver.findElement(By.id("city"));
assertEquals("MyCityName", city.getText());
Even with a simple test, changes to the UI are made frequently. It could be the new design or restructuring of fields and buttons. This impacts the test case as you’d have a suite of Selenium Java tests that needs updating.
Some of the problems for this type of Selenium Java test are:
- Changes in the UI breaks multiple tests often in several places
- Duplication of selectors both inside and across tests – no reuse
What Are The Advantages of Page Object Model (POM)?
Using Page Object Model for Selenium Java testing, we can prevent the test code from being brittle and lessen the chances of duplicated code. It also improves readability and makes the code more interactive and easy to understand.
POM introduces a decoupling layer by separating the abstraction of the test object and the Selenium Java testing scripts. This is implemented by creating an UI object to be automated to wrap HTML elements and encapsulate interactions with the UI, which in turn takes all the WebDriver calls. So, in case of any element changes, this is the only page/class to be updated to incorporate the latest UI.
Page object model helps to give more realistic names to functions which helps to map to operation being done. This design pattern can be used with any kind of framework like keyword-driven, Data-driven, hybrid framework, etc.
How To Implement Page Object Model?
This Selenium Java tutorial will demonstrate how POM is suitable for applications with multiple pages. In the page object model structure, all the web elements present on each page are separated in a single page class file along with functions to do all possible interactions on that page and is generally known as *Page.java like LoginPage.java. Below are the important topics, you need to know before we start to write our first Selenium Java testing script:
Page Factory
In order to use POM and support it effectively in project, we use Page Factory which says, create all the element locators for the page in starting of the class and initialize all the elements in the page when page is loaded and create an object of the page itself before the web element variables can be used.
Elements of a webpage can be declared as
@FindBy(how=How.XPATH, using=”fld_username2”)
WebElement usernameTxtBox2;
And can be initialized using initElements function on PageFactory as
RegisterPage register = new RegisterPage();
PageFactory.initElements(driver, register);
Or in a more simpler code as
RegisterPage register = PageFactory.initElements(driver, RegisterPage.class);
Or even in class constructor as
public RegisterPage (WebDriver driver) {
     this.driver = driver;
     PageFactory.initElements(driver, this);
}
Understanding Web Element Locators
PageFactory uses reference to actual elements on the page to initialize the referring web element on the page class file by means of locators. These locators are identified by the use of @FindBy annotation. With this annotation, the user defines a way to look up the element like by name along with the necessary information associated with the element as per given locator.
@FindBy(how=How.XPATH, using=”fld_username2”)
WebElement usernameTxtBox2;
Every time a function is called for any interaction on the web page which uses this webelement variable, the driver will first try to find the element again using PageFactory. This is very helpful in case some element might not be visible at the start of the page but after some action, then also that element is available for actions as Page Factory searches for the element again when it is called for some action. For elements which are loaded initially at the time of page load and are not changed and can be accessed via cache, Page Factory provides another annotation @CacheLookup for elements which are already there and need not be found again saving time and memory and action can be performed directly on them.
@FindBy(how=How.XPATH, using=”fld_username2”)
@CacheLookup
WebElement usernameTxtBox2;
This entire definition of the WebElement variable can be replaced with
@FindBy(xpath = “fld_username2”)
private WebElement usernameTxtBox2;
The @FindBy annotation supports a range of locator strategies that makes it easier to use as per available information about the web elements. Let us understand all these to make the project structure better.
1. ID
Id locators are used to locate unique elements in the DOM. ID locators are unique to the webelement and are the fastest method to locate any web element.
driver.findElement(By.id("your_text"));
2. Name
Name locators in Selenium Java testing are used to identify webelements of a page, unlike ID locators they may not be unique to a page.
Name locators in Selenium Java testing are used to identify webelements of a page, unlike ID locators they may not be unique to a page.
3. Class
Class Name locators in Selenium Java testing are used to identify webelements through class attributes.
driver.findElement(By.className("inputtext"));
Note: If more than one element has the same id/name/class then it always acts on the first search element occurrence. In such cases we need to make the locator unique or use some other locator that has a unique occurrence for the required element.
4. Link
Link selectors can only be used for hyperlinks. Pick up the link text from the page html.
driver.findElement(By.linkText("Blog"));
5. CSS
CSS selectors can also be used when it’s difficult to access ID or name. Tagname and attributes are used to make a css element locator
Text between the starting and ending tag is called innerText.
Case 1 : tag with id input id = “email”
driver.findElement(By.cssSelector("input# ch_login_email "))
Case 2: tag with class input class=”btn btn-default form-post” //each space in class name is replaced by dot(.)
driver.findElement(By.cssSelector("form-control mt-3 form-control-lg"))
6. Xpath
Xpath in Selenium Java Testing is used to identify web elements on the web page using XML expressions.
GROUP-1
input placeholder=’Search’ name=’firstname’
xpath with single attribute //need to use @ before attribute name and value of attribute must be in single quote
xpath= //input[@placeholder=’Search’]
xpath with multiple attributes
xpath= //input[@placeholder=’Search’ or @name=’firstname’]  //works as logical OR
xpath= //input[@placeholder=’Search’ and @name=’firstname’]  //works as logical AND
Use * on place of attribute
xpath= //input[@*=’Search’]
Use * on place of tag name
xpath= //*[@placeholder=’Search’ or @name=’firstname’]
GROUP-2
Any Text
xpath with inner text
xpath= //a[text()=’any text’]
xpath with inner text (contains)
xpath= //a[contains(text(),’any’)]
xpath with inner text (not contains)
xpath= //a[not(contains(text(),’any text’))]
xpath with inner text (starts-with)
xpath= //a[starts-with(text(),’any’)]
GROUP-3
Multiple xpath for same element
xpath= //input[@id=’email’] | //input[@id=’emailNew’]
Dynamic xpath using contains
xpath= //input[contains(@id,’ema’)]
We have talked in depth about XPath and subgroups in great detail in our Selenium Xpath tutorial.
Writing Our First Selenium Java Test Case using Page Object Model
Before we start writing the Selenium Automation test case, we must remember a few of unsaid rules of working with Page Object Model with Selenium Java testing to make it more effective
- A page object file should never have assertions or any kind of related functionality. It is only meant to store web element variables and their interactions.
- Page object for a web page, need not necessarily contain all the web elements of the page. Only meaningful and required elements are to be used.
- For almost all scenarios, web page interactions redirects/leads to a new page. So the page should return a page object of the following page in all valid cases.
To write the first Selenium Automation test case, let us take the example of Gmail login flow for easy understanding.
For our Selenium Java tutorial, this test case will have
- Pages – GmailHomePage.java and GmailLoginPage.java and GmailInboxPage.java
- TestBase.java
- GmailLoginTestCase.java
TestBase Class
In this class we create the object of WebDriver class and redirect to gmail login url
public class TestBase {
     public static WebDriver driver;

     @BeforeSuite
     public void initializeWebDriver() throws IOException {
          System.setProperty("webdriver.chrome.driver","\src\drivers\chromedriver.exe");
          driver = new ChromeDriver();

          // To maximize browser
          driver.manage().window().maximize();

          // Implicit wait
          driver.manage().timeouts().implicitlyWait(10, TimeUnit.SECONDS);

          // To open Gmail site
          driver.get("https:// www.gmail.com");
     }

     @AfterSuite
     public void quitDriver() {
          driver.quit();
     }
}
GmailHomePage Class
In this, we identify the web elements of Gmail Home Page and methods to interact with web elements on it.
public class GmailHomePage {

     WebDriver driver;

     @FindBy(link = “Sign In”)
     WebElement signInButton;

     public GmailHomePage (WebDriver driver) {
          this.driver = driver;
          PageFactory.initElements(driver, this);
     }

     // This method is to click on signIn button
     public GmailLoginPage clickSignInButton() {
          signInButton.click();
          return new GmailLoginPage(driver);
     }
}
GmailLoginPage Class
In this, we identify the web elements of Gmail Login Page and methods to interact with web elements on it.
public class GmailLoginPage {

     WebDriver driver;

     @FindBy(xpath = "// input[@type='email']]")
     WebElement emailTextBox;

     @FindBy(xpath = "// input[@type='password']")
     WebElement passwordTextBox;

     @FindBy(xpath = "// div[@role = 'button' and @id  = 'identifierNext']")
     WebElement nextButton;

     public GmailLoginPage(WebDriver driver) {
          this.driver = driver;
          PageFactory.initElements(driver, this);
     }

     // This method is to set Email in the email text box
     public void setEmail(String strEmail) {
          emailTextBox.sendKeys(strEmail);
     }
     // This method is to set Password in the password text box
     public void setPassword(String strPassword) {
          passwordTextBox.sendKeys(strPassword);
     }

     // This method is to click on Next Button
     public GmailInboxPage clickOnNextButton() {
          nextButton.click();
          return new GmailInboxPage (driver);
     }
}
GmailInboxPage Class
In this, we identify the web elements of Gmail Home Page and methods to interact with web elements on it.
public class GmailInboxPage {

     WebDriver driver;

     @FindBy(xpath = “//a[@title='Gmail']”)
     WebElement gmailHeader;

     public GmailInboxPage (WebDriver driver) {
          this.driver = driver;
          PageFactory.initElements(driver, this);
     }

     // This method is to verify if gmail header is visible
     public Boolean gmailHeaderVisibility() {
          return gmailHeader.isVisible();
     }
}
GmailLoginTest class
In this class we define the test case and sequence of webpage interactions
public class GmailLoginTest extends TestBase {

     @Test
     public void init() throws Exception {
          GmailHomePage gmailHomePage = new GmailHomePage(driver);
          GmailLoginPage gmailLoginpage =  gmailHomePage.clickSignInButton();
          gmailLoginpage.setEmail("abc@gmail.com");
          gmailLoginpage.clickOnNextButton();
          gmailLoginpage.setPassword("23456@qwe");
          GmailInboxPage gmailInboxPage=  gmailLoginpage.clickOnNextButton();
          Assert.assertTrue(gmailInboxPage.gmailHeaderVisibility);
     }
}
The case can be executed by using any TestRunner for the code as per library used.
This would make the first test case using POM and Selenium Java Testing, where we navigate to the gmail login page, do login and verify redirection to the inbox. A better approach would be to add another class file, GmailLoginFlow.java to add the page interactions and abstract them from main test class as following:
Updated GmailLoginTest class
@Test
     public void testGmailLoginFlow() throws Exception {
          GmailLoginFlow gmailLoginFlow = new GmailLoginFlow();
          gmailLoginFlow.verifyGmailLoginFlow(driver);
     }
}
GmailLoginFlow class
public class GmailLoginFlow
{
     public GmailLoginFlow()
     {}

     public void verifyGmailLoginFlow(WebDriver driver){
          GmailHomePage gmailHomePage = new GmailHomePage(driver);
          GmailLoginPage gmailLoginpage =  gmailHomePage.clickSignInButton();
          gmailLoginpage.setEmail("abc@gmail.com");
          gmailLoginpage.clickOnNextButton();
          gmailLoginpage.setPassword("23456@qwe");
          GmailInboxPage gmailInboxPage=  gmailLoginpage.clickOnNextButton();
          Assert.assertTrue(gmailInboxPage.gmailHeaderVisibility);
     }
}
How to Execute Page Object Model By Using LambdaTest Selenium Grid
In order to execute the same Selenium Automation test scenario over LambdaTest, TestBase class can be modified as follows to incorporate LambdaTest properties.
public class TestBase {
     public static WebDriver driver;

     @BeforeSuite
     public void initializeWebDriver() throws IOException {
          DesiredCapabilities capabilities = new DesiredCapabilities();

          String username = "<your_lambdatest_username>";
          String accesskey = "<your_lambdatest_accesstoken>";
          String lambdaTestGridURL = "@hub.lambdatest.com/wd/hub";

          capabilities.setCapability("build", "Selenium_POM_Project");
          capabilities.setCapability("name", "Verify Gmail Login Flowt");
          capabilities.setCapability("platform", "Windows 10");
          capabilities.setCapability("browserName", "chrome");
          capabilities.setCapability("version", "73.0");
          capabilities.setCapability("visual",false);
          capabilities.setCapability("network",false);
          capabilities.setCapability("console",false);
          capabilities.setCapability("tunnel",false);
          try {
               driver = new RemoteWebDriver(new URL("http://" + username + ":" + accesskey
                + lambdaTestGridURL), capabilities);
               }
          catch (MalformedURLException e) {
               System.out.println("Invalid grid URL");
               }

     // To maximize browser
     driver.manage().window().maximize();

     // To open Gmail site
     driver.get("https:// www.gmail.com");
     }

     @AfterSuite
     public void quitDriver() {
          driver.quit();
     }
}
Monitoring Test Results By LambdaTest Dashboard
As the setup is completed and having run a sample test, we can now move to the dashboard to explore the run results.
Login to your LambdaTest account redirects users to dashboard, which gives an overview of the whole tests and activities done so far along with available integrations.
You can see the number of tests run via automation, run using real time browser utility, concurrent sessions. date of execution and much more.
Next is the Realtime Browser Testing panel. It enables users to execute tests on any browser version of choice in any OS and resolution of user choice by just simply selecting from the available list.
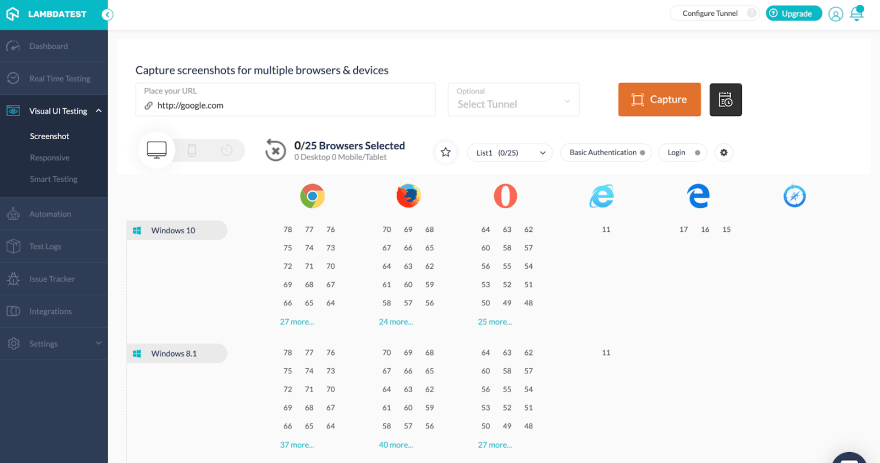
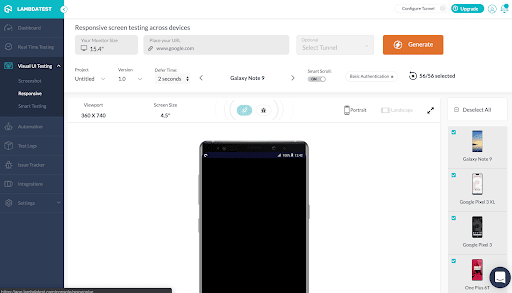
Visual UI Testing enabled users to run tests with screenshots taking capability on a varied set of OS and browser combinations. It also provides features to test across different UI for responsiveness depending on different screen sizes and resolutions.
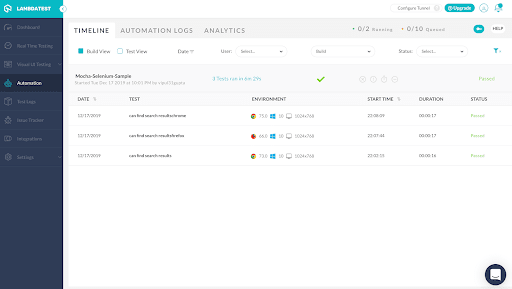
Automation section of the dashboard helps users to keep track of all the automation run triggered along with all related automation logs and analytics.
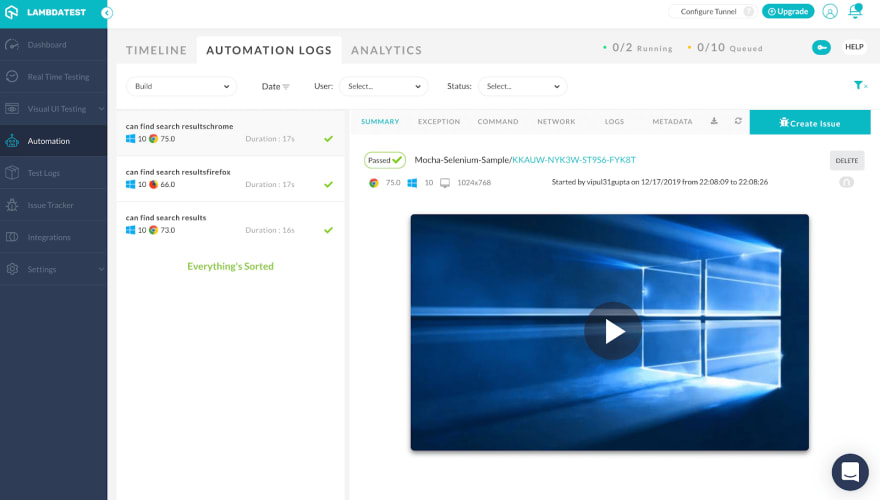
Automation logs provided by Lambdatest can be considered as the best utility provided owing to the range of different types of logs provided. Logs in the form of video, network and test run provides users with all possible information about the run and helps in facilitating debugging and troubleshooting to a large extent.
Logs for any run other than the automation, like real time testing or screenshot testing or responsive one can be found under this section. This captures all associated information along with filters for better analysis and has the ability to download those reports and screenshots.
Another important use case of using LambdaTest is that it allows you to add issues or bugs at the same time when they are encountered and provides a section in the same dashboard for easier tracking of its progress on different stages.
Also the ability to integrate with more than 30 apps for different purposes like communication, bug tracking, CI/CD, Project Management adds more to the positives of using this tool for cloud based testing.
Wrapping It Up
An object repository design pattern, Page Object Model, helps to create the test code maintainable, reusable and optimised. Combined with Page Factory, It makes writing web pages easier for selenium automation by combining all web page interactions, in a separate page file. It makes the code simple and to be adapted easily for continuous changing requirements.
In our previous Selenium Java Testing tutorials, we have covered how to test login process, user signup, access form.
So, that was all for now, you should be able to create a page object model for Selenium Java Testing now. In case of any doubts, feel free to reach out to us in the comment section below. If you liked this article, share it with your friends on facebook, LinkedIn or twitter. Happy Testing

Posted on May 19, 2020
Join Our Newsletter. No Spam, Only the good stuff.
Sign up to receive the latest update from our blog.


