Integration of Huawei Analytics Kit and Ads Kit in Book Reading Android app (Kotlin) - Part 2

MuraliAkula1
Posted on February 8, 2022

Introduction
In this article, we can learn how to integrate the Huawei Analytics Kit and Ads Kit in Book Reading app. So, I will provide the series of articles on this Book Reading App, in upcoming articles I will integrate other Huawei Kits.
Analytics Kit
HUAWEI Analytics Kit provides analysis models to understand user behaviour and gain in-depth insights into users, products **and **content. It helps you to gain insight about user behaviour on different platforms based on the user behaviour events and user attributes reported by through apps.
AppGallery Connect
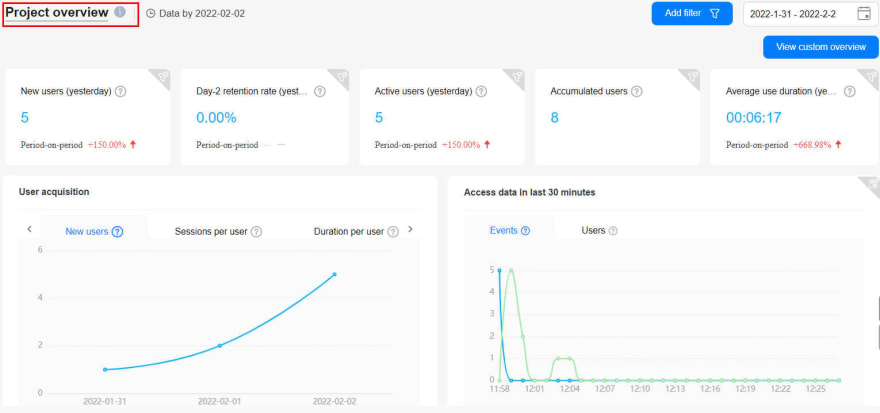
Find the Analytics using AppGallery connect dashboard.
Choose My Projects > Huawei Analytics > Overview > Project overview.
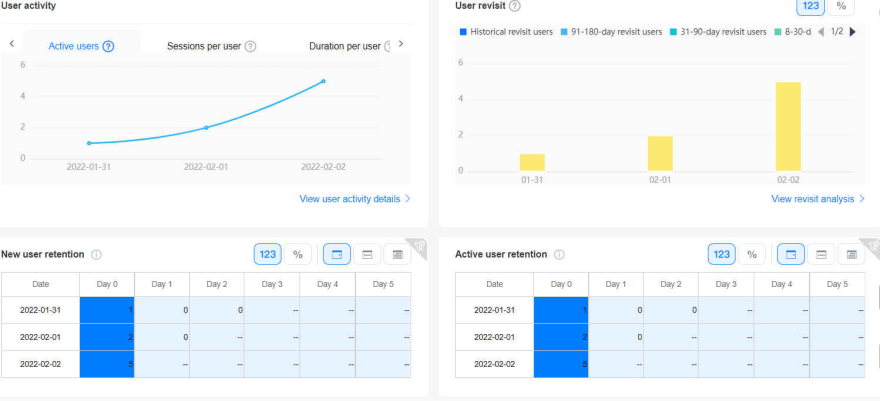
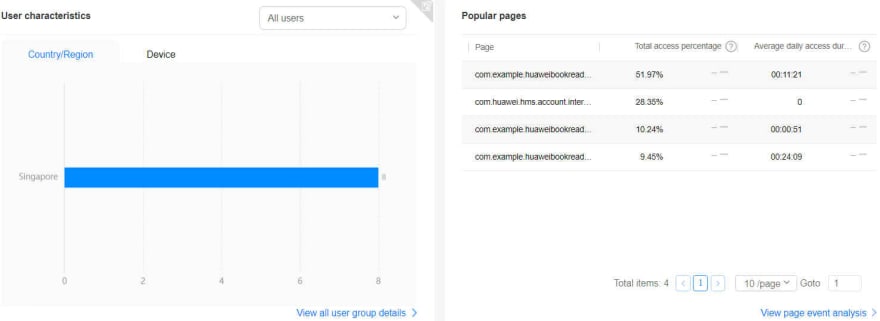
Project overview displays the core indicators of current project, such as the number of new users, User activity, User acquisition, User revisit, New user retention, Active user retention, User characteristics and Popular pages etc. providing a quick overview of the users and how they are using your app.
Ads Kit
Huawei Ads provides to developers a wide-ranging capabilities to deliver good quality ads content to users. This is the best way to reach target audience easily and can measure user productivity. It is very useful when we publish a free app and want to earn some money from it.
HMS Ads Kit has 7 types of Ads kits. Now we can implement Interstitial Ads in this application.
Interstitial ads are full-screen ads that cover the interface of an app. Such an ad is displayed when a user starts, pauses **or **exits an app, without disrupting the user's experience.
Requirements
- Any operating system (MacOS, Linux and Windows).
- Must have a Huawei phone with HMS 4.0.0.300 or later.
- Must have a laptop or desktop with Android Studio, Jdk 1.8, SDK platform 26 and Gradle 4.6 and above installed.
- Minimum API Level 24 is required.
- Required EMUI 9.0.0 and later version devices.
How to integrate HMS Dependencies
- First register as Huawei developer and complete identity verification in Huawei developers website, refer to register a Huawei ID.
- Create a project in android studio, refer Creating an Android Studio Project.
- Generate a SHA-256 certificate fingerprint.
- To generate SHA-256 certificate fingerprint. On right-upper corner of android project click Gradle, choose Project Name > Tasks > android, and then click signing
Report, as follows.

- Create an App in AppGallery Connect.
- Download the agconnect-services.json file from App information, copy and paste in android **Project **under **app **directory, as follows.

Enter SHA-256 certificate fingerprint and click **Save **button, as follows.

Add the below maven URL in build.gradle(Project) file under the repositories of buildscript, dependencies **and **allprojects, refer Add Configuration.
maven { url 'http://developer.huawei.com/repo/' }

classpath 'com.huawei.agconnect:agcp:1.6.0.300'
Add the below plugin and dependencies in build.gradle(Module) file.
apply plugin: id 'com.huawei.agconnect'

// Huawei AGC

implementation 'com.huawei.agconnect:agconnect-core:1.6.0.300'

// Huawei Analytics Kit

implementation 'com.huawei.hms:hianalytics:6.4.0.300'

// Huawei Ads Kit

implementation 'com.huawei.hms:ads-lite:13.4.51.300'
Now Sync the gradle.
Add the required permission to the AndroidManifest.xml file
.// Analytics Kit
<uses-permission android:name="android.permission.INTERNET" />
<uses-permission android:name="com.huawei.appmarket.service.commondata.permission.GET_COMMON_DATA" />
Let us move to development
I have created a project on Android studio with empty activity let us start coding.
In the MainActivity.kt we can find the business logic for Analytics.
`class MainActivity : AppCompatActivity() {
// Initialize the Analytics
var  mInstance: HiAnalyticsInstance? = null

override fun onCreate(savedInstanceState: Bundle?) {
    super.onCreate(savedInstanceState)
    setContentView(R.layout.activity_main)

    sign_btn.setOnClickListener(mOnClickListener)
    // Initialize the Analytics function
    initAna()

}
private fun initAna() {
// Enable Analytics Kit Log
HiAnalyticsTools.enableLog()
// Generate the Analytics Instance
mInstance = HiAnalytics.getInstance(this)
// Enable collection capability
mInstance?.setAnalyticsEnabled(true)
}
override fun onActivityResult(requestCode: Int, resultCode: Int, data: Intent?) {
    super.onActivityResult(requestCode, resultCode, data)
    if (requestCode == 1002 ) {
        val authAccountTask = AccountAuthManager.parseAuthResultFromIntent(data)
        if (authAccountTask.isSuccessful) {

            // Analytics data to send custom events
            val bundle = Bundle()
            bundle.putString("email", data!!.extras!!.getString("email" ))
            bundle.putString("name", data.extras!!.getString("name"))
            bundle.putString("phone", data!!.extras!!.getInt("phone").toString())
            bundle.putString("marks", data!!.extras!!.getFloat("86.5").toString())
            mInstance!!.onEvent(HAEventType.SIGNIN, bundle)

            Toast.makeText(this, "SigIn success", Toast.LENGTH_LONG).show()
        } else {
            Toast.makeText(this, "SignIn failed: " + (authAccountTask.exception as ApiException).statusCode, Toast.LENGTH_LONG).show()
        }
    }
}
}`
In the ListActivity.kt we can find the business logic for Ads.
`class ListActivity : AppCompatActivity() {
// Initialize the Interstitial Ads Kit
private var interstitialAd: InterstitialAd? = null

override fun onCreate(savedInstanceState: Bundle?) {
    super.onCreate(savedInstanceState)
    setContentView(R.layout.activity_list)

   title = getString(R.string.interstitial_ad)
    btn_alltypes.setOnClickListener {
        loadInterstitialAd()
    }

    showInterstitialAd()
    val actionBar = supportActionBar
    actionBar!!.setDisplayHomeAsUpEnabled(true)
}

private val adListener: AdListener = object : AdListener() {
    override fun onAdLoaded() {
        super.onAdLoaded()
        showToast("Ad loaded")
        // Display an interstitial ad.
        showInterstitialAd()
        val intent = Intent(this@ListActivity, Home::class.java)
        startActivity(intent)
    }
    override fun onAdFailed(errorCode: Int) {
        showToast("Ad load failed with error code: $errorCode")
        Log.d(TAG, "Ad load failed with error code: $errorCode")
        val intent = Intent(this@ListActivity, Home::class.java)
        startActivity(intent)
    }
    override fun onAdClosed() {
        super.onAdClosed()
        showToast("Ad closed")
        Log.d(TAG, "onAdClosed")
        val intent = Intent(this@ListActivity, Home::class.java)
        startActivity(intent)
    }
    override fun onAdClicked() {
        Log.d(TAG, "onAdClicked")
        super.onAdClicked()
    }
    override fun onAdOpened() {
        Log.d(TAG, "onAdOpened")
        super.onAdOpened()
    }
    override fun onAdLeave() {
        Log.d(TAG, "onAdLeaves")
        super.onAdLeave()
    }
}

private fun loadInterstitialAd() {
    // Load an interstitial ad.
    interstitialAd = InterstitialAd(this)
    val adParam = AdParam.Builder().build()
    interstitialAd!!.adId = getString(R.string.video_ad_id)
    interstitialAd!!.loadAd(adParam)
    interstitialAd!!.adListener = adListener
}

private val adId: String
    get() = if (btn_alltypes.isClickable) {
        getString(R.string.image_ad_id)
    } else {
        getString(R.string.video_ad_id)
    }

private fun showInterstitialAd() {
    // Display the ad
    if (interstitialAd != null && interstitialAd!!.isLoaded) {
        interstitialAd!!.show(this)
    } else {
        Toast.makeText(this, "Ad did not load", Toast.LENGTH_LONG).show()
    }
}

private fun showToast(text: String) {
    runOnUiThread {
        Toast.makeText(this@ListActivity, text, Toast.LENGTH_LONG).show()
    }
}

companion object {
    private val TAG = ListActivity::class.java.simpleName
}

override fun onSupportNavigateUp(): Boolean {
    finish()
    return super.onSupportNavigateUp()
}
}`
In the activity_main.xml we can create the UI screen.
`<?xml version="1.0" encoding="utf-8"?>
xmlns:app="http://schemas.android.com/apk/res-auto"
xmlns:tools="http://schemas.android.com/tools"
android:layout_width="match_parent"
android:layout_height="match_parent"
android:orientation="vertical"
android:background="@drawable/book_fly"
tools:context=".MainActivity">
<ImageButton
    android:id="@+id/sign_btn"
    android:layout_width="290dp"
    android:layout_height="60dp"
    android:layout_alignParentBottom="true"
    android:layout_centerInParent="true"
    android:layout_margin="15dp"
    android:paddingTop="10dp"
    app:srcCompat="@drawable/huawei_id_buttons" />
`
In the activity_list.xml we can create the UI screen.
`<?xml version="1.0" encoding="utf-8"?>
xmlns:app="http://schemas.android.com/apk/res-auto"
xmlns:tools="http://schemas.android.com/tools"
android:layout_width="match_parent"
android:layout_height="match_parent"
android:orientation="vertical"
android:paddingTop="10dp"
android:paddingBottom="10dp"
tools:context=".ListActivity">
<Button
    android:id="@+id/btn_alltypes"
    android:layout_width="310dp"
    android:layout_height="wrap_content"
    android:layout_marginTop="70dp"
    android:textAlignment="center"
    android:layout_gravity="center_horizontal"
    android:textSize="20sp"
    android:textColor="@color/black"
    android:padding="10dp"
    android:textAllCaps="false"
    android:text="Types of Books" />
`
Demo
Tips and Tricks
- Make sure you are already registered as Huawei developer.
- Set minSDK version to 24 or later, otherwise you will get AndriodManifest merge issue.
- Make sure you have added the agconnect-services.json file to app folder.
- Make sure you have added SHA-256 fingerprint without fail.
- Make sure all the dependencies are added properly.
Conclusion
In this article, we have learned how to integrate the Huawei Analytics Kit and Ads Kit in Book Reading app. So, I will provide the series of articles on this Book Reading App, in upcoming articles will integrate other Huawei Kits.
I hope you have read this article. If you found it is helpful, please provide likes and comments.
Reference
Analytics Kit
Ads Kit - Interstitial Ads

Posted on February 8, 2022
Join Our Newsletter. No Spam, Only the good stuff.
Sign up to receive the latest update from our blog.
Related
November 29, 2024


