How to scale Hangfire with docker

Mohsen Esmailpour
Posted on May 24, 2021

Hangfire is an open-source framework that helps you to create, process and manage your background jobs and an easy way to perform fire-and-forget, delayed and recurring jobs inside .NET applications. This post does not cover the basics of Hanfgire so read this article to learn the basics of Hangfire.
This post covers:
- How to config Hangfire to have multiple queues
- How to config worker count
- How to scale Hangfire worker service
I'm going to implement a sample project that contains a producer service that produces and exposes messages via web API and a consumer service which every second fetch messages from the producer service and enqueue messages into Hangfire. Each message has a different priority to process, so we enqueue each message to different queues based on priority and a worker service that processes messages and can be scaled out. You can skip steps 1-10 if you already have experience with Hangfire.
Producer Service
Imagine you need to call an external service and get a substantial amount of messages from that external service and queue messages to process. Our producer service mimics that external service behavior that provides messages.
- Step 1 - Create a class library project and name it
JobQueue.Shared - Step 2 - Add
Messagemodel class to the class library project ```csharp
public class MessageModel
{
public Guid MessageId { get; set; }
public DateTime CreateDate { get; set; }

public string Category { get; set; }

public object Payload { get; set; }
}
- Step 3 - Create ASP.NET Core Web API project and name it `JobQueue.ProducerService`
- Step 4 - Reference shared class library project to producer service project

- Step 5 - Create message producer

Let's create a message producer class that generates a random message. I used an excellent library [Bogus](https://github.com/bchavez/Bogus) to generate fake data for testing purposes.
```csharp


internal class MessageGenerator
{
    private static readonly string[] Categories = { "express", "normal" };
    private static readonly Faker<MessageModel> Faker;

    static MessageGenerator()
    {
        var random = new Random();

        Faker = new Faker<MessageModel>()
            .StrictMode(false)
            .RuleFor(p => p.Category, f => f.PickRandom(Categories))
            .RuleFor(p => p.MessageId, f => f.Random.Guid())
            .RuleFor(p => p.CreateDate, f => f.Date.Between(DateTime.Now.AddSeconds(-random.Next(1, 5)), DateTime.Now));
    }

    public static IEnumerable<MessageModel> GenerateMessages()
    {
        return Faker.Generate(100);
    }
}
Let's save generated message in a message store.
internal class MessageStore
{
    private readonly List<MessageModel> _store = new();
    private static readonly MessageStore _instance = new();

    private MessageStore()
    {
    }

    public static MessageStore Instance => _instance;

    public int Count => _store.Count;

    public void AddMessages(IEnumerable<MessageModel> messages)
    {
        _store.AddRange(messages);
    }

    public IEnumerable<MessageModel> GetMessages(int count)
    {
        var message = _store.Take(count).ToList();
        _store.RemoveRange(0, message.Count);

        return message;
    }
}
Let's create a background service that periodically generates messages and save them into messages. I used hosted service in ASP.NET Core to achieve this aim.
internal class MessageProducerHostedService : IHostedService, IDisposable
{
    private Timer _timer;

    public Task StartAsync(CancellationToken cancellationToken)
    {
        _timer = new Timer(SeedData, null, TimeSpan.Zero, TimeSpan.FromSeconds(1));

        return Task.CompletedTask;
    }

    public Task StopAsync(CancellationToken cancellationToken)
    {
        _timer?.Change(Timeout.Infinite, 0);

        return Task.CompletedTask;
    }

    public void Dispose()
    {
        _timer?.Dispose();
    }

    private void SeedData(object state)
    {
        if (MessageStore.Instance.Count > 2000)
            return;

        var messages = MessageGenerator.GenerateMessages();
        MessageStore.Instance.AddMessages(messages);
    }
}
- Step 6 - Create an API to expose messages ```csharp
[ApiController]
[Route("api/v1/[controller]")]
public class MessagesController : ControllerBase
{
[HttpGet]
public IEnumerable Get()
{
return MessageStore.Instance.GetMessages(new Random().Next(50, 200));
}
}
####Consumer Service
- Step 7 - Create ASP.NET Core Web API project and name it `JobQueue.ConsumerService`

- Step 8 - Install `Hangfire.AspNetCore` and `HangFire.Redis.StackExchange` nuget packages

- Step 9 - Implement a background service that periodically fetches messages from the producer service and enqueue into a queue
```csharp


public class MessageReceiverHostedService : IHostedService
{
    private readonly CancellationTokenSource _cts;
    private readonly IServiceProvider _serviceProvider;

    public MessageReceiverHostedService(IServiceProvider serviceProvider, ILogger<MessageReceiverHostedService> logger)
    {
        _serviceProvider = serviceProvider;
        _cts = new CancellationTokenSource();
    }

    public async Task StartAsync(CancellationToken cancellationToken)
    {
        await Task.Factory.StartNew(() => FetchMessagesAsync(_cts.Token), cancellationToken);
    }

    public Task StopAsync(CancellationToken cancellationToken)
    {
        _cts.Cancel();

        return Task.CompletedTask;
    }

    private async Task FetchMessagesAsync(CancellationToken cancellationToken)
    {
        while (true)
        {
            using var scope = _serviceProvider.CreateScope();
            var httpClient = scope.ServiceProvider.GetRequiredService<JobHttpClient>();
            var messages = await httpClient.GetJobMessagesAsync(cancellationToken);

            if (!messages.Any())
                continue;

            var categories = messages.GroupBy(m => m.Category).ToList();

            Parallel.ForEach(categories, category =>
            {
                Enqueue(category.Key, category.ToList());
            });

            await Task.Delay(TimeSpan.FromSeconds(5), cancellationToken);

            if (cancellationToken.IsCancellationRequested)
                break;
        }
    }

    private void Enqueue(string queueName, List<MessageModel> messages)
    {
        var client = new BackgroundJobClient();
        var state = new EnqueuedState(queueName);

        foreach (var message in messages.OrderBy(o => o.CreateDate))
        {
            Expression<Action> action = queueName == "express"
                ? () => MessageProcessor.ProcessExpressMessageAsync(message, message.MessageId)
                : () => MessageProcessor.ProcessNormalMessageAsync(message, message.MessageId);
            client.Create(action, state);
        }
    }
}
Each message has a Category property that identifies the priority of it. We have two categories, express and normal and express has a higher priority. We need two queues for express and normal categories.
One more thing I want to mention is that in this background service I didn't use the timer. Read this article to find out more on this case.
- Step 8 - Add new class
MessageProcessortoJobQueue.Sharedproject ```csharp
public class MessageProcessor
{
[Queue("express")]
[DisplayName("JobId: {1}")]
[AutomaticRetry(Attempts = 3)]
public static async Task ProcessExpressMessageAsync(MessageModel message, Guid messageId)
{
await Task.Delay(TimeSpan.FromSeconds(new Random().Next(1, 4)));
}
[Queue("normal")]
[DisplayName("JobId: {1}")]
[AutomaticRetry(Attempts = 3)]
public static async Task ProcessNormalMessageAsync(MessageModel message, Guid messageId)
{
    await Task.Delay(TimeSpan.FromSeconds(new Random().Next(1, 4)));
}
}
We have to methods for processing messages from each queue. One limitation of Hangfire is that you cannot use a method to process jobs from multiple queues (or at least I'm not aware of it but it can be done by implementing a custom `Queue` attribute).

- Step 9 - Reference shared class library project to consumer service project

- Step 10 - Add Hangfire dashboard to consumer service
Hangfire has a dashboard that enables you to monitor the jobs and their statuses. It also allows you to manually trigger available jobs.
Open `Startup.cs` class and add Hangfire dependencies to `ConfigureServices` method:
```csharp


public void ConfigureServices(IServiceCollection services)
{
    services.AddControllers();
    services.AddHostedService<MessageReceiverHostedService>();

    services.AddHangfire(configuration => configuration
        .SetDataCompatibilityLevel(CompatibilityLevel.Version_170)
        .UseSimpleAssemblyNameTypeSerializer()
        .UseRecommendedSerializerSettings()
        .UseRedisStorage(_redis));
}
And in configure method:
public void Configure(IApplicationBuilder app, IWebHostEnvironment env)
{
    ...

    app.UseEndpoints(endpoints =>
    {
        endpoints.MapDefaultControllerRoute();
        endpoints.MapHangfireDashboard();
    });
}
Run producer project and navigate to <localhost>/hangfire to view the dashboard.
Worker Service
- Step 11 - Create Worker Service project and name it
JobQueue.WorkerService - Step 12 - Open
appsettings.jsonfile and the following configuration: ```json
"Hangfire": [
{
"QueueName": "express",
"WorkerCount": 5
},
{
"QueueName": "normal",
"WorkerCount": 2
}
],
Background jobs are processed by a [dedicated pool of worker](https://docs.hangfire.io/en/latest/background-processing/configuring-degree-of-parallelism.html) threads that run inside the Hangfire server subsystem. For each queue, we can config the number of workers.

- Step 13 - Add new class `HangfireQueueSetting` to bind configuration:
```csharp


internal class HangfireQueueSetting
{
    public string QueueName { get; set; }

    public int WorkerCount { get; set; }
}
- Step 14 - Install
Hangfire.AspNetCoreandHangFire.Redis.StackExchangenuget packages - Step 15 - Open
Program.csclass and add Hangfire dependencies ```csharp
public class Program
{
private static ConnectionMultiplexer _redis;
public static void Main(string[] args)
{
    CreateHostBuilder(args).Build().Run();
}

public static IHostBuilder CreateHostBuilder(string[] args) =>
    Host.CreateDefaultBuilder(args)
        .ConfigureServices((hostContext, services) =>
        {
            _redis = ConnectionMultiplexer.Connect(hostContext.Configuration.GetConnectionString("RedisConnection"));

            services.AddHangfire(configuration => configuration
                .SetDataCompatibilityLevel(CompatibilityLevel.Version_170)
                .UseSimpleAssemblyNameTypeSerializer()
                .UseRecommendedSerializerSettings()
                .UseRedisStorage(_redis));

            var queueSettings = hostContext.Configuration.GetSection("Hangfire").Get<List<HangfireQueueSetting>>();
            foreach (var setting in queueSettings)
            {
                services.AddHangfireServer(options =>
                {
                    options.ServerName = $"{Environment.MachineName}:{setting.QueueName}";
                    options.Queues = new[] { setting.QueueName };
                    options.WorkerCount = setting.WorkerCount;
                });
            }
        });
}
- Step 16 - Reference shared class library project to producer service project
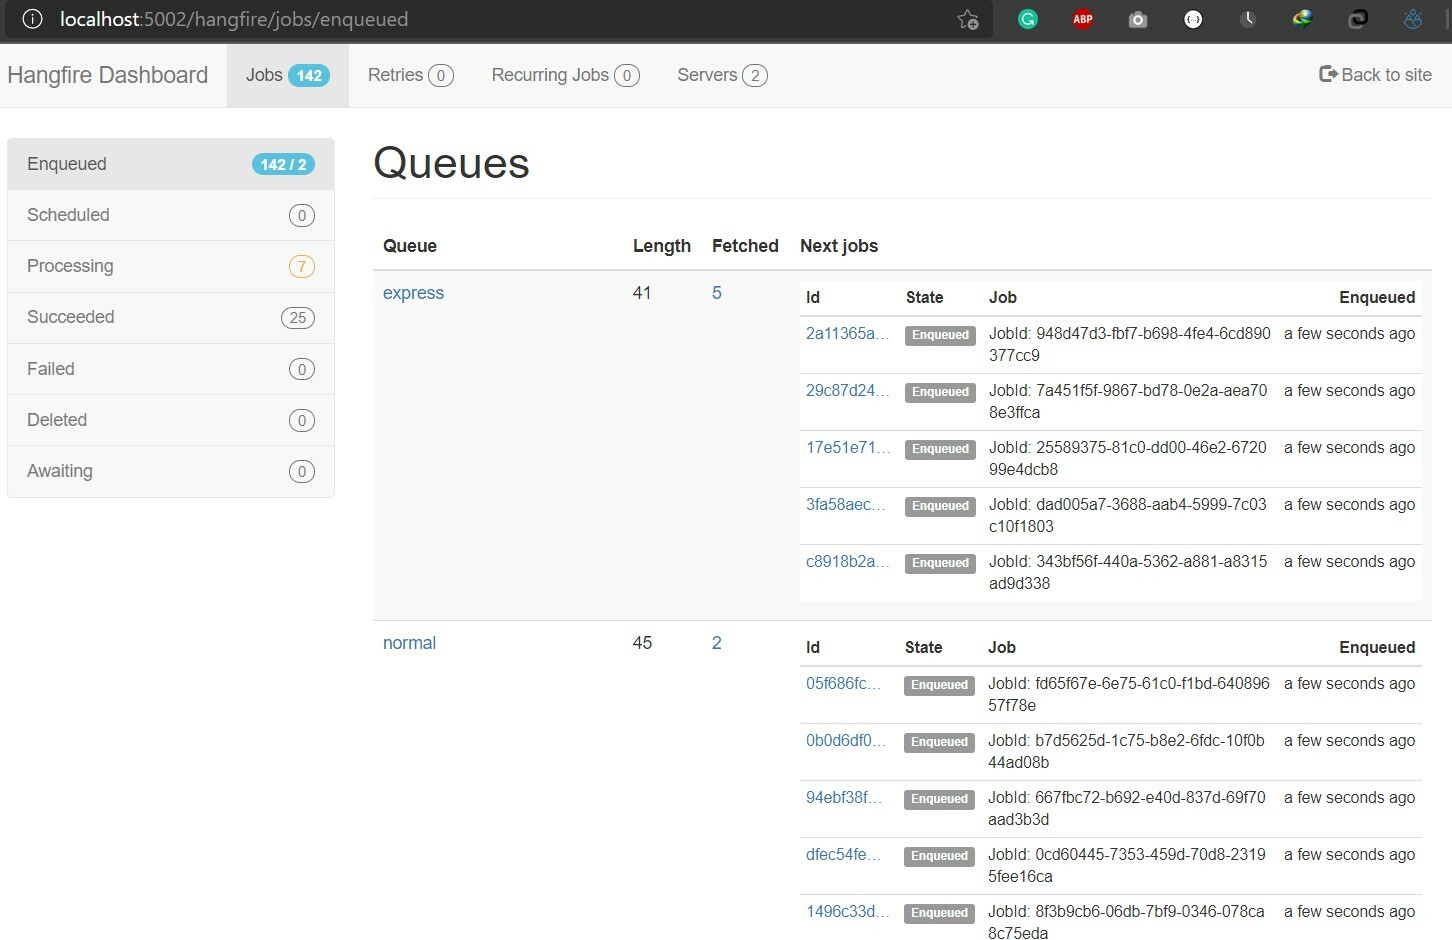
Now run all projects and navigate to Hangfire dashboard and you could see jobs are processing:

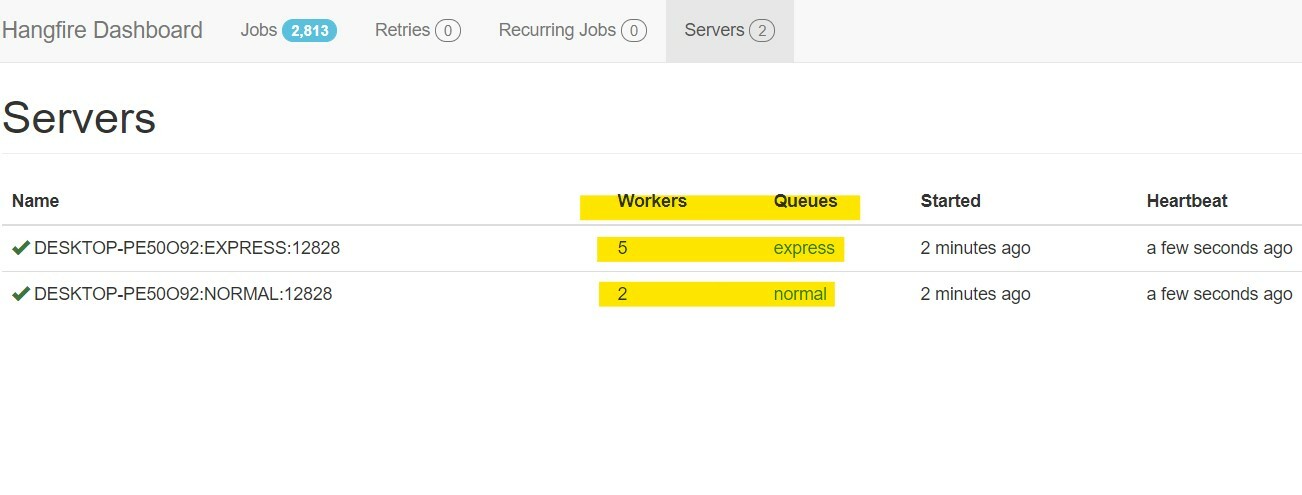
Click on the `Servers` tab and you can see we have two queues and with different worker count:

####Dockerizing Services
```yml
version: '3.4'
networks:
service_network:
services:
redis:
image: "redis"
ports:
- 6379:6379
networks:
- service_network
consumerservice:
image: ${DOCKER_REGISTRY-}jobqueueconsumerservice
container_name: consumerservice
ports:
- 9000:80
networks:
- service_network
build:
context: .
dockerfile: JobQueue.ConsumerService/Dockerfile
environment:
- ConnectionStrings__RedisConnection=redis:6379
- JobApi__BaseAddress=http://producerservice
producerservice:
image: ${DOCKER_REGISTRY-}jobqueueproducerservice
container_name: producerservice
build:
context: .
dockerfile: JobQueue.ProducerService/Dockerfile
networks:
- service_network
workerservice:
image: ${DOCKER_REGISTRY-}workerservice
networks:
- service_network
build:
context: .
dockerfile: JobQueue.WorkerService/Dockerfile
environment:
- ConnectionStrings__RedisConnection=redis:6379
- Hangfire__0__WorkerCount=10
- Hangfire__1__WorkerCount=5
We can configure worker count via docker-compose file by passing values through environment:
Hangfire__0__WorkerCount=10
Let's run projects via docker-compose:
- run
docker-compose build - run
docker-compose up -d - run
docker-compose scale workerservice=2 - To access the job dashboard, enter
http://localhost:9000address in the browser
You can find the source code for this walkthrough on Github.

Posted on May 24, 2021
Join Our Newsletter. No Spam, Only the good stuff.
Sign up to receive the latest update from our blog.