Customize Medusa and Gatsby to Implement Wishlist Functionality

Carlos Padilla
Posted on August 9, 2022

Medusa is an open source headless commerce that allows you to quickly build an ecommerce platform through its API with just a few commands. In addition to its core that holds all the features an ecommerce requires, Medusa also offers out of the box a ready-made Gatsby storefront that you can use to get your ecommerce store up and running.
This tutorial will guide you through the process of adding wishlist functionality to your Medusa server and then using it to implement a Wishlist flow on a Gatsby storefront.
You can find the final code for this tutorial in this GitHub repository for the Medusa server and this one for the Gatsby storefront.
What you’ll be Creating
Medusa Server
In this article, you’ll learn how to set up your medusa server so that you can have a wishlist functionality. In a nutshell, to achieve that, you need to do the following:
- Add two new tables to your database and the entities that represent them to store customers’ wishlists and wishlist items.
- Add a wishlist service with helper methods to perform actions related to the wishlist and wishlist items.
- Add custom endpoints to fetch and create wishlists, and add and remove wishlist items.
Gatsby Storefront
Once your Medusa server has the wishlist functionality, the next step is to implement the wishlist flow on your Gatsby storefront; this includes the following:
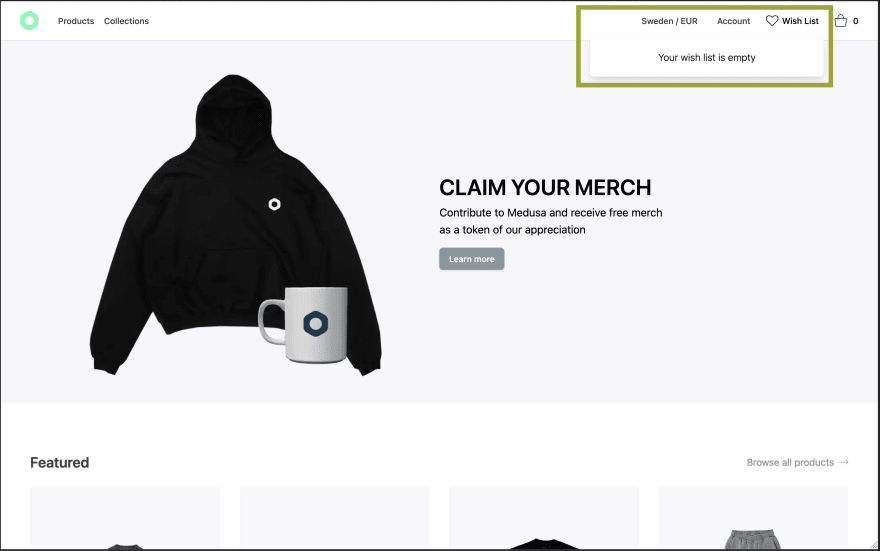
- A wishlist popover that gives customers a quick view of what is in their wishlist.
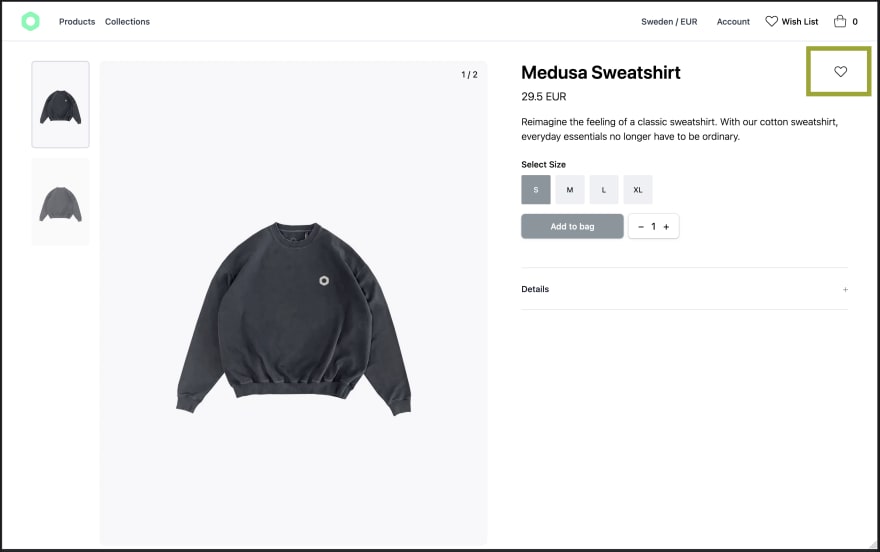
- Add or remove products to the wishlist from the product detail page.
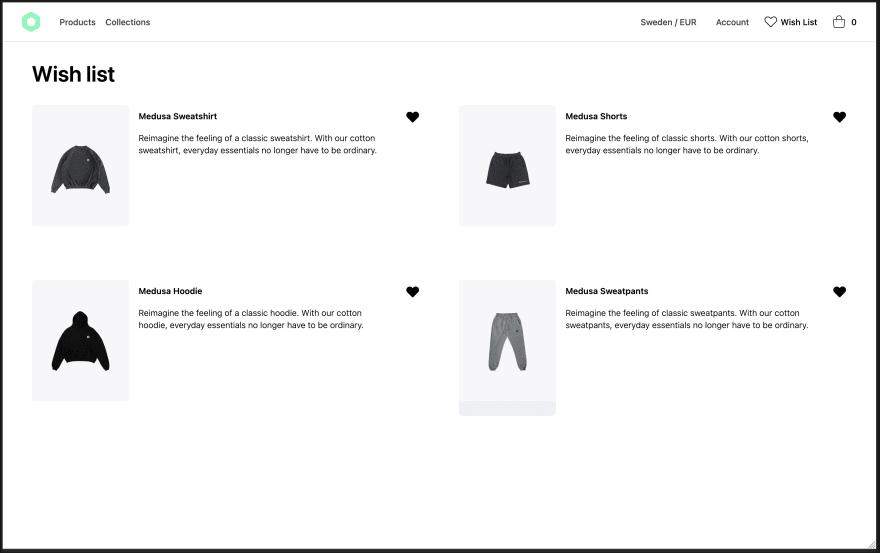
- A wishlist page to list the products saved in their wishlist and remove them.
Prerequisites
Before you follow along with this tutorial, make sure you have:
- A Medusa server with some dummy data to work with. If you don’t, please follow the QuickStart guide to set up a Medusa server first.
- As you’ll use migrations in one of the steps, you need to install PostgreSQL and configure it with your Medusa Server.
- This tutorial uses the Gatsby starter to test the wishlist functionality added to the Medusa server. However, you can still follow along using a different storefront framework.
Setting up Medusa server
Add the Wishlist Entity
Start by creating the file src/models/wishlist.ts with the following content:
import {
  BeforeInsert,
  Column,
  Entity,
  Index,
  JoinColumn,
  ManyToOne,
  OneToMany,
} from "typeorm"

import { Customer } from "@medusajs/medusa/dist/models/customer"
import { Region } from "@medusajs/medusa/dist/models/region"
import { BaseEntity } from "@medusajs/medusa"
import { generateEntityId } from "@medusajs/medusa/dist/utils"

@Entity()
export class Wishlist extends BaseEntity {
  readonly object = "wishlist"

  @Index()
  @Column()
  region_id: string

  @ManyToOne(() => Region)
  @JoinColumn({name: "region_id"})
  region: Region

  @Index()
  @Column({nullable: true})
  customer_id: string

  @ManyToOne(() => Customer)
  @JoinColumn({name: "customer_id"})
  customer: Customer

  // TODO add wishlish item relation

  @BeforeInsert()
  private beforeInsert(): void {
    this.id = generateEntityId(this.id, "wish")
  }
}
This uses the decorator @Entity imported from Typeorm to create the Wishlist entity. Then, you create a Wishlist class that extends Medusa's BaseEntity.
A Wishlist can have many wishlist items, so, later on, you'll edit this entity to add the relation between them.
Add Wishlist Repository
To access and modify entity data, you need to create a repository for this entity. Create the file src/repositories/wishlist.ts with the following content:
import { EntityRepository, Repository } from "typeorm"
import { Wishlist } from "../models/wishlist"

@EntityRepository(Wishlist)
export class WishlistRepository extends Repository<Wishlist> { }
Add Wishlist Item Entity
The WishlistItem entity is a pivot table in the database that indirectly relates a product with a wishlist.
Create the file src/models/wishlist-item.ts with the following content:
import { BeforeInsert, Column, Entity, JoinColumn, ManyToOne, Unique } from "typeorm"
import { BaseEntity } from "@medusajs/medusa"
import { generateEntityId } from "@medusajs/medusa/dist/utils"
import { Product } from '@medusajs/medusa/dist/models/product'
import { Wishlist } from './wishlist';

@Entity()
@Unique(["wishlist_id", "product_id"])
export class WishlistItem extends BaseEntity {
  @Column()
  wishlist_id: string

  @ManyToOne(() => Wishlist, (wishlist) => wishlist.items)
  @JoinColumn({name: "wishlist_id"})
  wishlist: Wishlist

  @Column()
  product_id: string

  @ManyToOne(() => Product)
  @JoinColumn({name: "product_id"})
  product: Product

  @BeforeInsert()
  private beforeInsert(): void {
    this.id = generateEntityId(this.id, "item")
  }
}
This entity has two relationships, one with the wishlist and the other one with the product. The product relation allows fetching the wishlist item along with the product information.
You also need to add the relation between the Wishlist and the WishlistItem entities. In src/models/wishlist.ts, replace the //TODO with the following:
@OneToMany(() => WishlistItem, (wishlistItem) => wishlistItem.wishlist, {
  onDelete: "CASCADE"
})
items: WishlistItem[]
Make sure to import the WishlistItem entity at the beginning of the file:
import { WishlistItem } from './wishlist-item'
Add Wishlist Item Repository
Next, create the file src/repositories/wishlist-item.ts with the following content:
import { EntityRepository, Repository } from "typeorm"
import { WishlistItem } from '../models/wishlist-item';

@EntityRepository(WishlistItem)
export class WishlistItemRepository extends Repository<WishlistItem> { }
Create migrations
Migrations update the database schema with new tables or make changes to existing tables. You must create a migration for your Wishlist and WishlistItem entities to reflect them in the database schema.
Create the file src/migrations/wishlist.ts with the following content:
import { MigrationInterface, QueryRunner } from "typeorm";

export class wishlist1655952820403 implements MigrationInterface {

  public async up(queryRunner: QueryRunner): Promise<void> {
    // Tables
    await queryRunner.query(`CREATE TABLE "wishlist" ( "id" character varying NOT NULL, "region_id" character varying NOT NULL, "customer_id" character varying, "created_at" TIMESTAMP WITH TIME ZONE NOT NULL DEFAULT now(), "updated_at" TIMESTAMP WITH TIME ZONE NOT NULL DEFAULT now(), "deleted_at" TIMESTAMP WITH TIME ZONE, CONSTRAINT "PK_gknmp6lnikxobwv1rhv1dgs982" PRIMARY KEY ("id") )`);
    await queryRunner.query(`CREATE TABLE "wishlist_item" ( "id" character varying NOT NULL, "wishlist_id" character varying, "product_id" character varying, "created_at" TIMESTAMP WITH TIME ZONE NOT NULL DEFAULT now(), "updated_at" TIMESTAMP WITH TIME ZONE NOT NULL DEFAULT now(), "deleted_at" TIMESTAMP WITH TIME ZONE, CONSTRAINT "PK_7p8joiapu4u0dxbsatkm5n1qs2" PRIMARY KEY ("wishlist_id", "product_id") )`);

    // Foreign key constraints
    await queryRunner.query(`ALTER TABLE "wishlist" ADD CONSTRAINT "FK_auvt4ec8rnokwoadgpxqf9bf66" FOREIGN KEY ("region_id") REFERENCES "region"("id") ON DELETE NO ACTION ON UPDATE NO ACTION`);
    await queryRunner.query(`ALTER TABLE "wishlist" ADD CONSTRAINT "FK_5ix0u284wt3tmrlpb56ppzmxi7" FOREIGN KEY ("customer_id") REFERENCES "customer"("id") ON DELETE NO ACTION ON UPDATE NO ACTION`);
    await queryRunner.query(`ALTER TABLE "wishlist_item" ADD CONSTRAINT "FK_vovw0ddpagwehc13uw0q8lrw2o" FOREIGN KEY ("wishlist_id") REFERENCES "wishlist"("id") ON DELETE CASCADE ON UPDATE NO ACTION`);
    await queryRunner.query(`ALTER TABLE "wishlist_item" ADD CONSTRAINT "FK_1cvf31byyh136a7744qmdt03yh" FOREIGN KEY ("product_id") REFERENCES "product"("id") ON DELETE CASCADE ON UPDATE NO ACTION`);
  }

  public async down(queryRunner: QueryRunner): Promise<void> {
    await queryRunner.query(`ALTER TABLE "wishlist" DROP CONSTRAINT "FK_auvt4ec8rnokwoadgpxqf9bf66"`);
    await queryRunner.query(`ALTER TABLE "wishlist" DROP CONSTRAINT "FK_5ix0u284wt3tmrlpb56ppzmxi7"`);
    await queryRunner.query(`ALTER TABLE "wishlist_item" DROP CONSTRAINT "FK_vovw0ddpagwehc13uw0q8lrw2o"`);
    await queryRunner.query(`ALTER TABLE "wishlist_item" DROP CONSTRAINT "FK_1cvf31byyh136a7744qmdt03yh"`);
    await queryRunner.query(`DROP TABLE "wishlist"`);
    await queryRunner.query(`DROP TABLE "wishlist_item"`);
  }

}
Here, the up method runs if the migration hasn't been run before. It creates the wishlist and wishlist_item tables and adds some foreign keys.
Add Wishlist Service
Once your entities are ready, the next step is to create the service that allows you to perform actions related to the wishlist and wishlist items.
Create the file src/services/wishlist.ts with the following content:
import { BaseService } from 'medusa-interfaces'
import { MedusaError } from 'medusa-core-utils'

class WishlistService extends BaseService {
  constructor({ manager, wishlistRepository, wishlistItemRepository }) {
    super()
    this.manager_ = manager
    this.wishlistRepository_ = wishlistRepository
    this.wishlistItemRepository_ = wishlistItemRepository
  }

    async create(payload) {
    return await this.atomicPhase_(async (transactionManager) => {

      if (!payload.region_id) {
        throw new MedusaError(MedusaError.Types.INVALID_DATA, `A region_id must be provided when creating a wishlist`)
      }

      const wishlistRepository = transactionManager.getCustomRepository(this.wishlistRepository_)
      const createdWishlist = wishlistRepository.create(payload)
      const { id } = await wishlistRepository.save(createdWishlist)

      const [wishlist] = await wishlistRepository.find({
        where: { id },
        relations: ['items', 'items.product']
      })

      return wishlist
    })
  }

  async retrieve(id) {
    return await this.atomicPhase_(async (transactionManager) => {
      const wishlistRepository = transactionManager.getCustomRepository(this.wishlistRepository_)
            const [wishlist] = await wishlistRepository.find({
                    where: { id },
                    relations: ['items', 'items.product']
            })

      if (!wishlist) {
        throw new MedusaError(MedusaError.Types.NOT_FOUND, `Wishlist with ${id} was not found`)
      }

      return wishlist
    })
  }

  async addWishItem(wishlist_id, product_id) {
    return await this.atomicPhase_(async (transactionManager) => {
      const wishlistItemRepository = transactionManager.getCustomRepository(this.wishlistItemRepository_)
      const wishlistRepository = transactionManager.getCustomRepository(this.wishlistRepository_)

      const [item] = await wishlistItemRepository.find({ where: { wishlist_id, product_id } })

      if (!item) {
        const createdItem = wishlistItemRepository.create({ wishlist_id, product_id })
        await wishlistItemRepository.save(createdItem)
      }

            const [wishlist] = await wishlistRepository.find({
        where: { id: wishlist_id },
        relations: ['items', 'items.product']
      })

      return wishlist
    })
  }

  async removeWishItem(id) {
    return await this.atomicPhase_(async (transactionManager) => {
      const wishlistItemRepository = transactionManager.getCustomRepository(this.wishlistItemRepository_)
      const wishlistRepository = transactionManager.getCustomRepository(this.wishlistRepository_)
      const [item] = await wishlistItemRepository.find({ where: { id } })
      const wishlist_id = item.wishlist_id

      if (item) {
        await wishlistItemRepository.remove(item)
      }

            const [wishlist] = await wishlistRepository.find({
        where: { id: wishlist_id },
        relations: ['items', 'items.product']
      })

      return wishlist
    })
  }
}

export default WishlistService
In the WishlistService, you implement four methods:
- The
createmethod creates a new wishlist. - The
retrievemethod retrieves a wishlist and wishlist items associated with it using the wishlist’s ID. - The
addWishItemmethod adds a new wishlist item to the wishlist. - The
removeWishItemmethod deletes a wishlist item from a wishlist using the item’s ID.
Add Wishlist Endpoints
The last step to finish the Medusa server setup is adding custom endpoints so you can use the wishlist functionality from the Storefront.
First, create the file src/api/wishlist/index.ts with the following content:
import { json, Router } from 'express'

const route = Router()

export default (app) => {
  app.use('/store/wishlist', route)
  route.use(json())

  // Wishlist
  route.get('/:id', async (req, res) => {
    const wishlistService = req.scope.resolve('wishlistService')
    const wishlist = await wishlistService.retrieve(req.params.id)
    res.json(wishlist)
  })

    route.post('/', async (req, res) => {
    const wishlistService = req.scope.resolve('wishlistService')
    const payload = {region_id: req.body.region_id, customer_id: null}

    if (req.user && req.user.customer_id) {
      const customerService = req.scope.resolve("customerService")
      const customer = await customerService.retrieve(req.user.customer_id)
      payload.customer_id = customer.id
    }

    const wishlist = await wishlistService.create(payload)
    res.json(wishlist)
  })

  // Wishlist items
  route.post('/:id/wish-item', async (req, res) => {
    const wishlistService = req.scope.resolve('wishlistService')
    const wishlist = await wishlistService.addWishItem(req.params.id, req.body.product_id)
    res.json(wishlist)
  })

  route.delete('/:id/wish-item/:item_id', async (req, res) => {
    const wishlistService = req.scope.resolve('wishlistService')
    const wishlist = await wishlistService.removeWishItem(req.params.item_id)
    res.json(wishlist)
  })

  return app
}
You map each endpoint to a method in the WishlistService. All endpoints return a wishlist object with its wishlist items.
Next, create the file src/api/index.ts with the following content:
import { Router, json } from 'express'
import cors from 'cors'
import { projectConfig } from '../../medusa-config'
import wishlist from './wishlist'

const corsOptions = {
  origin: projectConfig.store_cors.split(','),
  credentials: true
}

export default () => {
  const app = Router()
  app.use(cors(corsOptions))

  wishlist(app)

  return app
}
You import your wishlist routes to inject them into Medusa's router. Also, you use the cors library with Medusa’s CORS options. This allows you to use these endpoints on the Storefront.
Running Migrations
In this section, you’ll run the migrations to add the necessary tables for the wishlist functionality to the database.
In your terminal, run the following commands to transpile the TypeScript files to JavaScript files then run the migrations:
yarn run build && medusa migrations run
Test Wishlist Functionality
Start by running your server:
yarn start
This starts your server on port 9000.
To run the following tests, you need to use a tool like Postman to easily send requests to your server.
Test Creating a Wishlist
To create a wishlist you need to associate it with a region ID. So, send a GET request to localhost:9000/store/regions to get the available regions on your Medusa server and copy the first region's id.
Then, send a POST request to localhost:9000/store/wishlist and in the body pass the region_id you copied. For example:
{
  "region_id": "reg_01G6MFABCQ6GWK1DZWZJ8P35JM"
}
The request returns a wishlist object like this one:
{
  "object": "wishlist",
  "region_id": "reg_01G6MFABCQ6GWK1DZWZJ8P35JM",
  "customer_id": null,
  "id": "wish_01G6MGYVABK9ZXNCP5KM2Y9NFS",
    "items": [],
  "created_at": "2022-06-28T06:46:09.482Z",
  "updated_at": "2022-06-28T06:46:09.482Z"
}
Test Add Items to Wishlist
Wishlist items are associated with products. So, you need to retrieve a product ID first.
Send a GET request to localhost:9000/store/products to get the list of products, then, choose one of them and copy its id.
Next, send a POST request to localhost:9000/store/wishlist/YOUR_WISHLIST_ID/wish-item where YOUR_WISHLIST_ID is the id you got in the previous step. In the body, pass the product_id you copied. For example:
{
    "product_id": "prod_01G6MFABJ7QP3W3R8ZSWYDTNVG"
}
The request returns a wishlist object with one item attached to it:
{
    "object": "wishlist",
    "items": [
        {
            "wishlist_id": "wish_01G6MGYVABK9ZXNCP5KM2Y9NFS",
            "product_id": "prod_01G6MFABJ7QP3W3R8ZSWYDTNVG",
            "product": {
                "id": "prod_01G6MFABJ7QP3W3R8ZSWYDTNVG",
                "created_at": "2022-06-28T06:17:29.187Z",
                "updated_at": "2022-06-28T06:17:29.187Z",
                "deleted_at": null,
                "title": "Medusa T-Shirt",
                "subtitle": null,
                "description": "Reimagine the feeling of a classic T-shirt. With our cotton T-shirts, everyday essentials no longer have to be ordinary.",
                ...
            },
            "id": "item_01G6MKY3KZVQF7GQ72Z6GZ1JAQ",
            "created_at": "2022-06-28T07:38:10.937Z",
            "updated_at": "2022-06-28T07:38:10.937Z"
        }
    ],
    "region_id": "reg_01G6MFABCQ6GWK1DZWZJ8P35JM",
    "customer_id": null,
    "id": "wish_01G6MGYVABK9ZXNCP5KM2Y9NFS",
    "created_at": "2022-06-28T06:46:09.482Z",
    "updated_at": "2022-06-28T06:46:09.482Z"
}
If everything works as expected, you can go to the next section, where you implement this wishlist functionality in the Gatsby storefront.
Set up Storefront
In this section, you'll learn how to integrate the wishlist feature you just added to your Medusa server on a Gatsby Storefront.
Add Wishlist Popover
Start by adding the icon that represents the wishlist in the header. Create the file src/icons/wishlist.jsx with the following content:
import React from "react"

const WishlistIcon = ({ props, fill }) => {
  return (
    <svg
      xmlns="http://www.w3.org/2000/svg"
      width="1.5rem"
      height="1.5rem"
      viewBox="0 0 256 256"
      {...props}
    >
      {!fill ? (
        <path
          fill="currentColor"
          d="M128 220.2a13.6 13.6 0 0 1-9.9-4.1L35 133a58 58 0 0 1 2.2-84.2a56.5 56.5 0 0 1 41.6-14a62.8 62.8 0 0 1 40.3 18.3L128 62l11-11a57.9 57.9 0 0 1 84.1 2.2a56.2 56.2 0 0 1 14.1 41.6a62.8 62.8 0 0 1-18.3 40.3l-81 81a13.6 13.6 0 0 1-9.9 4.1Zm5.6-8.3ZM75 46.7a44 44 0 0 0-29.7 11.1a45.8 45.8 0 0 0-1.8 66.7l83.1 83.1a1.9 1.9 0 0 0 2.8 0l81-81c18.2-18.2 19.9-47.5 3.8-65.3a45.8 45.8 0 0 0-66.7-1.8l-15.3 15.2a6.1 6.1 0 0 1-8.5 0l-13.1-13.1A50.3 50.3 0 0 0 75 46.7Z"
        ></path>
      ) : (
        <path
          fill="currentColor"
          d="m220.3 136.5l-81 81a15.9 15.9 0 0 1-22.6 0l-83.1-83.1a59.9 59.9 0 0 1 2.3-87c23.3-21.1 61.3-19.1 84.6 4.3l7.5 7.4l9.6-9.5A60.4 60.4 0 0 1 181.5 32a59.8 59.8 0 0 1 43.1 19.9c21 23.3 19.1 61.3-4.3 84.6Z"
        ></path>
      )}
    </svg>
  )
}

export default WishlistIcon
Next, create the file src/components/header/wishlist-popover-item.jsx with the following content:
import React from "react"
import RegionalLink from '../utility/regional-link'

const WishlistPopoverItem = ({ item }) => {
  return (
    <RegionalLink to={item.handle} className="font-normal">
      <div className="flex hover:bg-gray-100">
        <div className="overflow-hidden rounded-md mr-4">
          <img className="w-16 h-auto" src={item.thumbnail} alt={item.title} />
        </div>
        <div className="flex items-center">
          <div>
            <p className="font-medium text-sm">{item.title}</p>
          </div>
        </div>
      </div>
    </RegionalLink>
  )
}

export default WishlistPopoverItem
This component renders the wishlist items inside the wishlist popover. It only shows the product's title and thumbnail, and it's wrapped with a RegionalLink component that allows visiting the product detail page.
The next step is to add a WishlistContext to keep the wishlist in sync across the Storefront. It would be best if you had a useWishlist hook to access the Medusa context.
Create the file src/hooks/use-wishlist.js with the following content:
import { useContext } from "react"
import WishlistContext from '../context/wishlist-context'

export const useWishlist = () => {
  const context = useContext(WishlistContext)

  if (!context) {
    throw new Error(
      "useWishlist hook was used but a WishlistContext. Provider was not found in the parent tree. Make sure this is used in a component that is a child of WishlistProvider"
    )
  }

  return context
}
Next, create the file src/context/wishlist-context.js with the following content:
import React, { createContext, useEffect, useState } from "react"
import { useRegion } from "../hooks/use-region"
import { useMedusa } from "../hooks/use-medusa"

const defaultWishlistContext = {
  wishlist: {
    items: [],
  },
  loading: false,
  actions: {
    addItem: async () => {},
    removeItem: async () => {},
  },
}

const WishlistContext = createContext(defaultWishlistContext)
export default WishlistContext

const WISHLIST_ID = "wishlist_id"
const isBrowser = typeof window !== "undefined"

export const WishlistProvider = props => {
  const [wishlist, setWishlist] = useState(defaultWishlistContext.wishlist)
  const [loading, setLoading] = useState(defaultWishlistContext.loading)
  const { region } = useRegion()
  const { client } = useMedusa()

  const setWishlistItem = wishlist => {
    if (isBrowser) {
      localStorage.setItem(WISHLIST_ID, wishlist.id)
    }
    setWishlist(wishlist)
  }

  useEffect(() => {
    const initializeWishlist = async () => {
      const existingWishlistId = isBrowser
        ? localStorage.getItem(WISHLIST_ID)
        : null

      if (existingWishlistId && existingWishlistId !== "undefined") {
        try {
          const { data } = await client.axiosClient.get(
            `/store/wishlist/${existingWishlistId}`
          )

          if (data) {
            setWishlistItem(data)
            return
          }
        } catch (e) {
          localStorage.setItem(WISHLIST_ID, null)
        }
      }

      if (region) {
        try {
          const { data } = await client.axiosClient.post("/store/wishlist", {
            region_id: region.id,
          })

          setWishlistItem(data)
          setLoading(false)
        } catch (e) {
          console.log(e)
        }
      }
    }

    initializeWishlist()
  }, [client, region])

  const addWishItem = async product_id => {
    setLoading(true)
    try {
      const { data } = await client.axiosClient.post(
        `/store/wishlist/${wishlist.id}/wish-item`,
        { product_id }
      )
      setWishlistItem(data)
      setLoading(false)
    } catch (e) {
      console.log(e)
    }
  }

  const removeWishItem = async id => {
    setLoading(true)
    try {
      const { data } = await client.axiosClient.delete(
        `/store/wishlist/${wishlist.id}/wish-item/${id}`
      )
      setWishlistItem(data)
      setLoading(false)
    } catch (e) {
      console.log(e)
    }
  }

  return (
    <WishlistContext.Provider
      {...props}
      value={{
        ...defaultWishlistContext,
        loading,
        wishlist,
        actions: {
          addWishItem,
          removeWishItem,
        },
      }}
    />
  )
}
First, you define a default wishlist context with some default properties and create a WishlistContext. Then, you create a WishlistProvider that initializes the wishlist and exposes some methods to add and remove wishlist items from the created Wishlist.
You need to add the WishlistContext to the MedusaProvider to be able to use it.
Open the file src/context/medusa-context.js, import the WishlistProvider at the beginning of the file, and in the returned JSX in MedusaProvider wrap the CartProvider with the WishlistProvider :
import { WishlistProvider } from "./wishlist-context"

export const MedusaProvider = ({ children, client }) => {
  return (
    //...
          <WishlistProvider>
            <CartProvider>{children}</CartProvider>
          </WishlistProvider>
    //...
  )
}
Next, create the file src/components/header/wishlist-popover.jsx with the following content:
import { Menu } from "@headlessui/react"
import { Link } from "gatsby"
import React from "react"
import PopoverTransition from "../popover-transition"
import WishlistIcon from "../../icons/wishlist"
import WishlistPopoverItem from "./wishlist-popover-item"
import { useWishlist } from "../../hooks/use-wishlist"

const WishlistPopover = () => {
  const { wishlist } = useWishlist()
  const iconStyle = { className: "mr-1" }

  return (
    <Menu as="div" className="relative inline-block text-left mr-2">
      <div>
        <Menu.Button className="inline-flex items-center justify-center w-full rounded p-2 text-sm font-medium hover:opacity-1/2">
          <WishlistIcon props={iconStyle} />
          <span>Wish List</span>
        </Menu.Button>
      </div>

      <PopoverTransition>
        <Menu.Items className="origin-top-right absolute right-0 mt-2 w-96 px-6 py-4 rounded-md shadow-lg bg-white ring-1 ring-black ring-opacity-5 focus:outline-none">
          <div className="py-1">
            {wishlist.items < 1 ? (
              <div className="flex justify-center">
                <p>Your wish list is empty</p>
              </div>
            ) : (
              <>
                {wishlist.items?.map((item, i) => {
                  return (
                    <div className="py-2 first:pt-0" key={i}>
                      <Menu.Item>
                        {() => (
                          <WishlistPopoverItem
                            item={item.product}
                            currencyCode="usd"
                          />
                        )}
                      </Menu.Item>
                    </div>
                  )
                })}
                <div className="flex flex-col mt-4">
                  <Menu.Item>
                    <Link to="/wishlist">
                      <button className="text-ui-dark py-2 text-sm w-full border px-3 py-1.5 rounded hover:text-black hover:bg-gray-100">
                        View Wish List
                      </button>
                    </Link>
                  </Menu.Item>
                </div>
              </>
            )}
          </div>
        </Menu.Items>
      </PopoverTransition>
    </Menu>
  )
}

export default WishlistPopover
Here you use the WishlistIcon and WishlistPopoverItem components that you created previously. Also, you use the useWishlist hook to get the wishlist items from the wishlist context and render them in the wishlist popover component.
Finally, to show the WishlistPopover in the storefront’s header open the file src/components/header/index.jsx and import the component at the beginning of the file:
import WishlistPopover from "./wishlist-popover"
Then, update the mockData object by adding the wishlist property at the end with some demo data:
const mockData = {
  customer: {...},
  cart: {...},
  regions: [...],
  wishlist: {
    items: [
      {
        id: "1",
        title: "Medusa Tote",
        thumbnail:
          "https://medusa-public-images.s3.eu-west-1.amazonaws.com/tshirt.png",
      },
    ],
  },
}
Lastly, add the WishlistPopover just before the CartPopover in the returned JSX:
//...
<WishlistPopover wishlist={mockData.wishlist} />
<CartPopover cart={mockData.cart} />
//...
Test Wishlist Popover
To test out the Wishlist Popover make sure your Medusa server is running and start your Gatsby storefront:
yarn start
Then, go to the URL http://localhost:8000. You should see the wishlist icon in the header on the left of the cart icon. Click on the heart icon and the wishlist popover will be shown.
Add a wishlist button on the product detail page
You will implement the functionality to add or remove items to or from the Wishlist in the product detail page.
Open the file src/templates/product.js and at the beginning of the Product function add the following snippet just after the useCart hook:
const {
  wishlist,
  actions: { addWishItem, removeWishItem },
} = useWishlist()
You get access to the wishlist object in the wishlist context and the methods to add and remove wishlist items.
Next, after the handleAddToCart function, add a state variable to track whether the product is already on the wishlist or not:
const [onWishlist, setOnWishlist] = useState(() =>
  wishlist.items.some(i => i.product_id === product.id)
)
Don’t forget to import the useWishlist and useState hooks at the start of the file
import React, { useEffect, useState } from "react"
import { useWishlist } from "../hooks/use-wishlist"
Then, add the toggleWishlist function to add or remove the item from the Wishlist after the onWishlist state variable:
const toggleWishlist = async () => {
  if (!onWishlist) {
    await addWishItem(product.id)
    setOnWishlist(true)
  } else {
    const [item] = wishlist.items.filter(i => i.product_id === product.id)
    await removeWishItem(item.id)
    setOnWishlist(false)
  }
}
This function is where you use the wishlist actions from the wishlist context. If the item is not on the wishlist, you call the addWishItem action. Otherwise, you call the removeWishItem action.
To use this function, find the <h1> HTML element that renders the product's title and replaces it with the following code:
// Replace this line
<!-- <h1 className="font-semibold text-3xl">{product.title}</h1> -->

// with this
<div className="flex justify-between items-center">
  <h1 className="font-semibold text-3xl">{product.title}</h1>
  <button onClick={toggleWishlist}>
    <WishlistIcon fill={onWishlist} />
  </button>
</div>
You use the WishlistIcon to let customers know if that product is on the Wishlist or not. If the heart icon is outlined, that means the product is not on the Wishlist. Otherwise, if the icon is filled then the product is on the Wishlist.
Remember to import the WishlistIcon component at the beginning
import WishlistIcon from "../icons/wishlist"
Test Wishlist Button
Run your Gatsby Storefront if it’s not running and visit any product detail page. You should see the heart icon on the top-right of the product's info.
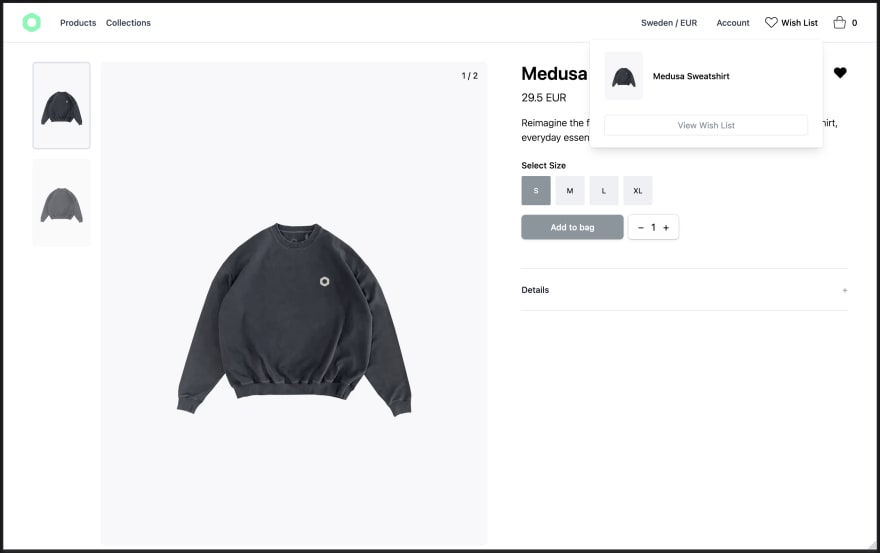
If you click on it, the addWishItem action is triggered, then the icon will change to black. In the wishlist popover, you should see the newly added item.
If you click on it again the removeWishItem action is called and the item is deleted from the wishlist.
Add Wishlist Listing Page
The last thing to do is to implement the wishlist page to see all the items added to the Wishlist and remove them from it.
Create the file src/components/wishlist/wishlist-item.jsx with the following content:
import React from "react"
import WishlistIcon from "../../icons/wishlist"
import { useWishlist } from "../../hooks/use-wishlist"
import RegionalLink from "../utility/regional-link"

const WishlistItem = ({ item }) => {
  const {
    actions: { removeWishItem },
  } = useWishlist()
  const { product } = item

  return (
    <div className="flex mb-6 last:mb-0">
      <div className="bg-ui rounded-md overflow-hidden mr-4 max-w-1/4">
        <img
          className="h-auto w-full object-cover"
          src={product.thumbnail}
          alt={product.title}
        />
      </div>
      <div className="flex text-sm flex-grow py-2 justify-between space-x-8">
        <RegionalLink to={product.handle} className="w-full">
          <div className="flex flex-col justify-between w-full hover:text-green-400">
            <div className="flex flex-col">
              <p className="font-semibold mb-4">{product.title}</p>
              <p>{product.description}</p>
            </div>
          </div>
        </RegionalLink>

        <div className="flex flex-col justify-between">
          <div className="flex justify-end w-full">
            <button onClick={async () => await removeWishItem(item.id)}>
              <WishlistIcon fill={true} />
            </button>
          </div>
        </div>
      </div>
    </div>
  )
}

export default WishlistItem
This component is responsible for rendering each wishlist item on the wishlist page. It shows the product's image, title, and description. It also has a button with the WishlistIcon component to call the removeWishItem action.
Next, create the file src/pages/wishlist.js with the following content:
import React from "react"
import SearchEngineOptimization from "../components/utility/seo"
import { useWishlist } from '../hooks/use-wishlist'
import WishlistItem from '../components/wishlist/wishlist-item'

const Wishlist = () => {
  const { wishlist } = useWishlist()

  return (
    <div className="layout-base">
      <SearchEngineOptimization title="Wishlist" />
      <div className="flex relative flex-col-reverse lg:flex-row mb-24">
        <div className="flex flex-col">
          <div className="mb-8">
            <h1 className="font-semibold text-4xl">Wish list</h1>
          </div>
          <div className="w-full grid grid-cols-2 gap-16">
            {wishlist.items.map(item => {
              return (
                <WishlistItem
                  key={item.id}
                  item={item}
                  currencyCode={wishlist.region?.currency_code || 'usd'}
                />
              )
            })}
          </div>
        </div>
      </div>
    </div>
  )
}

export default Wishlist
This page is straightforward. it gets the wishlist items from the wishlist object retrieved using the useWishlist hook and renders them on the page.
Test Wishlist Listing Page
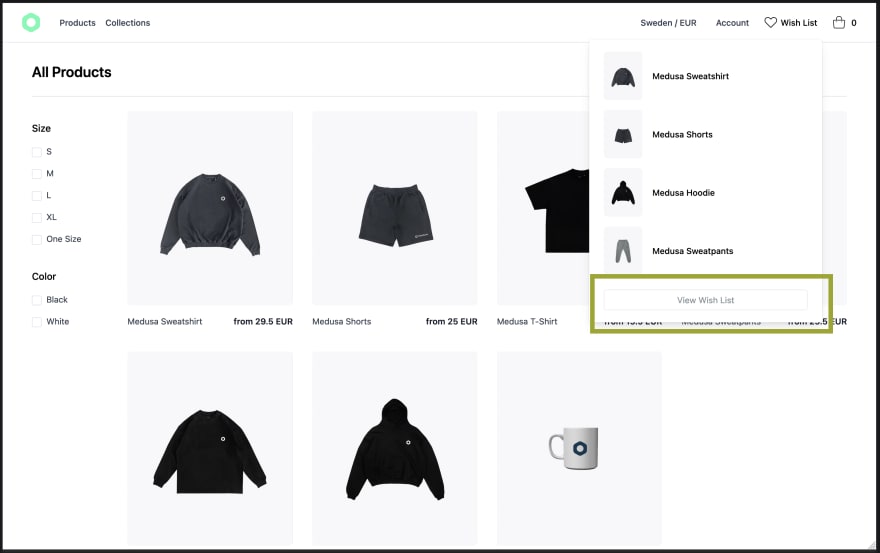
Re-run your Gatsby Storefront and try adding some products to the Wishlist. Once you have some products added, open the wishlist popover and then click on the View Wish List button.
You’ll then be redirected to the wishlist page where you can view all items in the wishlist.
If you click on the heart icon next to any of the products, the product gets removed from the wishlist. The wishlist popover will also be updated.
What’s next
There are more functionalities you can implement related to the wishlist:
- Allow moving items from the wishlist to the cart and vice versa.
- Allow logged-in customers to have multiple wishlists and update or delete them.
- Add notes to wishlist items.
You can also check out the following resources to dive more into Medusa's core:
- Learn how to add a subscriber in your Medusa server that listens to events to perform an action.
- Learn how to send notifications when an event occurs.
- Learn how to extract your wishlist functionality into a medusa plugin.
Should you have any issues or questions related to Medusa, then feel free to reach out to the Medusa team via Discord.

Posted on August 9, 2022
Join Our Newsletter. No Spam, Only the good stuff.
Sign up to receive the latest update from our blog.
