Learning Laravel 6 and VueJS for Javascript/NodeJS developer part 1 - getting Laravel running

Michael "lampe" Lazarski
Posted on October 13, 2019

One of the first full-stack web frameworks I worked with was Ruby on Rails. I still think to this day that it is a fantastic framework to work with as a developer. It extracts away a lot of pain for you. Do you need to add something to the database? No problem. You need to write a simple migration. Need an auth system? No problem, it is just one CLI command away. You don't know how to set up your project structure? No need to think about this. The framework already has the best practices for you!
Lately, in the web dev community, you can hear more and more about Laravel. People call it sometimes the Ruby on Rails of PHP. So in this series, we will together explore Laravel 6, and as our frontend framework, we will use VueJS.
Getting Laravel to run
Requierments
PHP
Laravel is written in PHP and needs PHP plus some extra extensions.
Here are the requirements for laravel 6.0
- PHP >= 7.2.
- BCMath PHP Extension
- Ctype PHP Extension
- JSON PHP Extension
- Mbstring PHP Extension
- OpenSSL PHP Extension
- PDO PHP Extension
- Tokenizer PHP Extension
- XML PHP Extension
In this tutorial, I will use Ubuntu since it is one of the favorite Linux distros, and you can easily install Ubuntu with WSL.
First lets add an ppa(of course we need a ppa it is Ubuntu ;) ).
sudo add-apt-repository ppa:ondrej/php ; sudo apt update ; sudo apt upgrade
Now that we have everything up to date let's install all the dependencies
sudo apt install php7.3-common php7.3-cli php7.3-bcmath php7.3-zip php7.3-gd php7.3-mysql php7.3-curl php7.3-mbstring php7.3-imap php7.3-xml php7.3-intl php7.3-mysql
MySql/MariaDB
You can either provide a Database in the cloud, or you can install one locally. We will install MariaDB on our Ubuntu system. For that, we need the following package.
sudo apt install mariadb-server mariadb-client
After that, we need to set up the database
sudo mysql_secure_installation
Please follow the instructions and remember all the logo credentials we will need them later
Now you need to start mariadb.
sudo service mysql start
Composer
Composer is a package manager for PHP, and it is used for creating new laravel projects and then managing PHP dependencies. So let's install it:
sudo apt install composer
Creating our first laravel application
Now that we have composer running, we need to install the global laravel installer. This will help us to create new projects with just one simple command line.
composer global require laravel/installer
We need to add the following line at the end of your ~/.bashrc.
Open the file with any editor you like and add the following line to it:
$HOME/.config/composer/vendor/bin
Now you either need to close and reopen your terminal or run this command
source .bashrc
Now you should have the laravel command at your fingertips.
laravel new Laragram
This will now take some time to download and install all the dependencies.
In the meantime, I will tell you what we will build here. So maybe you already have seen LaraGram in the composer command. If you now think we will create an Instagram clone, then you are right! The goal of this series is to have an Instagram like app with all the most essential features. Like sharing posts with picture uploads, following people, commenting under posts, and some more features. Okay, the command now should have finished, and you should have a new folder called LaraGram.
Starting our first laravel application
Now let's run our newly created application. Please make sure that your terminal is in the LaraGram folder and then run the following command:
php artisan serv
This should now start a server, and you should see the following message in your terminal:
Laravel development server started: http://127.0.0.1:8000
This means that you now can go to your favorite browser (It should be firefox ;) ) and enter the URL http://127.0.0.1:800 into the address bar. You should see now the default laravel page.
Creating a database for laravel
First, we need to edit one file in our laravel project. You need to find the file
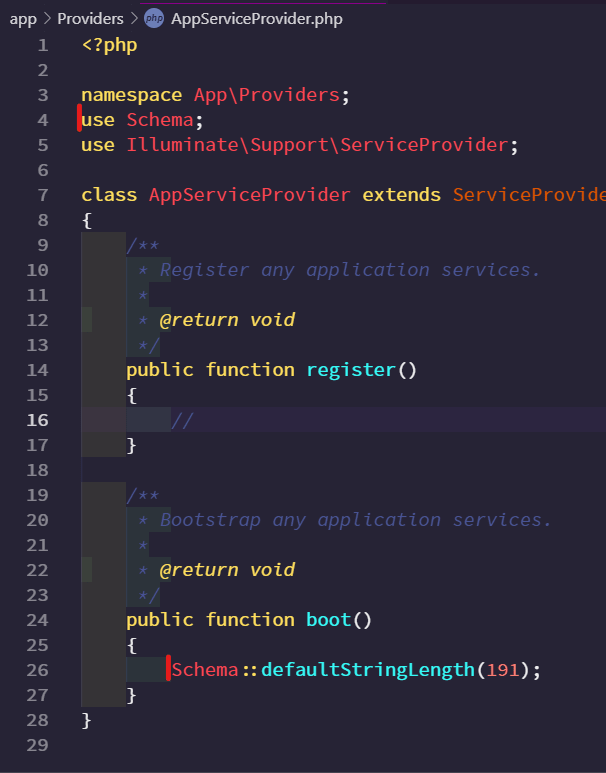
app->Providers->AppServiceProvider.php and add the following lines:
use Schema;

Schema::defaultStringLength(191);
Here is a picture of how it should look:

Now we can connect to mariadb:
sudo mysql -u <root or a user that can access the db> -p
And we can create the table
CREATE DATABASE laragram CHARACTER SET utf8mb4 COLLATE utf8mb4_unicode_ci;
USE laragram;
CREATE USER 'larauser'@'localhost' IDENTIFIED BY 'larapw';
GRANT ALL PRIVILEGES ON laragram.* To 'larauser'@'localhost' IDENTIFIED BY 'larapw';
EXIT;
This will create a database called 'laragram' with a user called 'larauser' and the password 'larapw'.
Let's see if laravel can now talk to our database. First, stop the server with CTRL+c and then run the following command:
php artisan migrate
This command tells laravel to run the migrations that the framework creates by default for us.
If everything is okay, it should like in the image above.
Setting up vue.js
First, we need to tell laravel to use vuejs
php artisan preset vue
Now we only need two more steps to get our frontend running.
npm install
This will install the npm dependencies. If everything is fine, we can now run our frontend.
npm run dev
or
npm run watch
The first command will build the frontend once, and the second will run forever and rebuild the frontend when you save a file.
Now we have everything set up and ready to work on our Instagram clone!
We will start with this in part 2! So don't forget to follow to get an alert when the next part is released!
👋Say Hallo! Instagram | Twitter | LinkedIn | Medium | Twitch | YouTube

Posted on October 13, 2019
Join Our Newsletter. No Spam, Only the good stuff.
Sign up to receive the latest update from our blog.
Related

October 13, 2019


