Deploy Node.js to EC2

Konstantin Stanmeyer
Posted on February 10, 2023

Setting up an environment to use for both development and production on a cloud server can especially useful for remote teams and testing purposes.
This blog will explain how to initialize an Ubuntu instance within an EC2 virtual machine, with an end goal of creating somewhat of a "sandbox" to clone Github repositories. It will also allow us to open endpoints to this server and utilize running api's or applications.
First, here is some basic code for a test application to run within the deployed EC2 instance:
// ./app.js

import express from 'express';

const app = express();

app.get('/', (req, res) => res.json({ message: "App works!" }));

app.listen(3000, () => console.log("Server is running!"));
Now, with a working application, ensure that it is pushed to a Github repository, like so:
git init
git add .
git commit -m "first commit"
git remote add origin https://github.com/githubusername/example.git
git push -u origin main
Our next stop is to set up our EC2 instance. Assuming you have an AWS account set up, navigate to the EC2 dashboard.
IMPORTANT: Make sure you remember which region you are set within. For example, I set mine up to be hosted in Ohio so the small menu in the top-right of my page looks like so:
Here, the EC2 dashboard should display a menu like so:
Below that menu, select the "Launch Instance" button, which will bring you to a separate launch page.
Provide a name for your instance and select "Ubuntu" as the OS Image.
The outlined area shows the free tier option if you would like to run the server with no charges, but depending on your application you may prefer a different image.
Next, the security fields must be set up to SSH into our machine. Just below the tier options, create a new key-pair with the following options:
This will save a .pem file (or potentially .cer), which should be saved in an easy-to-remember folder within your computer. We will later navigate to the folder where this key resides to to SSH.
For simplicity I've allowed SSH traffic from any IP address, but this can allow specified access. The "Network Settings" section should look like so:
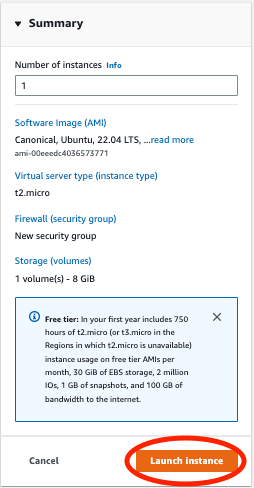
Keep the "Configure Storage" section as default, and select "Launch instance":
Navigate back to the EC2 dashboard, and select the instances option. Now, you should see your new Ubuntu machine running:
Select the instance's checkbox, and select the "Connect" option near the top right of the dashboard:
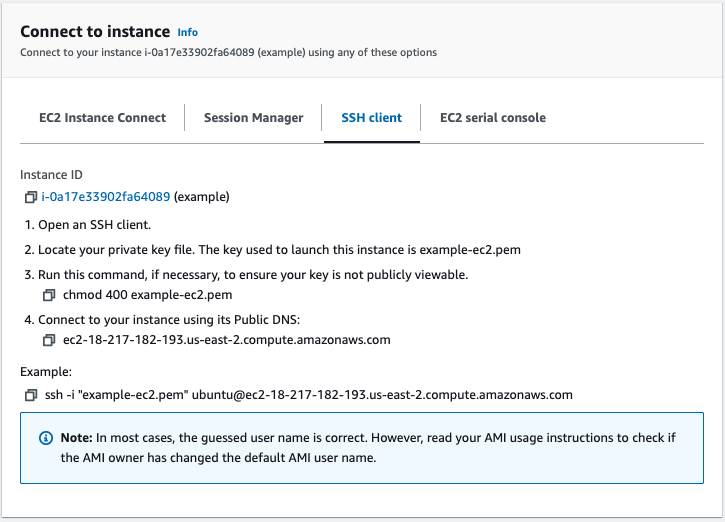
Make sure you're on the SSH tab, we will follow the steps listed:
Navigate to the folder where the access key was placed on our local computer. Within that folder, using a terminal, we must make sure our key is not "publically viewable" and run this command, from the third step(key is placed within my desktop folder for this example):
cd Desktop
chmod 400 example-ec2.pem
Which will return nothing, but we will then run the example SSH command:
Type "yes", and you will now be within your instance:
To allow us to run a Node application, we have to set up and install a few things. First, cURL will let us to download external packages and data:
sudo apt-get install curl
Node will be the next step, using setup code made from this open-source repository (can also choose a different version of Node/npm):
curl -sL https://deb.nodesource.com/setup_16.x | sudo -E bash -
Which will prompt us for a further command:
sudo apt-get install nodejs
One last package must be installed, being PM2, which will allow us to execute a command that keeps a defined process running, even after closing out of the SSH terminal. You can also use other tools like Screen if you'd prefer to avoid further downloads, built into Lunix.
sudo npm install -g pm2@latest
Clone your Github repository now:
git clone https://github.com/githubusername/example.git
Then run a pm2 command to start the process:
pm2 start example
It should be running within the machine now! You can monitor current processes within pm2 by typing:
pm2 list
With the application running, we need to allow our EC2 instance to expose the port the application is running on. We can navigate to the EC2 instance dashboard, and select the box for our current application. Below, now, we can see the security options like so:
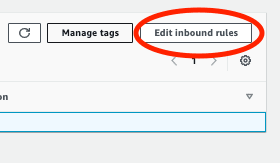
Select the option below "Security Groups", bringing you to the group's page, and click the "Edit inbound rules" button:
There should be the existing rule for SSH traffic, but select "Add rule", and fill out a new rule for Custom TCP traffic, within a port range you set in your application (this example used port 3000), along with allowing all IPs to access the ports:
Now, with your server still running, you should be able to visit your public IP, which you can find in the your running instance's menu:
Put the port your application is currently on, and it should be fully functional, returning all the data and handling all the requests you need!
The processes can be monitored by SSH'ing into the EC2 instance, and running pm2 list to check what's still running. You can stop these applications by typing pm2 stop <application name>.
.env Variables
To create an env file, cd into your project while SSH'ed into your instance, then run:
sudo touch .env
Editing the file can be done by running:
sudo nano .env
Save your edited content with control + S and exit with control + x.
NGINX
When using a domain/IP, we'd like to avoid having to request the exact port the process is running on. NGINX gives us the ability to reverse-proxy requests to a process on port 3000, while requesting from PORT 80(HTTP-traffic).
From the root of your instance, enter this command to create and edit a configuration file:
sudo nano /etc/nginx/conf.d/my-app.conf
Then, within that file, we can define the port in which our application is running, as well as where we'd like our NGINX server to listen from.
server {
    listen 80;
    server_name 242.19.227.100;
    # w/ domain it would be www.example.com

    location / {
        proxy_pass http://127.0.0.1:3000/;
    }
}
control + S + control + x
Restart the service with our updated configuration:
sudo service nginx restart
Now, the address you sending requests to has a domain like this:
// before

242.19.227.100:3000/

// after

242.19.227.100/
This setup allows you to push further changes to your Github repository, then update your running server with a simple SSH into it and pull command.
Thanks for reading!

Posted on February 10, 2023
Join Our Newsletter. No Spam, Only the good stuff.
Sign up to receive the latest update from our blog.


