Kate Naylor
Posted on March 18, 2020
I recently got this question from a friend of mine, and the first thing I thought about was dbForge Studio for MySQL. So, I quickly wrote a detailed instruction, and posting it here, as it may be useful to someone else.
First of all, let’s consider a set of files. These are sourced from the City of Los Angeles Open Data Portal and contains anonymized data on service calls made by the public to the Los Angeles Police Department.Each file contains a year’s worth of data.
Each file has a set of fields:
- A unique incident number
- Area where the incident occurred
- District where it was reported from
- Date of dispatch
- Dispatch time
- A call type code
- Call type description
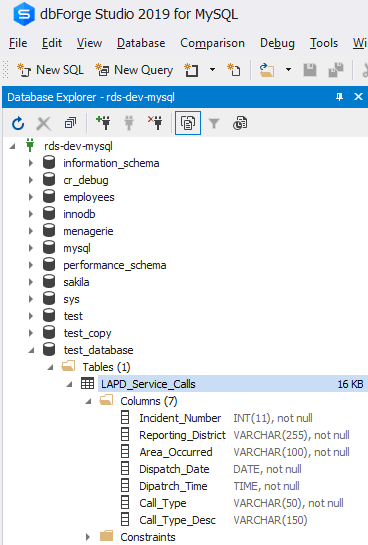
We have created a table called LAPD_Service_Calls with these fields in a test database:
To load a single data file, we can right click on the table and select “Import Data…” from the context menu:
This starts the Import Data wizard. We select the CSV file option and choose the source file and then click “Next”.
In the “Destination” screen, we have the database and the table already selected, so we click “Next”:
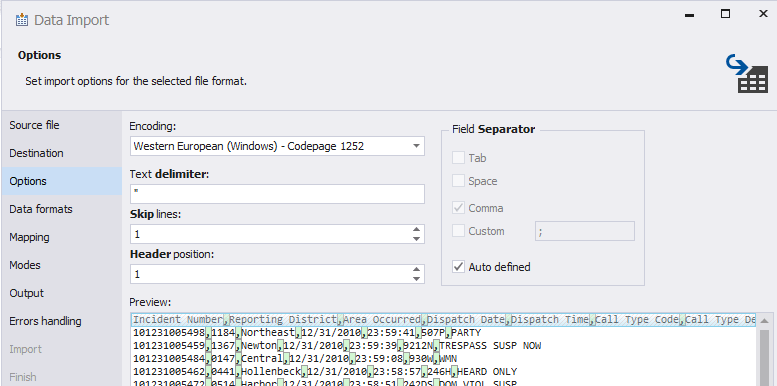
In the “Options” screen, we are not changing any of the options already selected for us. dbForge Studio for MySQL is smart enough to read the file, determine the header row, field separators etc. We click “Next”:
We leave the “Data formats” screen as is, and click “Next”:
In the next screen, we accept the mapping already defined and click “Next”:
In the next screen, we accept the append-only and bulk insert mode of loading and click “Next”:
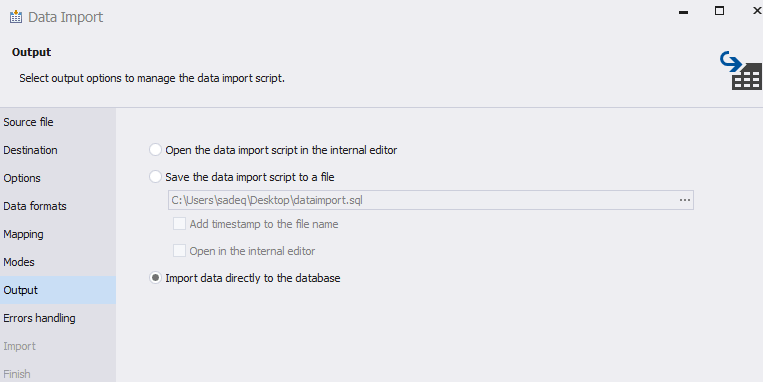
In the “Output” screen, we keep the option to import data directly into the database and click “Next”:
In the “Errors handling” screen, we select the option to abort the load after the first error:
We can now click the “Import” button to start importing the selected file. But we don’t want to load a single file - we want to load all the files.
Most MySQL GUI tools will not have an answer for this scenario - but dbForge Studio for MySQL does. And this is possible through something called a “template”. Basically, a dbForge Studio data import or export template is a file that holds all the options you have chosen in the wizard. You can call this template from the dbForge Studio command line tool and pass it each data file name as an input parameter.
To create the template, we select the down arrow key beside the “Save” button in the final screen,
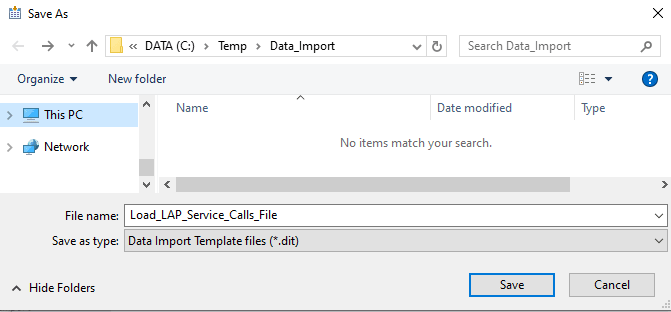
and select “Save Template…” from the context menu. This will allow us to save the options as a Data Import Template (.DIT) file. Here, we are saving it in the same folder as the data files:
Next, we write a small batch file like the one shown below, and save it in the data folder as well.
echo off

set data_path="C:\Temp\Data_Import\*.csv"
dir /b /s %data_path% > load_file_list.txt


set apppath="C:\Program Files\Devart\dbForge Studio for MySQL\dbforgemysql.com"


if ERRORLEVEL 0 @(
echo on
for /F %%i in (load_file_list.txt) do @(
%apppath% /dataimport /templatefile:Load_LAP_Service_Calls_File.dit /inputfile:"%%i"
)
)
del load_file_list.txt
Here, we are calling a Windows directory command to get a list of the source data files and saving the output in a plain text file (load_file_list.txt). We then set the app path to the dbForge Studio for MySQL’s command line utility. Next, we start reading the file. For each source file name and path listed, we are calling dbForge Studio for MySQL’s command line tool and passing it the data import option (/dataimport). We are also specifying the template file to use (/templatefile:). In this case, it is the template file we created before. The final parameter is the input file for the template (/inputfile). We are passing the data file name here.
We then run the batch file from the command prompt. The output will show data being loaded. After several minutes, all files are successfully loaded:
C:\Temp\Data_Import>data_import.bat

C:\Temp\Data_Import>echo off
=====================================================================Devart dbForge Studio 2019 for MySQL version 8.1.45.0
Copyright 2020 Devart. All rights reserved.
=====================================================================

Data import started at: 15/01/2020 10:00:32 PM

Import mode: Append

Importing data from LAPD_Calls_for_Service_2010.csv to table test_database.LAPD_Service_Calls:
916240 rows imported, 100%

Data import finished at: 15/01/2020 10:03:58 PM
=====================================================================
Devart dbForge Studio 2019 for MySQL version 8.1.45.0
Copyright 2020 Devart. All rights reserved.
=====================================================================

Data import started at: 15/01/2020 10:04:03 PM

Import mode: Append

Importing data from LAPD_Calls_for_Service_2011.csv to table test_database.LAPD_Service_Calls:
891376 rows imported, 100%

Data import finished at: 15/01/2020 10:07:23 PM
…
…
…

=====================================================================
Devart dbForge Studio 2019 for MySQL version 8.1.45.0
Copyright 2020 Devart. All rights reserved.
=====================================================================

Data import started at: 15/01/2020 10:33:25 PM

Import mode: Append

Importing data from LAPD_Calls_for_Service_2019.csv to table test_database.LAPD_Service_Calls:
2059515 rows imported, 100%

Data import finished at: 15/01/2020 10:40:25 PM
As we just saw, dbForge Studio for MySQL successfully bulk-loaded data from a number of files into a target table with very minimal effort.

Posted on March 18, 2020
Join Our Newsletter. No Spam, Only the good stuff.
Sign up to receive the latest update from our blog.


