How To Deploy Open Web Components to Heroku

jur erick
Posted on June 4, 2022

Prerequisite
This post assume you got the prerequisite items below:
- Your app is scaffolded using the Open Web Components generator. and...
- You already have your open-wc application working in your local machine.
- You are now ready to deploy your application to Heroku.
- You like using Github.
Building
The goal right now is to generate the static files of your application. The complete steps in doing this can be found in open-wc website's rollup page.
For our convenience, listed below are items necessary for this basic deployment.
1. Install rollup packages.
npm i -D rollup @open-wc/building-rollup rimraf deepmerge es-dev-server
2. Create a rollup.config.js file in the root folder of your app.
import merge from 'deepmerge';
import { createSpaConfig } from '@open-wc/building-rollup';

const baseConfig = createSpaConfig({
  developmentMode: process.env.ROLLUP_WATCH === 'true',
  injectServiceWorker: false,
});

export default merge(baseConfig, {
  input: './index.html'
});
3. Add the following NPM scripts to your package.json
{
  "scripts": {
    "build": "rimraf dist && rollup -c rollup.config.js",
    "start:build": "npm run build && es-dev-server --root-dir dist --app-index index.html --compatibility none --open"
  }
}
4. Run npm run build command.
This will generate a dist folder that will contain the optimized static files of our project.

5. Breath, sip your coffee. Succeeding steps below are easy too!
Github
Oh you like Github huh! Luckily, Heroku has the deployment method that connects your Github repository and allow you to manually (or automatically) deploy your application. We'll see that in a bit.
From this point, we will focus on the dist folder alone and it's contents. We aim to deploy this in Heroku.
1. http-server
cd to your dist folder and let's install the http-server package.
npm install http-server
2. package.json
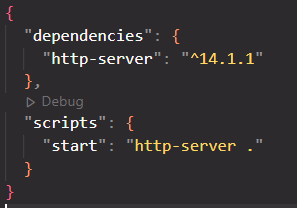
Make sure there are scripts section in your package.json file of the dist folder. The package.json content should be similar to this:

3. git push
push to your Github. Still in your dist folder, run the commands below.
git init
git remote add origin https://github.com/[yourname]/[yourrepository.git]
git branch -M master
git push -u origin master
After this successful pushed to Github, let's go now to Heroku.
Deploy
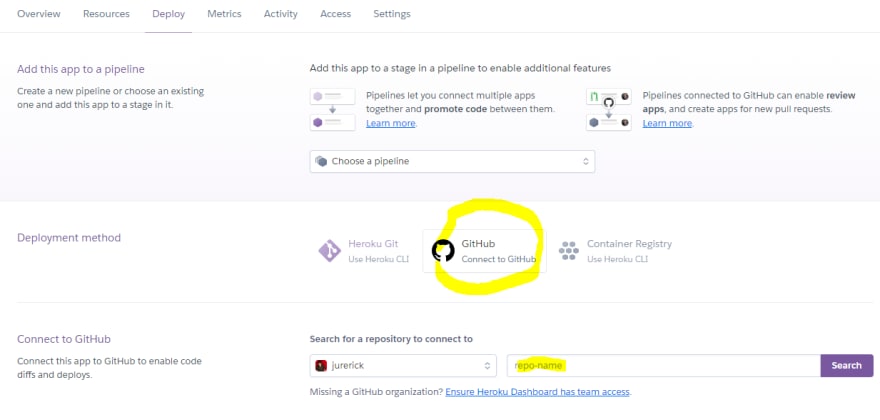
In your Heroku application page, go to the Deploy page. Down below is the Deployment method section.
- Choose Github.
- Search your repo name..
- and Connect!
Once connected, click deploy button in Manual deploy section below the page.

After the Heroku's build process, You should now be able to visit your application via Heroku's generated url.

Posted on June 4, 2022
Join Our Newsletter. No Spam, Only the good stuff.
Sign up to receive the latest update from our blog.
