How to successfully manage a large scale JavaScript monorepo aka megarepo

Jonathan Creamer
Posted on December 3, 2019
First off, this is a follow up to a post I did recently!
Say bye to monorepos say hello to megarepos
tldr; of the previous post is, when switching from a monolith to a monorepo, call it a megarepo instead...
Rather than a Death Star sized monolith which is prone to weakness with a single proton torpedo, prefer a megarepo , a force of specialized ships and pilots, which when working in concert together, can turn the tides of the galaxy.
Tools for managing a megarepo
There are many tools already in the wild for managing a megarepo. They handle things like running scripts against each package, deploying packages to NPM, determining which packages have changed, etc.
Each has its own pros and cons as all tools do. The particular tool we'll discuss going forward in this post is Bolt.
Bolt
Bolt and lerna were both created by the same folks. Bolt was just an iteration on a lot of the ideas lerna had, but with a few deviations.
Bolt is installed as a global module as well
npm i -g bolt
# or
yarn add global bolt
Bolt is meant to be even more of a "project" based, and is actually kind of a wrapper around Yarn and Yarn Workspaces.
It also locks the dependencies of the shared packages. Meaning, a single version of React, or React Router, etc is installed across all of the packages in the megarepo. There are a few reasons why this is done.
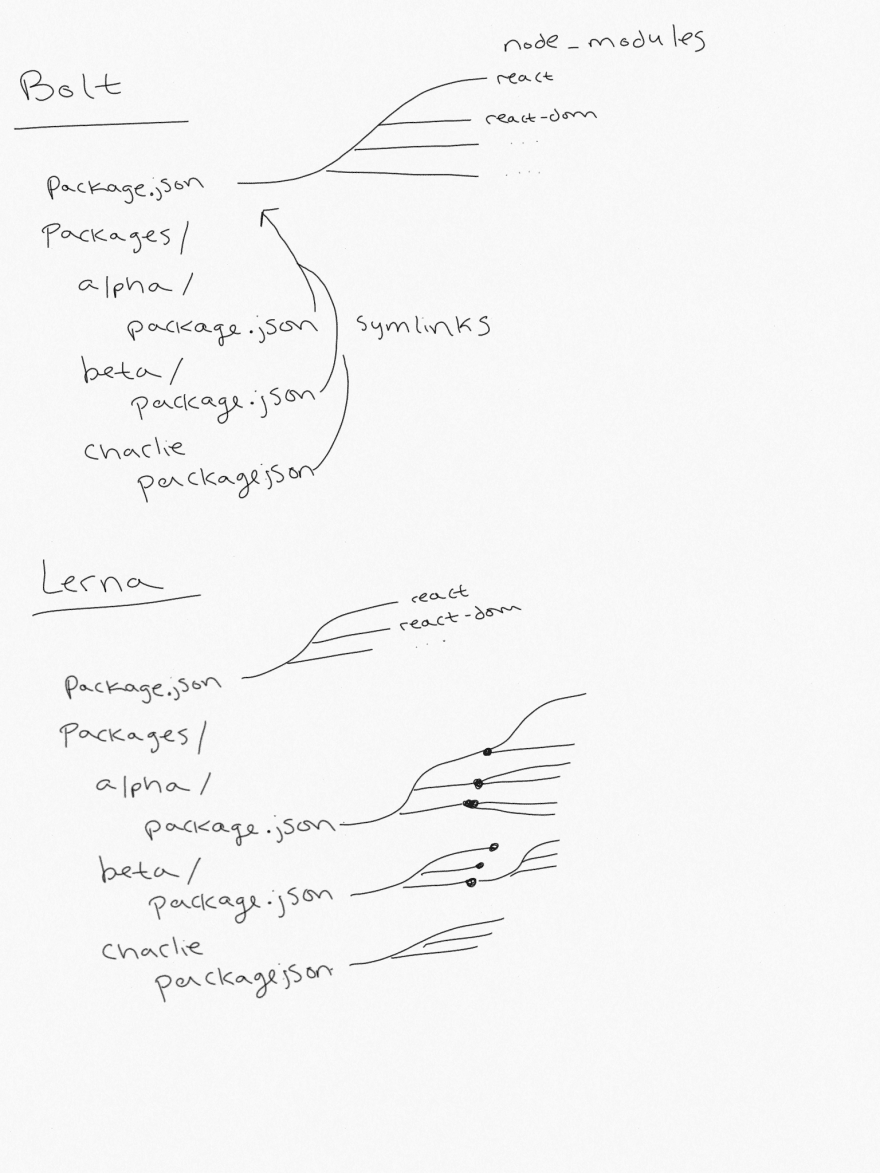
In a bolt megarepo, unlike lerna, when you add a project to a package, it is also automatically added to the top level package.json. This makes installs a bit quicker and easier as you won't ever have forked dependencies like you can in Lerna.
The above diagram illustrates how allowing packages to have differing versions of pacakges can cause the nested node_modules directories to fork in many different places. This bloats the repo size as well as complexity of maintenance, and overall yarn install times.
This also makes running the megarepo with Docker a bit less trivial as well
FROM node:12

WORKDIR /code

COPY package.json yarn.lock ./
RUN yarn

RUN npm i -g bolt

COPY . .

RUN bolt
With lerna and other monorepo tools, you have to constantly add new lines like...
COPY ./packages/alpha/package.json /code/packages/alpha/package.json
COPY ./packages/beta/package.json /code/packages/beta/package.json
COPY ./packages/charlie/package.json /code/packages/charlie/package.json
But, since bolt has all the dependencies of every package listed at the top level, it's much simpler and faster to install all the dependencies.
It also makes testing upgrades easier because the internal dependency graph of bolt makes it to where testing upgrades across packages is very simple. You can bump a package, run the tests and see how you're upgrade affects other parts of the megraepo.
Structure of a megarepo
Here is an example project...
[
jcreamer898/bolt-demo
Repo for demonstrating how to build a bolt megarepo - jcreamer898/bolt-demo
](https://github.com/jcreamer898/bolt-demo)
Most of the megarepo tools have similar ideas about how to structure themselves. In general there's a top level package.json folder, and a packages directory.
At least in the case of working with bolt and lerna.
For lerna, a lerna.json file is created which contains a tiny bit of config for setting which packages are a part of the
And with bolt the configuration is done in the package.json.
{
  "name": "rebel-alliance",
  "private": true,
  "bolt": {
    "workspaces": [
      "./packages/*/*"
    ]
  },
  "dependencies": {
    "react": "^16.12.0",
    "react-dom": "^16.12.0"
  }
}
See in the above how react in each package is just a symlink to the top level node_modules directory.
Creating shared tooling
One of the major benefits of having a megarepo is the ability to have one set of tooling which builds, tests, and deploys every package.
It takes the worry out of having to configure all of our mountains of front end code across multiple repos.
To get started...
Create a build directory and add it to the bolt section of the package.json
"bolt": {
    "workspaces": [
      "./packages/*/*",
      "./build/*"
    ]
  },
Let's create a builder project called hoth in ./build/hoth. We'll also use a library called scritch to help us create a super easy CLI...
[
scritch
A small CLI to help you write sharable scripts for your team

](https://www.npmjs.com/package/scritch)
Transpiling with Babel
Babel is undoubtedly going to be the first thing we need in our project. So, in hoth, add a few things...
First, a package.json...
{
    "name": "@rebels/hoth",
    "version": "1.0.0",
    "dependencies": {
        "@babel/cli": "^7.7.0",
        "@babel/core": "^7.7.2",
        "@babel/plugin-proposal-class-properties": "^7.7.0",
        "@babel/plugin-syntax-dynamic-import": "^7.2.0",
        "@babel/preset-env": "^7.7.1",
        "@babel/preset-react": "^7.7.0",
        "@babel/preset-typescript": "^7.7.2",
        "scritch": "^1.3.1"
    }
}
Add a cli.js file...
#!/usr/bin/env node
require("scritch")(__dirname);
Scritch will scan the scripts directory and auto generate a CLI.
Then a scripts directory with a babel.sh script in it...
#!/usr/bin/env bash

set -e

bolt workspaces exec \
    --parallel-nodes \
    -- \
    babel \
        --extensions .ts,.tsx,.js,.jsx \
        --root-mode upward \
        --source-maps true \
        -Dd dist \
        src
Don't forget to chmod +x ./build/hoth/scripts/babel.sh as well as the cli.js too. This is to make these scripts executable. Make sure and always do that for any new script added.
This will run babel in every workspace in parallel.
Then let's create a src/configs directory in hoth, and add babel.js
module.exports = {
    presets: [
        [
            '@babel/env',
            {
                targets: {
                    browsers: ['last 2 versions'],
                },
            },
        ],
        '@babel/react',
        '@babel/typescript',
    ],
    plugins: [
        '@babel/proposal-class-properties',
        '@babel/plugin-syntax-dynamic-import',
    ],
};
Next, since we are placing these config files in a package, we have to add some top level files that point to these...
// babel.config.js
module.exports = require('./build/hoth/src/configs/babel');
One more thing to make life easy is, you can hop up to the top level package.json and add...
"scripts": {
    "hoth": "./build/hoth/cli.js",
    "build": "yarn hoth babel"
},
Now, what you can do is...
> bolt hoth
> bolt build
bolt hoth will run scritch to tell you what all scripts you have available, and bolt build will run the babel.js script to run babel in every package.
We're well on our way now!
Since we're using the @rebels scope, we'll need to make sure that babel knows how to properly resolve that scope.
Let's say we add a new package called @rebels/endor for shared utils,
const resolver = {
    root: ['.'],
    alias: {
        '@rebels/alpha': './packages/theme-two/endor/src',
        '@rebels/beta': './packages/theme-three/endor/src',
        '@rebels/charlie': './packages/theme-one/charlie/src',
        '@rebels/endor': './packages/theme-one/endor/src',
    },
};

module.exports = {
    presets: [
        [
            '@babel/env',
            {
                targets: {
                    browsers: ['last 2 versions'],
                },
            },
        ],
        '@babel/react',
        '@babel/typescript',
    ],
    plugins: [
        '@babel/proposal-class-properties',
        '@babel/plugin-syntax-dynamic-import',
        ['module-resolver', resolver],
    ],
};
The alias piece could be configured to be dynamic as well by reading in all the packages and setting them up with so packages aren't manually added.
The premise here though is the resolver will at compile time swap @rebels/endor or any of the packages for its actual location on the file system at transpile time. This is mostly used for local development as ideally during a production build you'll run the bolt build step anyways. So, you can consider wrapping the resolver stuff up in a check for local dev or not.
Prettier
Let's add a format script which will run prettier on everything because who wants to format their code anyways. Add a prettier.js to the configs folder.
module.exports = {
    tabWidth: 4,
    arrowParens: 'always',
    trailingComma: 'all',
    proseWrap: 'always',
    singleQuote: true,
    overrides: [
        {
            files: '**/package.json',
            options: {
                tabWidth: 2,
            },
        },
    ],
};
And add the prettier.js at the root of the project...
// prettier.config.js
module.exports = require('./build/hoth/src/configs/prettier');
You can add dependencies just like you would with yarn.
bolt workspace @rebels/hoth add prettier
Now we'll add another script to ./build/hoth/scripts.
#!/usr/bin/env bash

set -e

prettier --write ' **/src/** /*.{ts,tsx,js}'
Now you can run...
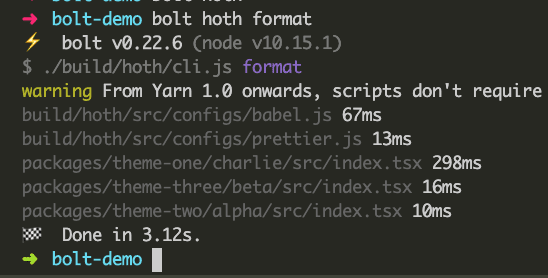
bolt hoth format
Which will format all the code in the repo.
You can continue adding more and more scripts to the CLI as needed for you and your team.
Typescript
We're relying on the @babel/preset-typescript to remove the types from the .ts files as shown in the babel config previously. We'll use typescript itself with noEmit: true to only do type checking.
We can setup typescript type checking by adding a tsconfig.json in our configs directory, and linking it at the top level like with babel and prettier.
For TypeScript we first run bolt w @rebels/hoth add typescript, and then add a ./build/hoth/src/configs/tsconfig.json...
{
    "exclude": [" **/node_modules/**", " **/test/**"],
    "compilerOptions": {
        "target": "es5",
        "module": "commonjs",
        "lib": ["dom", "es2015"],
        "jsx": "react",
        "outDir": "./dist",
        "noEmit": true,
        "downlevelIteration": true,
        "strict": true,
        "moduleResolution": "node",
        "esModuleInterop": true
    }
}
And at the top level add a tsconfig...
{
    "compilerOptions": {
        "resolveJsonModule": true,
        "paths": {
            "@rebels/alpha": ["packages/theme-one/alpha/src/index"],
            "@rebels/beta": ["packages/theme-one/beta/src/index"],
            "@rebels/charlie": ["packages/theme-one/charlie/src/index"]
        },
        "baseUrl": ".",
        "rootDir": "."
    },
    "extends": "./build/hoth/src/tsconfig.json",
    "include": ["./types/ **/*", "./packages/** /*", "build/**/*"]
}
In here you can see we've also specified some paths. This will help TypeScript know what the @rebels prefix points to.
Now we can add a typecheck.sh script into the cli...
#!/usr/bin/env bash

set -e

tsc
The final thing to make sure we have installed is the @types/react package.
bolt w @rebels/alpha add @types/react
bolt w @rebels/beta add @types/react
bolt w @rebels/charlie add @types/react
Now running bolt hoth typecheck will perform ONLY typechecking.
Jest
Setting up jest requires a few additional config files, but nothing we can't handle.
Add a ./build/hoth/src/configs/jest.js file...
module.exports = {
    resolver: require.resolve('./jest/resolver.js'),
    testPathIgnorePatterns: ['dist'],
    moduleFileExtensions: ['ts', 'tsx', 'js', 'jsx', 'json'],
    transform: {
        '^.+\\.(js|jsx|ts|tsx)$': require.resolve('./jest/transformer.js'),
    },
};
And a ./build/hoth/src/configs/jest/transformer.js
const babelJest = require('babel-jest');

module.exports = babelJest.createTransformer({
    configFile: './babel.config.js',
});
The resolver is where things get interesting...
Let's say in the future you have a package which imports another package.
import { ewoks } from "@rebels/endor";
Well, jest will look in the dist folder of @rebels/endor . That's not good...
So, we can use jest-enhanced-resolve to update the mainFields for where to find source code during imports.
'use strict';

let createResolve = require('jest-enhanced-resolve').default;

let resolve = createResolve({
    mainFields: ['rebels:source', 'main'],
    extensions: ['.js', '.jsx', '.ts', '.tsx'],
});

function resolver(modulePath, opts) {
    return resolve(modulePath, opts);
}

module.exports = resolver;
Then just make sure to add "rebels:source": "./src/index.ts" in all the package.json files.
The final thing is to add your test.sh script..
#!/usr/bin/env bash

set -e

jest
Now you can run bolt hoth test or add it to the "scripts" block to simply do bolt test.
Wrapping up
This is all just the start of working with a megarepo! There's so many more things you can add. Webpack, a development server, versioning the packages, etc. All things to keep an eye out for in future posts.

Posted on December 3, 2019
Join Our Newsletter. No Spam, Only the good stuff.
Sign up to receive the latest update from our blog.


