Jason C
Posted on May 12, 2020

Welcome to the sixth article in this series. In the last article we built a Vue PWA. Way back in Part 3 we talked about sending commands from the cloud to the bot. Now let's wire up the web app to these Particle Cloud Functions.
Particle Cloud API
First, I had to setup an access token to the Particle Cloud API. This will allow me to make http calls to Particle, and they will handle sending the commands to my device.
We'll grab the Particle CLI and login:
$ npm install -g particle-cli
$ particle login
Now that the CLI is connect to a particle account we can create a token:
particle token create --never-expires
We can now make http calls in this format:
curl https://api.particle.io/v1/devices/{Device Id}/{Function Name} \
     -d args={Function Arg} \
     -d access_token={Token}
Azure Function to Send Commands
We could use the Particle JavaScript SDK, but I'd rather build this logic in the Azure Functions backend we creating in Part 4.
[FunctionName("SensorData_SendCommand")]
public static async Task<HttpResponseMessage> SendCommand(
    [HttpTrigger(AuthorizationLevel.Function, "post", Route = "SensorData/SendCommand")] HttpRequestMessage req,
    ILogger logger
    )
{
    var incomingValues = await req.Content.ReadAsAsync<CommandMessage>();
    var command = incomingValues?.Command;
    if (string.IsNullOrWhiteSpace(command)) return req.CreateResponse(System.Net.HttpStatusCode.BadRequest, "Missing Command");


    var deviceId = Environment.GetEnvironmentVariable("Particle_DeviceId");
    var accessToken = Environment.GetEnvironmentVariable("Particle_AccessToken");
    var url = $"https://api.particle.io/v1/devices/{deviceId}/sendCommand";

    var client = new HttpClient();
    var values = new Dictionary<string, string> { { "access_token", accessToken }, { "args", command } };
    var content = new FormUrlEncodedContent(values);
    var response = await client.PostAsync(url, content);
    var result = await response.Content.ReadAsStringAsync();
    return req.CreateResponse(result);

}
One important thing to note, this HttpTrigger uses AuthorizationLevel.Function, this means calls need to send a key either in the query string or x-functions-key header. Mainly because I don't went you script kitties turning my pump on and off :-)
The rest of the code should be pretty self-explanatory. Read the incoming request to see which command is being sent, grab our device ID and Particle Token from environment variables, then make an HTTP post to Particle Cloud.
When everything is configured correctly we can now send commands to the device from Azure! Right now this is basically just a pass through, but I have plans to use an Azure TimeTigger later to only run my pump part of the day to save energy.
Vue Controls Screen
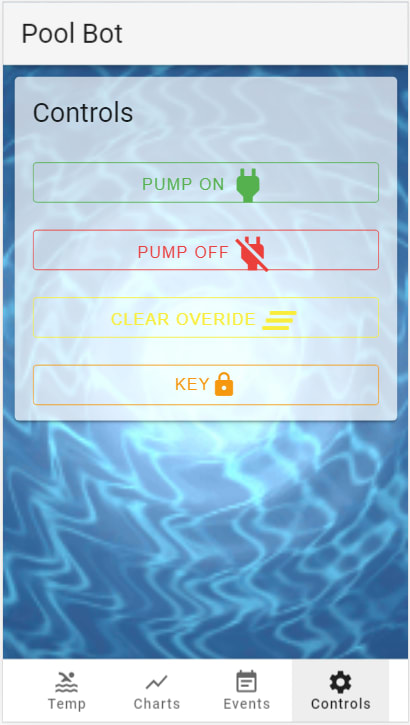
Let's build a little Vue component to control the Pump remotely!
<template>
  <div class="controls">
    <div>
      <v-card>
        <v-card-title>
          <h2 class="headline">Controls</h2>
        </v-card-title>

        <v-list-item>
          <v-list-item-content>
            <v-btn @click="sendCommand('+')" color="green" outlined>
              <span>Pump ON</span>
              <v-icon x-large>power</v-icon>
            </v-btn>
          </v-list-item-content>
        </v-list-item>
        <v-list-item>
          <v-list-item-content>
            <v-btn @click="sendCommand('-')" color="red" outlined>
              <span>Pump OFF</span>
              <v-icon x-large>power_off</v-icon>
            </v-btn>
          </v-list-item-content>
        </v-list-item>
        <v-list-item>
          <v-list-item-content>
            <v-btn @click="sendCommand('!')" color="yellow" outlined>
              <span>Clear Override</span>
              <v-icon x-large>clear_all</v-icon>
            </v-btn>
          </v-list-item-content>
        </v-list-item>
        <v-list-item>
          <v-list-item-content>
            <v-bottom-sheet v-model="openPassPanel">
              <template v-slot:activator="{ on }">
                <v-btn color="orange" v-on="on" outlined>
                  <span>Key</span>
                  <v-icon>lock</v-icon>
                </v-btn>
              </template>
              <v-sheet class="text-center" height="200px">
                <v-card>
                  <v-card-title>
                    <h2>Security Key</h2>
                  </v-card-title>

                  <v-card-text>
                    <v-form>
                      <v-text-field v-model="functionKey" label="Key" type="password" required></v-text-field>
                      <v-btn class="mx-2 float-right" large color="blue" @click="save">
                        <v-icon dark>mdi-content-save</v-icon>
                        <span>Save</span>
                      </v-btn>
                      <br />
                      <br />
                    </v-form>
                  </v-card-text>
                </v-card>
              </v-sheet>
            </v-bottom-sheet>
          </v-list-item-content>
        </v-list-item>
      </v-card>
    </div>
  </div>
</template>

<script>
export default {
  data() {
    return {
      openPassPanel: false,
      functionKey: localStorage.getItem("functionKey") || ""
    };
  },
  computed: {},
  mounted() {},
  beforeDestroy() {},
  methods: {
    sendCommand(cmd) {
      if (!this.functionKey) {
        this.openPassPanel = true;
        return;
      }
      this.$http
        .post(
          "SensorData/sendCommand",
          { Command: cmd },
          { headers: { "x-functions-key": this.functionKey } }
        )
        .then(response => {
          console.log(response);
        });
    },
    save() {
      localStorage.setItem("functionKey", this.functionKey);
      this.openPassPanel = false;
    }
  },
  components: {}
};
</script>
The above is just a list of buttons that call the sendCommand function passing different values. 
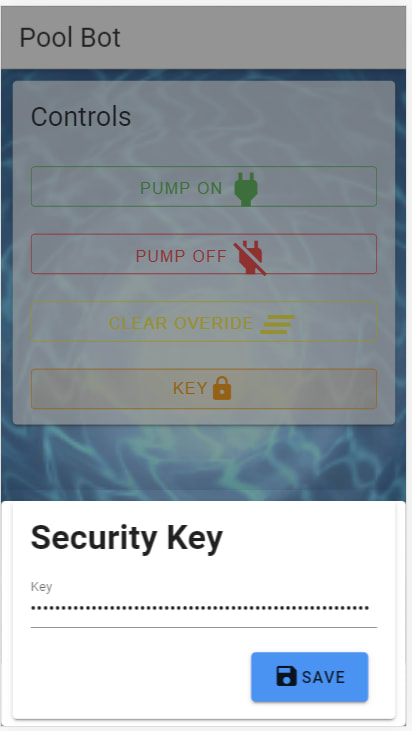
Since we secured the azure function we'll need to pass the x-functions-key header. For now I just throw together a Bottom Sheet that will allow us to enter a function key that we'll store in localstorage. 
And just in case I don't have my phone near the pool, I added hardware buttons to the pool bot to do these actions too!

Posted on May 12, 2020
Join Our Newsletter. No Spam, Only the good stuff.
Sign up to receive the latest update from our blog.