Angular polyfill strategies

Fabrizio Fortunato
Posted on November 15, 2018
Cross browser compatibility is a big part of modern web development. While the majority of browsers are now aligning to the new web standards, cross browser issues still occur for different reasons. Sometimes browsers have bugs, different level of support for a new technology. Angular supports all the most recent browsers but supporting all this variety of browsers it's challenging especially where there are lacks of support for modern technologies. This is why the Angular team recommends to load polyfills depending on your targets. The polyfill provides a functionality expected to be natively available.
An Angular application created with the angular-cli contain the file src/polyfills.ts. The file highlight the different modules that might be needed for a specific browser in order to work properly. While creating a web application, especially a public facing one, it is necessary to deal with cross browser compatibility. A user might come to your web app using an older browser or an older version of a browser and you shouldn’t force them to upgrade. Depending on the project audience it is necessary to load the polyfills needed.
In this post, I want to explore different approaches to load polyfills on an Angular application. Starting from a very simple scenario where we load all the possible modules to more advanced ones. The polyfills are often a neglected part of an Angular application resulting in a performance loss for your web application and users.
Bundle them all
In our first case, we are just blindly uncommenting all the imports statements in our polyfills files. This is a very simple case and I imagine for a lot of developers that are starting an Angular project, this is the easiest way to get your application working with no extra effort, except for your users.
import 'core-js/es6/symbol';
import 'core-js/es6/object';
import 'core-js/es6/function';
import 'core-js/es6/parse-int';
import 'core-js/es6/parse-float';
import 'core-js/es6/number';
import 'core-js/es6/math';
import 'core-js/es6/string';
import 'core-js/es6/date';
import 'core-js/es6/array';
import 'core-js/es6/regexp';
import 'core-js/es6/map';
import 'core-js/es6/weak-map';
import 'core-js/es6/set';
import 'core-js/es6/array';
import 'classlist.js'; // Run `npm install --save classlist.js`.
import 'core-js/es6/reflect';
import 'web-animations-js'; // Run `npm install --save web-animations-js`.
import 'zone.js/dist/zone'; // Included with Angular CLI.
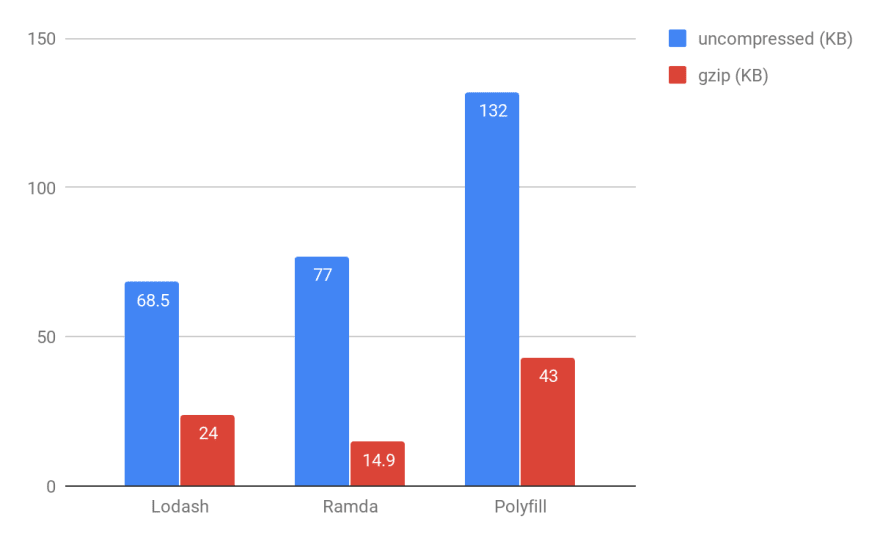
All the browsers, even the ones which don’t need polyfills, are paying the price of the older browser in your list of supported ones. So every user needs to download the generated file in its entirety. If we look at the generated polyfill bundle size, this is double the space that a common utility library such as ramda or lodash occupies without using any tree-shaking on them.
IE aside
As you can imagine this is not an ideal solution and it is impacting all your users with no discrimination. On my research to improve the previous solution I stumble across what is currently used at angular.io. The website serves an additional file ie-polyfill only to IE11/10/9 browser and a smaller polyfill for all the rest. The solution implemented is simple and effective and it consists of pre-generating a bundle for IE and loading it in a script tag with always present in the index adding nomodule attribute.
Create the following file src/ie-polyfills.js:
/ **IE9, IE10 and IE11 requires all of the following polyfills.** /
import 'core-js/es6/symbol';
import 'core-js/es6/object';
import 'core-js/es6/function';
import 'core-js/es6/parse-int';
import 'core-js/es6/parse-float';
import 'core-js/es6/number';
import 'core-js/es6/math';
import 'core-js/es6/string';
import 'core-js/es6/date';
import 'core-js/es6/array';
import 'core-js/es6/regexp';
import 'core-js/es6/map';
import 'core-js/es6/set';
import 'classlist.js';
import 'web-animations-js';
Leaving only the following inside src/polyfill.ts
import 'zone.js/dist/zone'; // Included with Angular CLI.
To generate the ie-polyfills just add the following command inside the script section in the package.json:
"build-ie-polyfills": "webpack-cli src/ie-polyfills.js -o src/generated/ie-polyfills.min.js -c webpack-polyfill.config.js",
"postbuild": "cp -p src/generated/ie-polyfills.min.js dist/generated"
And finally, add the script tag inside the head in src/index.html:
<script nomodule="" src="generated/ie-polyfills.min.js"></script>
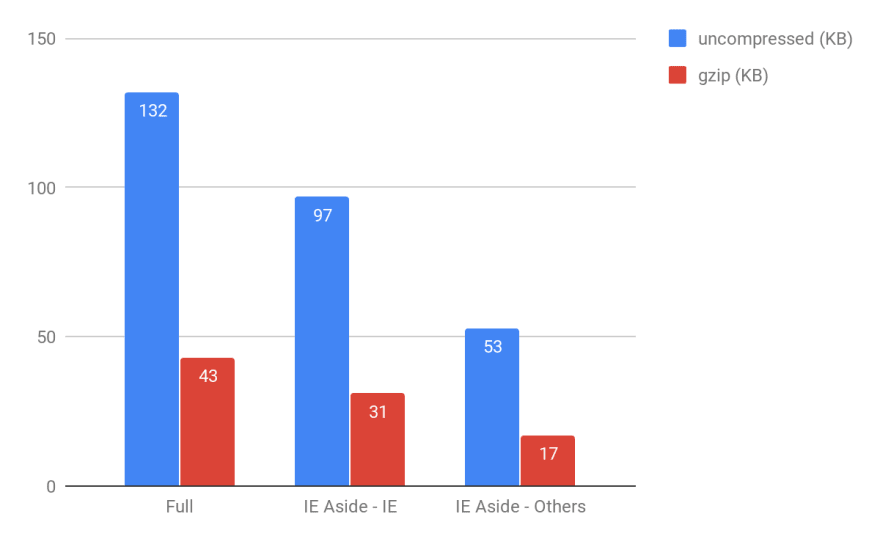
The nomodule attribute is a boolean attribute that prevents a script from being executed in user agents that support module scripts. Only browsers that do not support modules like IE11/10/9, will download the bigger bundle while the rest of the browsers will ignore it and just download the smaller file.
That’s almost a 60% improvement over the initial, bundle them all, solution proposed. It can be easily integrated in any application and it doesn't involve any complex change or infrastructure support. There is only one additional file served by your application. Here’s a link to a stackblitz application already configured for the occasion here.
Serverless service
The previous solution its great and I really encourage to test it out in your project to get an easy performance boost. There are few issues that cannot be ignored: the older browsers will have to perform an additional request to fetch two polyfills. Also using nomodule can only differentiate between browsers that support or not module. There are scenarios where you need to load a polyfill only for a specific browser. In one of our web application, we needed to load core-js/es7/object specifically for IOS 9 for example.
A more advanced solution is to dynamically serve the polyfills by detecting the browser request. The user-agent header can be used to detect the browser making the request.
A popular service used widely by the web development community is polyfill.io. The service created by Jonathan Neal, does exactly what describe earlier. Unfortunately, polyfill.io cannot be used for Angular applications due to the changes that it performs on global objects
The solution provided by polyfill.io it's very promising and reduces the total number of calls even for the oldest browser in the group. Serverless can recreate a similar solution to polyfill.io which can be easy to set up, maintain and also working with Angular applications.
Serverless framework is an open-source CLI for building and deploying serverless applications. Serverless provides basically a layer of abstraction on top of different cloud providers such as AWS, Google cloud or Azure. Let’s start by downloading and installing the serverless-cli globally.
Prerequisite for this section are: an AWS account and the aws-cli installed on your machine.
npm i -g serverless
Now that the serverless-cli is installed globally, we can use it to create the first project based on a nodejs template.
serverless create --template aws-nodejs --path angular-polyfill && cd angular-polyfill && npm init
The cli creates two different files inside the project: serverless.yml that specify the infrastructure configuration of the service. handler.js which contains the function, this is a lambda function which will be executed in a managed AWS infrastructure.
Before going into serverless specifics, in order to generate the different polyfills bundles, we are going to use webpack directly using the command line interface. To reduce the size we will also configure the UglifyJsPlugin which will take care to perform the necessary optimisations. Start by adding some dependencies
npm i --save-dev core-js web-animations-js classlist.js webpack zone.js webpack-cli uglifyjs-webpack-plugin
Create a simple webpack configuration in webpack.config.js and the javascript files with the different polyfills imports
// webpack.config.js
const UglifyJsPlugin = require('uglifyjs-webpack-plugin');

module.exports = {
  mode: 'production',
  optimization: {
    minimizer: [new UglifyJsPlugin({
      uglifyOptions: {
        warnings: false,
        parse: {},
        compress: {},
        mangle: true, // Note `mangle.properties` is `false` by default.
        output: null,
        toplevel: false,
        nameCache: null,
        ie8: false,
        keep_fnames: false,
      }
    })]
  }
};

//polyfills.js
import 'core-js/es7/reflect'; // Used in JIT - remove if you use only AOT
import 'zone.js/dist/zone';

//ie-polyfills.js
import 'core-js/es6/symbol';
import 'core-js/es6/object';
import 'core-js/es6/function';
import 'core-js/es6/parse-int';
import 'core-js/es6/parse-float';
import 'core-js/es6/number';
import 'core-js/es6/math';
import 'core-js/es6/string';
import 'core-js/es6/date';
import 'core-js/es6/array';
import 'core-js/es6/regexp';
import 'core-js/es6/map';
import 'core-js/es6/set';
import 'classlist.js';
import 'web-animations-js';

import 'core-js/es7/reflect'; // Used in JIT - remove if you use only AOT
import 'zone.js/dist/zone';
And last we add the scripts in our package.json
"build-ie-polyfills": "webpack-cli polyfills.js ie-polyfills.js -o ./generated/ie-polyfills.min.js --mode production --optimize-minimize -c webpack.config.js",
"build-polyfills": "webpack-cli polyfills.js -o ./generated/polyfills.min.js --mode production --optimize-minimize -c webpack.config.js"

npm run build-ie-polyfills && npm run build-polyfills
Running the two commands generate two different polyfills files inside the generated folder to be used inside our serverless function. Serverless framework needs to include the generated files in the function created. Inside serverless.yml specify:
package:
  include:
    - generated/polyfill.min.js
    - generated/ie-polyfill.min.js
  exclude:
    - ie-polyfills.js
    - polyfills.js
It is time to open handler.js and add the logic to serve a different polyfill based upon the user agent of the request. The idea is to detect the user agent and then based upon such information serve one or the other polyfill. Import a utility library which parses the user agent string with high accuracy by using hand-tuned dedicated regular expressions for browser matching.
npm i --save useragent

//handler.js
'use strict';

const useragent = require('useragent');
const util = require('util');
const fs = require('fs');
const readFile = util.promisify(fs.readFile);
const path = require('path');

const getPolyFillName = (browser) => {
  switch (browser) {
    case 'ie':
      return path.join(__dirname, '/generated/ie-polyfills.min.js');
    default:
      return path.join(__dirname, '/generated/polyfills.min.js');
  }
};

module.exports.polyfill = async (event, context) => {
  const ua = useragent.parse(event.headers['user-agent']);
  console.log(ua);
  const body = await readFile(getPolyFillName(ua.family.toLowerCase()), 'utf8');
  return {
    statusCode: 200,
    body,
    headers: {
      'Content-Type': 'application/javascript',
      'X-Detected-UA': ua.family,
    }
  };
};
The serverless function needs an endpoint for our browser to reach it. While working with AWS we can attach a lambda to an API Gateway and the latter will provide the integration from the function to the REST endpoint. Serverless simplify the creation of all the resources needed by simply adding events to the function inside serverless.yml
polyfill:
    handler: handler.polyfill
    events:
       - http:
           method: get
           path: /polyfill
Now we are ready to deploy our function
sls deploy
Serverless outputs at the end of the creation process a URL that point to your lambda.
To test that everything is working by pasting the URL in your browser and the service should return you the polyfill bundle targeted for your browser.
We can now easily modify our Angular application to download the polyfills directly from the service URL and remove polyfills bundling from it.
This is a very simple setup to showcase the power of serverless, depending on your website traffic there are different ways to enhance it, if you are interested let me know in the comments below.
Spending time deciding the polyfills that should be included is often omitted, penalising everyone for the “sin” of a few. The solutions explored hopefully will help you improve your website's app experience for your users.

Posted on November 15, 2018
Join Our Newsletter. No Spam, Only the good stuff.
Sign up to receive the latest update from our blog.


