How to setup WiFi hotspot in raspberry pi and connect with ESP8266

Iván Moreno
Posted on August 14, 2020

Basic connection between arduino and raspberry pi through WiFi
The Hardware is
- Esp8266 with arduino sdk
- Raspberry pi 3b+
System requirements
- arduino-cli
- picocom
- python3
Configurations for Raspberry Pi
- Install raspbian
- Enable ssh server
- Upgrade system
- Configure keys for ssh server
- Configure the raspberry pi as hotspot
- Install python3 and set as default python interpreter
- Copy server code
Configurations for ESP8266
- Install esp8266 for arduino
- Copy the code and upload to esp8266 board
Raspberry Pi Setup
Download raspbian buster lite from official repository
$ curl -LO http://downloads.raspberrypi.org/raspbian_lite/images/raspbian_lite-2020-02-14/2020-02-13-raspbian-buster-lite.zip
Write to sd card
$ unzip -p 2020-02-13-raspbian-buster-lite.zip | sudo dd of=/dev/mmcblk0 status=progress
Connect the raspberry pi via Ethernet and HDMI, startup the system and access with user=pi and password=raspberry. Enable ssh service
$ sudo systemctl enable --now ssh
Check what is the ip address and logout from the system
$ ip addr show eth0 # copy ip address
$ exit
Connect via ssh
$ ssh pi@{ip_address}
Add user with the same privileges and groups to pi user, generate password and delete the pi user
$ sudo useradd -m -s /bin/bash --groups $(groups pi | cut -d ' ' -f 4- --output-delimiter ',') new-user
Create password to new-user
$ sudo passwd new-user
Add new-user to sudoers file
$ echo "new-user ALL=(ALL) NOPASSWD: ALL" | sudo tee /etc/sudoers.d/010_new-user-nopasswd
Login to new user
$ su new-user
Check if sudo works
$ sudo apt update
Check groups
$ groups new-user
If everything works, logout and access to new-user with ssh, first logout
$ exit
Generate keys to new-user and copy to raspberry pi
$ ssh-keygen -f ~/.ssh/rpi-key
Copy public key to raspberry pi
$ ssh-copy-id -i ~/.ssh/rpi-key.pub new-user@{raspberry-pi-ip}
Now access to new-user on raspberry pi
$ ssh new-user@{raspberry-pi-ip}
Remove pi user
$ sudo userdel -rf pi
Update and upgrade the system
$ sudo apt update && sudo apt upgrade -y
Reboot the system
$ sudo reboot
Setup hotspot
Create an access point in raspberry pi

 Diagram                                  +- RPi ---------+
                                      +---+ 192.168.10.15 |          +- ESP8266 ---+
                                      |   |     WLAN AP   +-)))  (((-+ WLAN Client |
                                      |   | 192.168.7.1   |          | 192.168.7.x |
                                      |   +---------------+          +-------------+
                                      .
                                      .
                              .
                 +- Router -----+     |
                 | Firewall     |     |   +- PC#2 --------+
(Internet)---WAN-+ DHCP server  +-LAN-+---+ 192.168.10.11 |
                 | 192.168.10.1 |     |   +---------------+
                 +--------------+     |
                                      |   +- PC#1 --------+
                                      +---+ 192.168.10.10 |
                                          +---------------+
Install required packages
$ sudo apt-get -y install hostapd dnsmasq netfilter-persistent iptables-persistent
Enable wireless access point
$ sudo systemctl unmask hostapd
$ sudo systemctl enable hostapd
Define the wireless interface IP configuration
Configure wlan0 interface in /etc/dhcpcd.conf
Add the following lines
  interface wlan0
    static ip_address=192.168.7.1/24
    nohook wpa_supplicant
Enable ip forwarding in /etc/sysctl.conf and uncomment the following line
net.ipv4.ip_forward=1
Allow traffic between clients on this foreign wireless network
$ sudo iptables -t nat -A POSTROUTING -o eth0 -j MASQUERADE
Make persistent changes
$ sudo netfilter-persistent save
Configure the DHCP and DNS services for the wireless network
First create a backup
$ sudo mv /etc/dnsmasq.conf /etc/dnsmasq.conf.orig
Edit /etc/dnsmasq.conf and add the following lines
  interface=wlan0
  dhcp-range=192.168.7.2,192.168.7.40,255.255.255.0,24h
  domain=wlan
  address=/gw.wlan/192.168.7.1
Set WiFi country
Localization Options -> Change WLAN Country -> choose your country -> finish
$ sudo raspi-config
Ensure wireless operation
$ sudo rfkill unblock wlan
Configure access point in /etc/hostapd/hostapd.conf
Add the following lines
  country_code=MX
  interface=wlan0
  ssid=rpi-hotspot
  hw_mode=g
  channel=8
  macaddr_acl=0
  auth_algs=1
  ignore_broadcast_ssid=0
  wpa=2
  wpa_passphrase=rasp-p@s2w0rd
  wpa_key_mgmt=WPA-PSK
  wpa_pairwise=TKIP
  rsn_pairwise=CCMP
Reboot the system and check connection with new access point
Install python3 and set as default interpreter
$ sudo apt install -y python3
$ sudo rm /usr/bin/python
$ sudo ln -s /usr/bin/python3 /usr/bin/python
Copy pythonServer to raspberry pi
ESP8266 Configurations
Install required packages
- arduino-cli
- picocom
Install esp8266 arduino core
First add additional boards in ~/Arduino/arduino-cli.yml and add the following lines
# arduino-cli.yaml
board_manager:
  additional_urls:
    - http://arduino.esp8266.com/stable/package_esp8266com_index.json
Update index
$ arduino-cli --config-file ~/Arduino/arduino-cli.yml core update-index
Search esp8266 boards
$ arduino-cli --config-file ~/Arduino/arduino-cli.yml core search esp8266
Install esp8266 boards
$ arduino-cli --config-file ~/Arduino/arduino-cli.yml core install esp8266:esp8266
Compile and upload the sketch, assuming that port of esp8266 is /dev/ttyUSB0
$ arduino-cli compile -b esp8266:esp8266:nodemcuv2 -u -p /dev/ttyUSB0 arduinoClient/
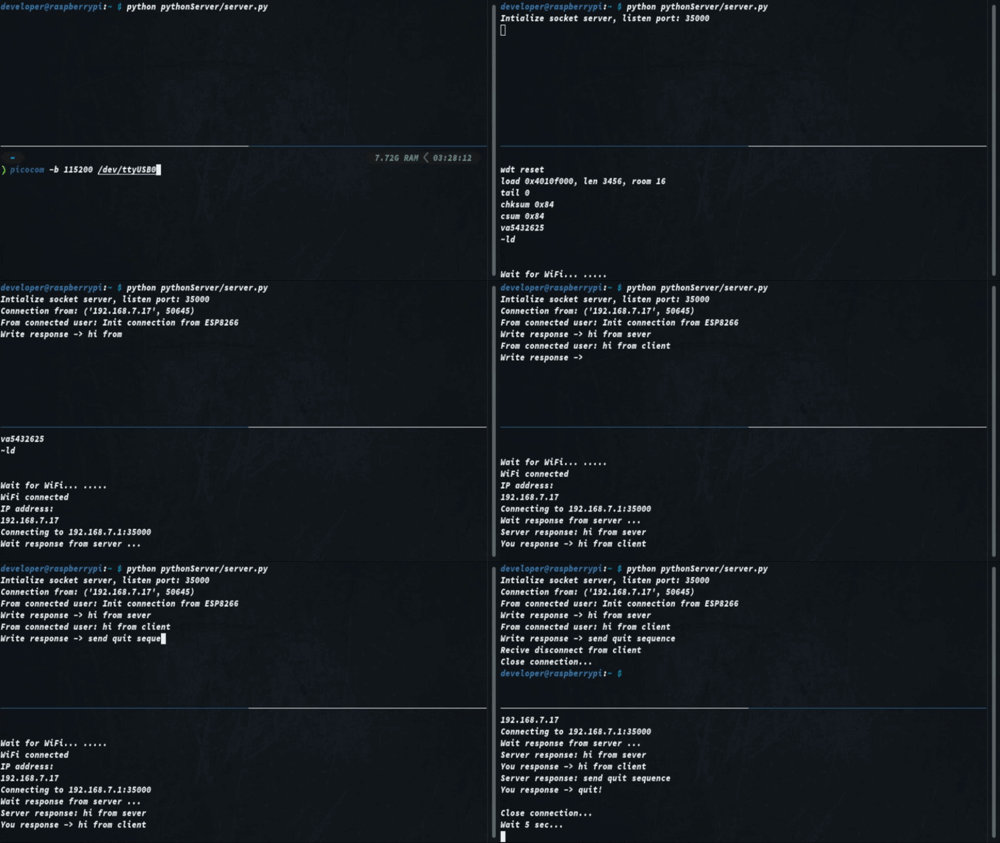
Test communications
Init server in raspberry pi
$ python ~/pythonServer/server.py
Init serial monitor for esp8266 board
$ picocom -b 115200 /dev/ttyUSB0
Raspberry pi output
  Intialize socket server, listen port: 35000
  Connection from: ('192.168.7.17', 59552)
  From connected user: Init connection from ESP8266
  Write response -> hi from server
  From connected user: hi from client
  Write response -> send quit sequence
  Recive disconnect from client
  Close connection...
Arduino output
  Wait for WiFi... .....
  WiFi connected
  IP address:
  192.168.7.17
  Connecting to 192.168.7.1:35000
  Wait response from server ...
  Server response: hi from server
  You response -> hi from client
  Server response: send quit sequence
  You response -> quit!
Source Code

Posted on August 14, 2020
Join Our Newsletter. No Spam, Only the good stuff.
Sign up to receive the latest update from our blog.

