Adding Cosmos DB to Azure Search index

Ishwar398
Posted on November 6, 2023

In continuation to Setting Cognitive Search with Blob Storage
In the above post, we saw how can we integrate Azure blob storage with Azure cognitive search. In this post, we will learn how can we create an Indexer with Cosmos DB, and push the indexer to the same index where Blob Storage indexer is pushing results to.
Due to this, search will be done across multiple sources i.e. Blob and Cosmos.
We already have Azure cognitive search and Cosmos DB set up.
Cosmos DB data:
We have a cosmos DB data present in a specific format. We can decide on which fields we want to be searchable. Based on that selection, we need to decide on the fields which we will be using in the index.
Below is a format which we will be using for setting up the index.
{
        "id": UNIQUE_ID,
        "filename": FILENAME,
        "format": FORMAT,
        "tags": [
            {
                "type": EXAMPLE_SEARCH_FIELD,
                "city": EXAMPLE_SEARCH_FIELD
            }
        ]
    }
In the above format, we will be keeping the filename, format and the tags as a searchable entity.
Setting up the data source in Azure Cognitive Search
Just as we added the Blob Storage as the data source, we will be adding a Cosmos DB data source as well.
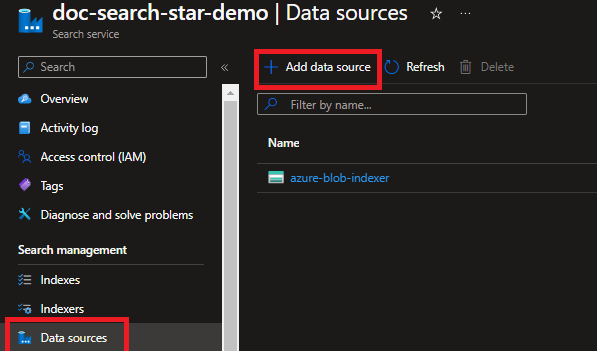
Click on the Data Sources option from the left pane and click on the Add Data Source button.
Select Cosmos DB from the Data Source and give it a name. Then click on the Choose an existing connection link. This will bring the results of the Cosmos DB accounts in that resource group.
Then, the dropdown for the Database and Collection will be filled. Select appropriate items from the dropdown.
Now, we need to write a query which will run against the DB and bring the relevant results. This query should always bring the results in incremental manner, which means it should only fetch the results which are new and not present in the Search index. To do so, it takes help of the _ts field automatically provided by the Cosmos DB. And it maintains the values of the last _ts value in @HighWaterMark field.
In our case, we need the above mentioned fields as Searchable.
So, our query will look like this.
SELECT c.id, c.filename, c.format, t.type, t.city FROM c join t in c.tags WHERE c._ts >= @HighWaterMark ORDER BY c._ts
Save the data source, it will be now visible in the Data Sources list.
Setting up the Indexer
Click on the Indexers option from the left pane, and then click on Add Indexer.
Give the name to the Indexer, select the target index, and then select the newly created data source
Fill the schedule as per requirement. As per the schedule, the Indexer will run and fetch the data from the Cosmos DB.
Save the indexer, and then run it. It will fetch the data from the DB.
Setting up the index
Now, once we have the data source and indexer working fine, lets set up the index.
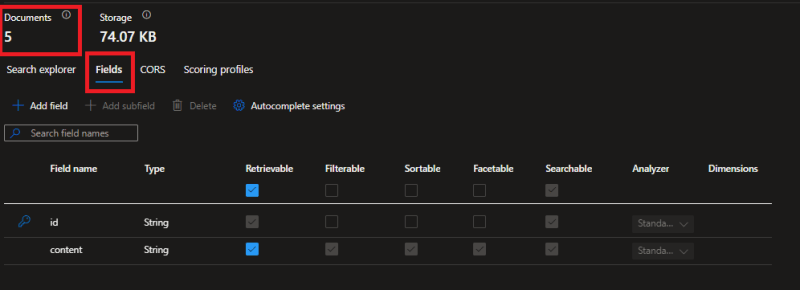
Click on the index which we selected as the target index in the cosmos indexer. And then click on Fields. You can also see the number of documents currently present in the index.
Add the fields which we selected from the cosmos db query.
You can select which fields you want as Searchable, Retrievable, Sortable, Facetable etc. which adding the fields.
You can try the Search option in the Index. The entries from the Cosmos will be shown in the Search results.

Posted on November 6, 2023
Join Our Newsletter. No Spam, Only the good stuff.
Sign up to receive the latest update from our blog.
Related
November 30, 2024


