omnix
Posted on September 11, 2022
I decided to configure my Neovim since it didn't look good and I wanted to supercharge my experience on it with extensions. So, I configured it. Here's how to do that:
Installing Neovim
Unfortunately, you can’t install Neovim using the built-in windows package manager, winget. You have to install another package manager. You can use scoop or chocolatey. I think scoop is better so I’m gonna use Scoop.
Scoop
>>> scoop install neovim
Chocolatey
>>> choco install neovim
and there, you’re done. If you don’t know how to install scoop, go to scoop.sh. Instantly, you will see the installation command. Make sure you are on Powershell! If you have the same problem with chocolatey, there’s an official tutorial here.
Setting up stuff
First, pull up the terminal. Make sure you are in no directory. Now, we’re gonna switch to the AppData directory using cd AppData. Now run cd Local to switch to the local directory. We’re gonna make a directory called “nvim” to store our config in it, and then switch to nvim.
# Change directory to "AppData"
>>> cd Appdata
# Change directory to "Local"
>>> cd Local
# Creates directory called "nvim"
>>> mkdir nvim
# Switches to "nvim" directory
>>> cd nvim
now that you’re in the nvim folder, create a file called init.vim . The first thing we’re gonna do is get Neovim to make that file and enter this command:
>>> nvim init.vim
Setting Up config/init.vim
now, lets add some code in our init.vim
set number
this will automatically run the command “set number ”. The set number command will show the line number. Now, to set a theme and install a filesystem, we need a plugin manager. For this, we’re gonna use vim-plug, an open-source popular vim and Neovim plugin manager/installer. We can install it by using this command in the official README of the project.
iwr -useb https://raw.githubusercontent.com/junegunn/vim-plug/master/plug.vim |`
ni "$(@($env:XDG_DATA_HOME, $env:LOCALAPPDATA)[$null -eq $env:XDG_DATA_HOME])/nvim-data/site/autoload/plug.vim" -Force
```
now, if this is in a different directory, move it to your `nvim` directory. You can access it by pressing `⊞ + R`. Now you’re at the run menu. Type in `%AppData%` . Now go to `Local > nvim`. Now go to the `vimfiles` folder installed and move the `autoload` folder into the `nvim` folder. Now copy and paste this config:
```bash
call plug#begin()
Plug 'preservim/nerdtree'
autocmd VimEnter * NERDTree
Plug 'navarasu/onedark.nvim'
call plug#end()
```
and then open Neovim using the `nvim` command. Enter command mode by pressing `esc` . Now type in `:PlugInstall` . This will install all of the plugins in the `init.vim` . Now you’ve installed all of the plugins, go back to the `init.vim` file and type in `colorscheme onedark`. One dark is a theme inspired by the Atom theme, it’s now available for vim and Neovim. The other plugin is NerdTree, which is a thing that lets you see your files on the left side of Neovim. Now, back to the configuration. If this doesn’t work, close your terminal or reload your Neovim and then try again. Now, this is your full config:
```bash
call plug#begin()
Plug 'preservim/nerdtree'
autocmd VimEnter * NERDTree
Plug 'navarasu/onedark.vim'
call plug#end()
colorscheme onedark
```
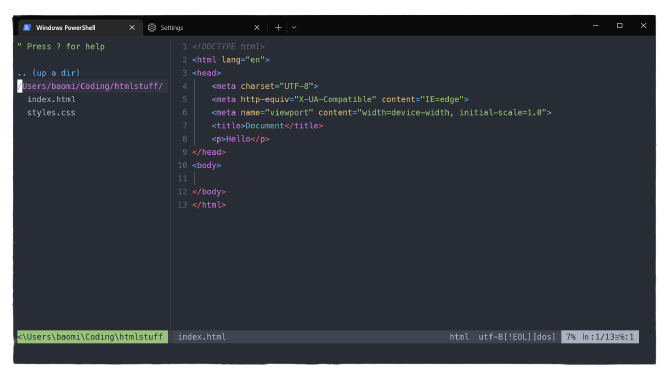
And, you’re pretty much done now! This is what it should look like:


Posted on September 11, 2022
Join Our Newsletter. No Spam, Only the good stuff.
Sign up to receive the latest update from our blog.