Kubectl Port-forward Flow Explained

Henrique Cavarsan
Posted on April 15, 2024

Introduction
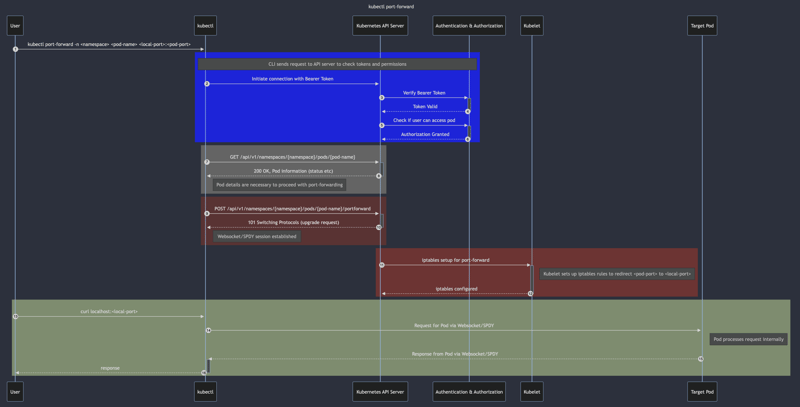
Recently, I joined a discussion about how the kubectl port-forward command works, which caught my attention because I have an app that improves some aspects of the native kubectl port-forward. I made a public Mermaid chart to show the complete process of executing this command. I included everything from the authentication phase to sending a request through localhost that goes to the target pod via SPDY.
I noticed this topic often comes up on various social networks, so I decided to write this article to share the diagram and explain the steps involved. I had two main reasons for writing this article:
To share this information with those who are interested, especially since the official documentation doesn't cover this process in one place, making it hard to quickly get a full picture.
To have a reference for myself for future use, so I can look back at this article when needed :D
The diagram might be updated after its release to add more details or correct any mistakes I might have made (it happens :D). Feel free to point out any errors or add information if you find something wrong ;)
You can view and edit the full diagram here: Mermaid Link
Sequence Diagram Explained
Full Mermaid SVG Link
I will start by explaining each step in the diagram, grouped into 5 sections: Initialization, Authentication & Authorization, Information Retrieval for Pod, Port-forwarding Session Establishment, Configuring iptables for Port Forwarding and SPDY Session for Port Forwarding
Initialization
The user initiates the port-forwarding process by executing kubectl port-forward -n <namespace> <pod-name> <local-port>:<pod-port> via the CLI (Command-Line Interface).
Authentication & Authorization
Upon receiving the command, the CLI sends a request to the Kubernetes API server to authenticate the user's tokens and verify permissions. This involves an initial connection establishment with a Bearer Token. The API server then verifies the token's validity and checks if the user has authorization to access the specified pod.
Information Retrieval for Pod
To proceed with port-forwarding, the CLI retrieves essential details about the target pod by sending a GET request to the Kubernetes API server. Once received,
Port-forwarding Session Establishment
The CLI initiates the port-forwarding session by sending a POST request to the Kubernetes API server, requesting the establishment of a port-forwarding connection for the specified pod. Upon receiving the request, the API server switches protocols to Websocket/SPDY, establishing a persistent connection with multiplexing capabilities.
Configuring iptables for Port Forwarding
The Kubernetes API server instructs the Kubelet to configure iptables for port-forwarding. The Kubelet sets up iptables rules to redirect traffic from the specified pod port to the designated external port (local port in kubectl)
SPDY Session for Port Forwarding
With the port-forwarding session established, the user interacts with the pod's application by sending requests through the Websocket/SPDY stream. The CLI wraps the user's request in a Websocket/SPDY frame, forwarding it to the Kubernetes API server. The API server then forwards the request to the Kubelet, which transmits it to the pod's port. The pod processes the request internally and responds, initiating a response flow back to the user through the established Websocket/SPDY session.
Feel free to edit the Mermaid chart here: Mermaid Live Editor
Conclusion
This article explains the kubectl port-forward command, detailing each step from starting up and logging in to transferring data. It covers authentication, authorization, and the SPDY connection to show how it works in Kubernetes.
While this article is meant to inform and not to promote, I'd like to share a link to kftray, a project I developed that adds new features and improvements to kubectl port-forward. If you're interested, you can check out kftray on GitHub here: kftray on GitHub.

Posted on April 15, 2024
Join Our Newsletter. No Spam, Only the good stuff.
Sign up to receive the latest update from our blog.


