25-Nodejs Course 2023: Validation Part III: Rule Implementation

Hasan Zohdy
Posted on November 2, 2022
Now we're going to continue working on our Rules, let's start with the required rule.
Required Rule
Open src/core/validator/rules/required.ts and let's update it with the following code:
// src/core/validator/rules/required.ts
export default class RequiredRule {
  /**
   * Rule name
   */
  public static ruleName = "required";

  /**
   * Determine if rule is valid
   */
  protected isValid = true;

  /**
   * Constructor
   */
  public constructor(
    protected readonly input: string,
    protected readonly value: any,
  ) {
    //
  }


  /**
   * Validate the rule
   */
  public async validate() {
    this.isValid = this.value.length > 0;
  }
}
We added ruleName as static property which holds the rule name, why we would do such a thing? because we might later customize the rulesTypes property in the Rules list class to be more dynamically.
Then we constructed the rule with the input name and its value.
isValid property will be true by default, in our validate method we'll update it to determine if we have a valid value or not.
Now let's implement the validate method:
// src/core/validator/rules/required.ts
export default class RequiredRule {
  /**
   * Rule name
   */
  public static ruleName = "required";

  /**
   * Determine if rule is valid
   */
  protected isValid = true;

  /**
   * Constructor
   */
  public constructor(
    protected readonly input: string,
    protected readonly value: any,
  ) {
    //
  }

  /**
   * Validate the rule
   */
  public async validate() {
    this.isValid = Boolean(this.value) && this.value.length > 0;
  }
}
And that it!, we just checked if there is a value and the value length is higher than 0, if it is then we have a valid value, otherwise we don't.
Now let's update update the rest of methods of the rule
// src/core/validator/rules/required.ts
export default class RequiredRule {
  /**
   * Rule name
   */
  public static ruleName = "required";

  /**
   * Determine if rule is valid
   */
  protected isValid = true;

  /**
   * Constructor
   */
  public constructor(
    protected readonly input: string,
    protected readonly value: any,
  ) {
    //
  }

  /**
   * Validate the rule
   */
  public async validate() {
    this.isValid = Boolean(this.value) && this.value.length > 0;
  }

  /**
   * Determine if rule validation passes
   */
  public passes() {
    return this.isValid;
  }

  /**
   * Determine if rule validation fails
   */
  public fails() {
    return this.isValid === false;
  }

  /**
   * Get error message
   */
  public error() {
    return `${this.input} is required`;
  }
}
We added the passes method which will check for the isValid property, if it's true then the rule passes, otherwise it fails.
We added the fails method which will check for the isValid property, if it's false then the rule fails, otherwise it passes.
We added the error method which will return the error message using the input name.
Now let's give it a try.
Open src/app/users/controllers/create-user and let's update it with the following code:
// src/app/users/controllers/create-user.ts
import { Request } from "core/http/request";

export default async function createUser(request: Request) {
  const { name, email } = request.body;

  return {
    name,
  };
}

createUser.validation = {
  rules: {
    name: ["required"],
    email: ["required"],
  },
};
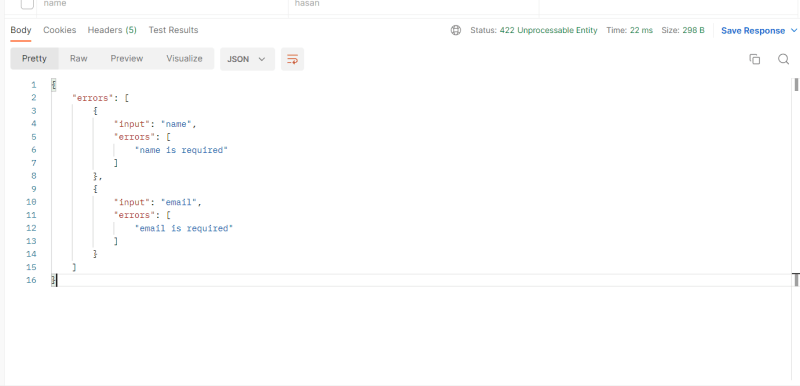
Now let's try to send a request without the name and email fields, we should get the following output:
As you can see its a merged list of errors, let's update it to make it more readable.
Back to Rules List
Now let's go back to our rules list class, what we will do is that if the rule has an error, we will push it to the rules list, and the rules list itself will return an object, input which will contain the input name and errors which will contain the errors list.
// src/core/validator/rules-list.ts
import { Request } from "core/http/request";
import RequiredRule from "./rules/required";

export default class RulesList {
  /**
   * Rules list
   */
  public static rulesTypes = {
    required: RequiredRule,
  };

  /**
   * Errors list
   */
  protected errorsList: any = [];

  /**
   * Request instance
   */
  protected request!: Request;

  /**
   * Constructor
   */
  public constructor(
    protected readonly input: string,
    protected readonly value: any,
    protected readonly rules: any,
  ) {
    //
  }

  /**
   * Set request
   */
  public setRequest(request: Request) {
    this.request = request;

    return this;
  }

  /**
   * Validate the rules
   */
  public async validate() {
    for (const ruleName of this.rules) {
      const RuleClass = (RulesList.rulesTypes as any)[ruleName];

      const rule = new RuleClass(this.input, this.value);

      await rule.validate();

      if (rule.fails()) {
        this.errorsList.push(rule.error());
      }
    }
  }

  /**
   * Check if validator fails
   */
  public fails() {
    return this.errorsList.length > 0;
  }

  /**
   * Check if validator passes
   */
  public passes() {
    return this.errorsList.length === 0;
  }

  /**
   * Get errors list
   */
  public errors() {
    return {
      input: this.input,
      errors: this.errorsList,
    };
  }
}
Now our errors will be like this
Pretty neat right?
String Rule
Let's make another rule to make sure we're working right, we'll make a rule to check if the input is a string.
Create src/core/validator/rules/string.ts.
We need to install a new package actually, it will help us a lot to validate values Supportive Is.
yarn add @mongez/supportive-is
Now let's update our string.ts file with the following code:
// src/core/validator/rules/string.ts
import Is from "@mongez/supportive-is";

export default class StringRule {
  /**
   * Rule name
   */
  public static ruleName = "string";

  /**
   * Determine if rule is valid
   */
  protected isValid = true;

  /**
   * Constructor
   */
  public constructor(
    protected readonly input: string,
    protected readonly value: any,
  ) {
    //
  }

  /**
   * Validate the rule
   */
  public async validate() {
    this.isValid = Is.string(this.value);
  }

  /**
   * Determine if rule validation passes
   */
  public passes() {
    return this.isValid;
  }

  /**
   * Determine if rule validation fails
   */
  public fails() {
    return this.isValid === false;
  }

  /**
   * Get error message
   */
  public error() {
    return `${this.input} is not a string`;
  }
}
What we updated is the validate method, we used the Is.string method to check if the value is a string or not.
And also updated the error message.
Now let's update our rulesTypes and add the string rule.
// src/core/validator/rules-list.ts
import { Request } from "core/http/request";
import RequiredRule from "./rules/required";
import StringRule from "./rules/string";

export default class RulesList {
  /**
   * Rules list
   */
  public static rulesTypes = {
    required: RequiredRule,
    string: StringRule,
  };
Now let's update our rules in create user controller.
// src/app/users/controllers/create-user.ts

createUser.validation = {
  rules: {
    name: ["required", "string"],
    email: ["required", "string"],
  },
};
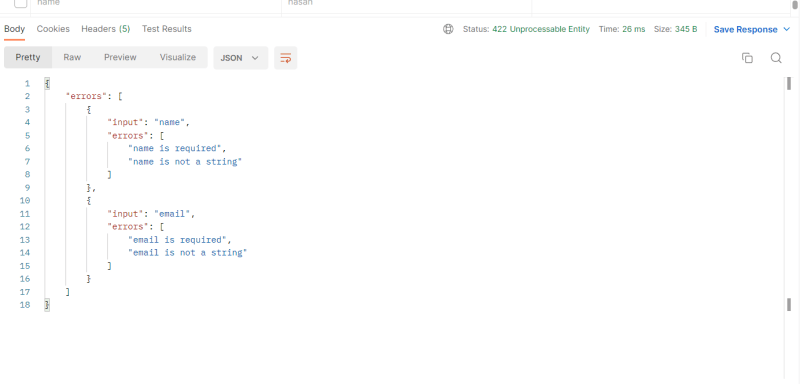
Now let's run again the server.
Now you'll see something like this:
Conclusion
In this article, we learned how to create a new rule, we created two rules, required and string, we also learned how to use the rules in our controllers.
In our next article we'll enhance our validator, for example if we have added a rule that does not exist in the rulesTypes what should be happen.
Also we'll create a configuration file to handle validation configuration, for example what to return, do we need to return only the first error or all errors.
🎨 Project Repository
You can find the latest updates of this project on Github
😍 Join our community
Join our community on Discord to get help and support (Node Js 2023 Channel).
🎞️ Video Course (Arabic Voice)
If you want to learn this course in video format, you can find it on Youtube, the course is in Arabic language.
💰 Bonus Content 💰
You may have a look at these articles, it will definitely boost your knowledge and productivity.
General Topics
- Event Driven Architecture: A Practical Guide in Javascript
- Best Practices For Case Styles: Camel, Pascal, Snake, and Kebab Case In Node And Javascript
- After 6 years of practicing MongoDB, Here are my thoughts on MongoDB vs MySQL
Packages & Libraries
- Collections: Your ultimate Javascript Arrays Manager
- Supportive Is: an elegant utility to check types of values in JavaScript
- Localization: An agnostic i18n package to manage localization in your project
React Js Packages
Courses (Articles)

Posted on November 2, 2022
Join Our Newsletter. No Spam, Only the good stuff.
Sign up to receive the latest update from our blog.


