Johnpaul Eze
Posted on November 24, 2022

Adding interactivity to images provides a more profound experience for the customer, making the product image almost tangible. In this tutorial, I will show you how to implement an in-house interactive media gallery with minimal fuss using Cloudinary and Xata.
Xata
Xata is a serverless database with built-in powerful search and analytics which is built on Next.js that offers a variety of data types.
Cloudinary
Cloudinary is a SaaS technology company that provides cloud-based image and video management services. It enables users to upload, store, manage, manipulate, and deliver images and video for websites and apps. The product gallery widget will be used in this series as a part of Cloudinary's wider range of services.
Next.js
Next.js is a React framework that offers serverside rendering and a fast build time. Hence we will use Next.js to build this project.
What we will build
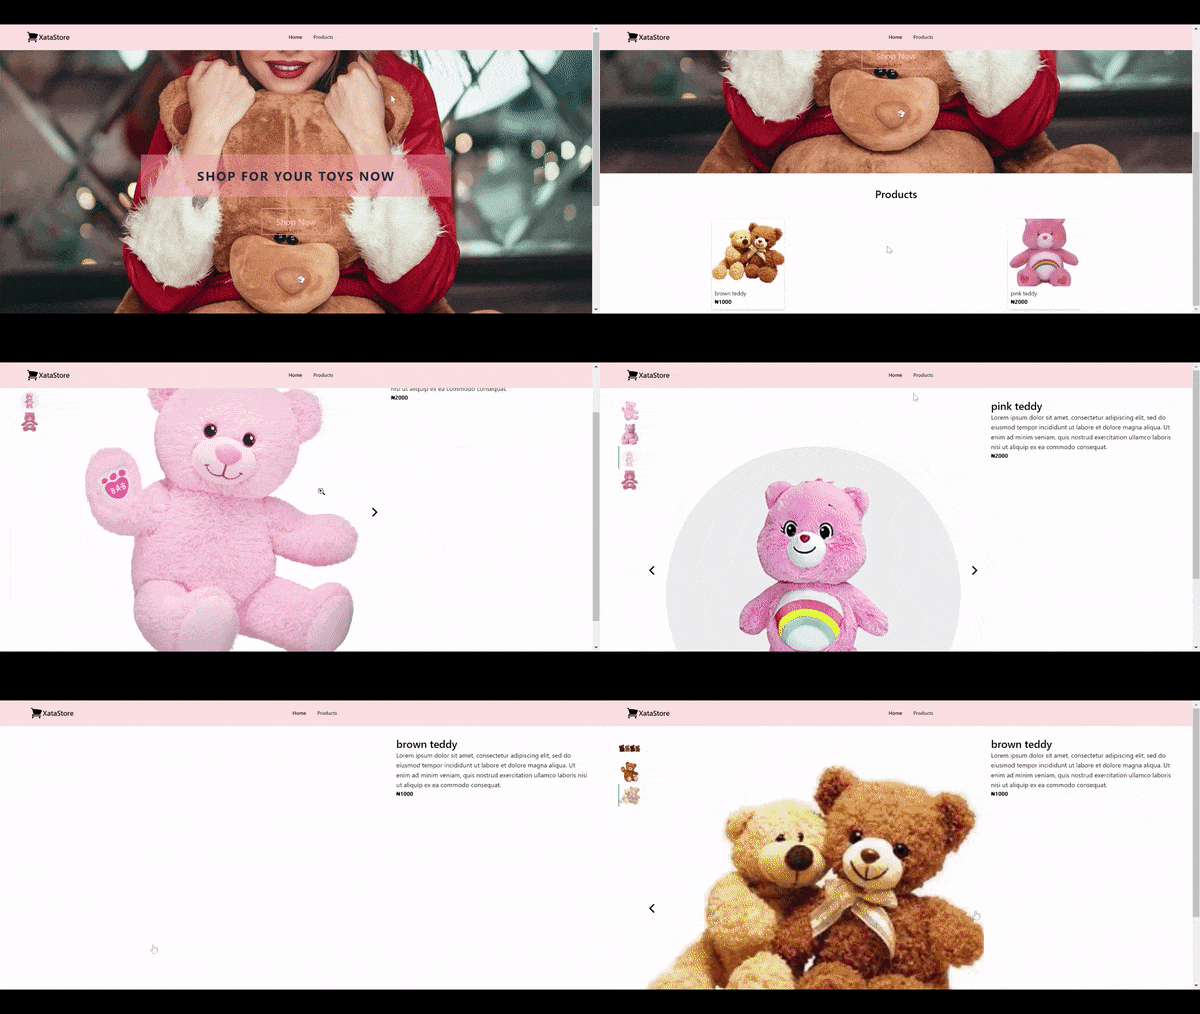
This series will focus on building the product Gallery management feature for an e-commerce web application. We'll use Xata on the backend to create our store products. Afterwards, We’ll use the Cloudinary Product Gallery widget to display our products and it's variants. Here's a demo of the end product in action:
Demo:
Prerequisites
To get the most out of this article the following is required:
- Experience with React and Next.js
- Knowledge of Xata CLI, and a Cloudinary account
Contents
- Part 1 - Getting started Xata
- Part 2 - Adding dynamic product details
- Part 3 - Setting up cloudinary gallery widget
Let's get started with the first part!
Getting started Xata
You can pull in data for products from wherever you want, a REST endpoint, or from a JSON file. Whatever works best for you. For this tutorial, our product data will come from a Xata database.
To create a Xata database, we have to create a Xata account. After that, we can now create a workspace. Inside this workspace, we can have multiple databases.
Creating a Xata Database
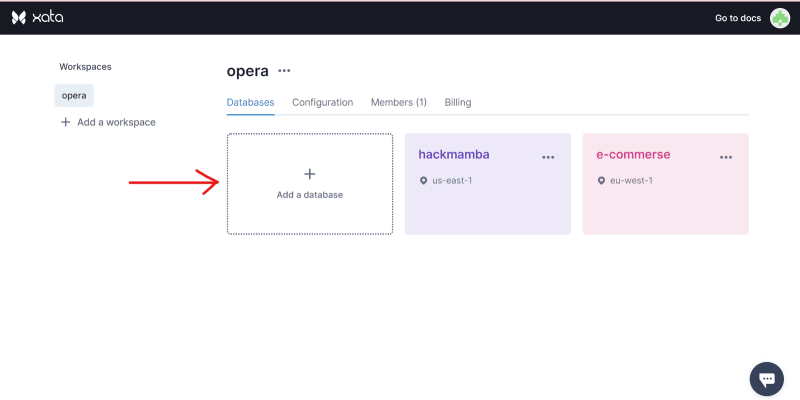
After you log in for the first time to Xata, you'll see an "Add a database" button. We can use this to create our first database.

Once our database is created, we will need to create tables.
Creating Tables
The fastest way to get started is to use Start with sample data or import a CSV file, but we want to create our schema, click Start from Scratch, and fill out a table name.
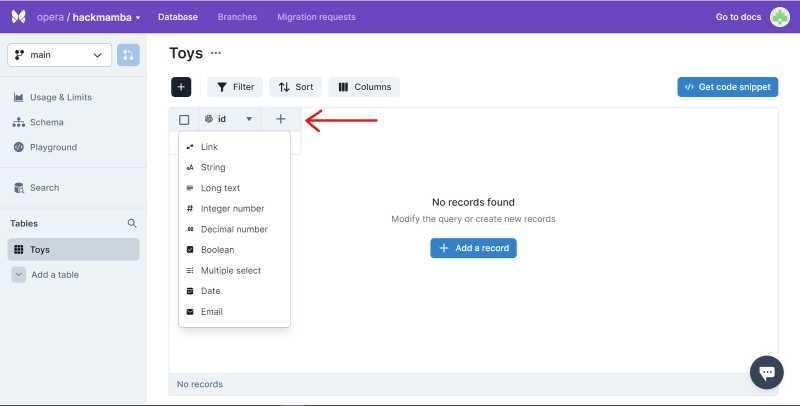
We can now define the schema for this table using the "+" icon on the table header. All tables have a required column: the id column, which provides a unique identity to each row.

When adding columns, we note that each column has multiple types to choose from. The products table will consist of the following columns:
- name: Stores the name of each product
- desc: Holds the description of each product
- imageUrl: Stores the image URL served from Cloudinary for each product
- price: Stores each product's price
- tags: Stores the tags for each product

As we add more tables, we can view and edit the schema on the Schema page in the UI.
Working with Our Data
To work with our data, click the Get Code Snippet button. This will bring up a drawer that shows the equivalent API call that we can use to replicate the same query in our code.

So far, we’ve created a database, defined a schema, entered data, and consumed it.
Next, explore Xata’s API to learn how to work with the data in a Next.js application.
Adding Xata to our Application
Since we have a global Xata command that we can invoke from anywhere, let's tell Xata who we are by running the following command:
xata auth login
Running this command will prompt us to either:
- create a new API key, or
- paste in an existing one.
For this tutorial, we will paste in an existing API key. However, to create a unique API key for your database, click on your profile icon and select account settings. It will look like this:

After we create an API key, the CLI knows who we are.
Next, let's initialize a project. We can do this by running the following command:
xata init
Once we're done, our project will be set up to query Xata.
Next, let’s create a .env file in the root directory of our project. This file will hold our Xata credentials.
To do this, add the following to the .env file:
  API_KEY=YOUR API KEY
  XATA_DATABASE_URL="YOUR DATBASE URL"
Fetching Products from Xata
To query Xata from our Next.js app, we will use getServerSideProps. This is a function that will be called by Next.js when it renders our page:
//index.jsx

import { BaseClient } from '@xata.io/client';

export async function getServerSideProps() {
  const xata = new BaseClient({
    branch: 'main',
    apiKey: process.env.API_KEY,
    databaseURL: process.env.XATA_DATABASE_URL
  });

   const page = await xata.db.products
     .select(["*"])
     .getAll()
  console.log(page.records)
  return {
    props: {
      products: page
    }
  }
}
In the snippet above, we imported BaseClient from @xata.io/client. We used this in our getServerSideProps() function to initialise the Xata Client. To successfully initialise our Xata client we need to have gotten our credentials from Xata and store them in our .env file.
Now that we are successfully fetching our product data from Xata, it only makes sense to display them on the homepage for users to see. To do that, let’s create a components/products.jsx file and add the following:
//components/products.jsx

import Link from "next/link"

const Products = ({ products }) => {
  return (
    <div className="grid grid-cols-2 md:grid-cols-2 lg:grid-cols-2 justify-items-center"">
      {
        products && products.map((prod, index) => (
              <div className="relative w-36 md:w-52 bg-white rounded-md border border-gray-200 shadow-md m-3" key={index}>
                  <div className="">
                      <Link href={`/product/${prod.id}`} className="">
                        <img className='object-cover w-36 md:w-52 h-48' src={prod.imageUrl} alt="" />
                      </Link>
                  </div>
                  <div className="card-info py-2 px-2">
                      <Link href={`/product/${prod.id}`}>
                          <h3>{prod.title}</h3>
                            <p>
                              <b>₦{prod.price}</b> <br />
                            </p>
                      </Link>
                  </div>
                ))
            }
      </div>
    )
}
export default Products
Here, we are mapping through our products and tracking the product details; hence we set product.title for the product name, product.price for the product price, and product.imageUrl for product images.
Next, let’s add the components/products.jsx file to our index.jsx page:
    //index.jsx

    //...

    export default function Home({ products }) {
      return (
        <div className="">
          <main>
            <div id='products' className="">
              <h1 className="text-3xl font-semibold text-center py-10">Products</h1>
              <Products products={products} />
            </div>
          </main>
        </div>
      )
    }

    //getServerSideProps function here
Here, we are exporting a Home page function with a prop of products.
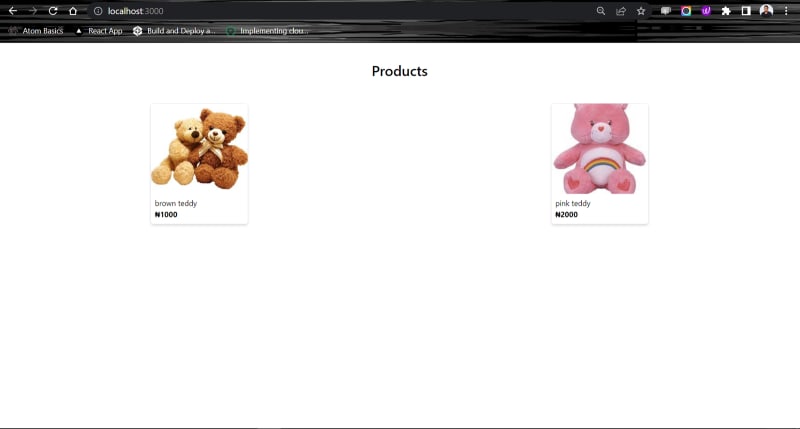
With that, if we reload the homepage on the browser, we should now see our products from Xata render for users to see.
Adding Dynamic Product details
Now that we have our products displayed, we want to implement dynamic pages so that when we click on a product, we open a product details page where you can see more information about the product.
To do that, we’ll follow the standard Next.js approach of using getStaticPaths to generate the dynamic paths and build the pages on demand with our data. We’ll use the Cloudinary Product Gallery widget to display more images of the products. Create a pages/product/[id].jsx file and add the following snippet:
// product/[id].jsx

import { BaseClient } from '@xata.io/client';

export default function product() {
   return (
     // Cloudinary product widget goes here
   )
}
export default product;

export async function getStaticPaths() {
    const xata = new BaseClient({
        branch: 'main',
        apiKey: process.env.API_KEY,
        databaseURL: process.env.XATA_DATABASE_URL
    });

    const page = await xata.db.products
        .select(["*"]).getAll()
    const products = page
    const paths =
        products &&
        products.map((prod) => ({
            params: { id: prod.id }
        }));
    return {
        paths: paths,
        fallback: false
    };
}
Here, we export the getStaticPath() function to make requests to our Xata database and generate all our products via the paths we’ve specified. Then, we loop through the products and assigned id to params.id to match the product ID.
Next, we will update the file and pass the paths we want to generate to the getStaticProps() function and then pass the generated product to our homepage:
// product/[id].jsx

//...

export async function getStaticProps({ params }) {
    const xata = new BaseClient({
        branch: 'main',
        apiKey: process.env.API_KEY,
        databaseURL: process.env.XATA_DATABASE_URL
    });

    const page = await xata.db.products
        .select(["*"])
        .getAll()
    const products = page
    const product =
        products && products.filter((prod) => params.id === prod.id);
    return {
        props: {
            product
        }
    };
}
We can pass the generated product to our IndexPage() component for rendering. However, we don’t just want to render it. We want to use the Cloudinary Product Gallery Widget to display all the different images of the product.
Setting up Cloudinary Product Gallery Widget
The Cloudinary gallery widget relies on the Client-side asset lists feature to retrieve the list of images (or videos) with specified tags. To ensure that this feature is available on your Cloudinary account, you must enable the Resource list option. By default, the list delivery type is restricted. To enable it, open the Security settings in your console and clear the Resource list item under Restricted media types.
Instantiate Gallery Widget
To instantiate the gallery widget, we will use Next’s Custom Document to update the <html> tags used to render a Page.
To override the default Document, create the file pages/_document.js and add the following:
//_document.jsx

import Document, { Html, Head, Main, NextScript } from "next/document";
class MyDocument extends Document {
    render() {
        return (
            <Html>
                <Head />
                <body>
                    <Main />
                    <NextScript />
                    <script
                      src="https://productgallery.cloudinary.com/all.js"
                        type="text/javascript"
                        strategy="beforeInteractive"
                    ></script>
                </body>
            </Html>
        );
    }
}
export default MyDocument;
The snippet above is the default Document added by Next.js that allows custom attributes as props. We’re using it to embed our JavaScript file, incorporating all the product gallery functionality.
Next, update your products/[id].jsx file to match the following snippet:
//products/[id].jsx

const Product = ({ product }) => {
    useEffect(() => {
        const productGallery = cloudinary.galleryWidget(
            {
                container: "#gallery",
                cloudName: "cloudName",
                mediaAssets: [{ tag: `${product[0].tags}`, mediaType: "image" }]
            },
            []
        );
        productGallery.render();
    });
    return (
        <div className='relative mx-auto'>
            <div className="flex flex-col md:w-6/6 p-8 md:flex-row">
                <div className="md:w-4/6 md:h-96 px-5">
                    <div className='' id="gallery"></div>
                </div>
                <div className="price md:w-2/6">
                    <h3 className='text-3xl font-semibold'>{product[0].title}</h3>
                    <p className='text-lg'>
                        {product[0].desc}
                    </p>
                    <p>
                       <b>₦{product[0].price}</b> <br />
                    </p>
                </div>
            </div>
        </div>
    );
};
export default Product;
Here, we initialize the Product Gallery Widget with the cloudinary.galleryWidget() method call and pass the initialization options, including the Cloud name and the tags of the media assets we wish to retrieve. We also specify a key named container as the div element where the gallery will be rendered.
With these, we can now view the individual product and its variants. The final result will look like the GIF shown below.

The live site is hosted on Netlify; you can view the site here.
Conclusion
In this tutorial, we went over querying e-commerce products from Xata and rendering multiple product variant images in a product display page using the Cloudinary Product Gallery Widget. We rendered only images. However, the widget can also render videos, 360 spin sets and 3D models, which you can read more about in the Cloudinary guide. With all these, your application guarantees a seamless experience that speaks much more than a static image.
Resources you may find helpful:

Posted on November 24, 2022
Join Our Newsletter. No Spam, Only the good stuff.
Sign up to receive the latest update from our blog.


