Building Home Provider Application with Xata, Cloudinary, and NextJs

Abdulrasaq Jamiu Adewuyi
Posted on November 23, 2022

Introduction
Nothing is more convenient than a database that works without worrying about its server(s). We don't have to worry about the server because an organization manages it. We don't have to worry about how many servers there are or how much RAM they have.
Xata is a serverless data platform that provides databases that guarantee high durability, availability, and security so we can focus on other things that matter.
In this article, you will learn how to use Nextjs with Xata (a serverless database) and Cloudinary (an assets storage service) to build a highly robust home provider application, Accommodate.
About Accommodate
The project (accommodate) is a platform that allows registered users (hosts) to add new homes to the platform and edit and delete existing homes, where home seekers can see a list of homes added by the hosts.
The main idea is to learn and show developers how easy and flexible it is to use Xata and Cloudinary.
Prerequisites
To follow along, we will need the following:
- Basic knowledge of JavaScript and NextJS
- Install Node.js on our computer
- Preferred code editor Visual Studio Code
Project Overview
I chose this project because it was helpful enough to explore various operations on the Xata database, such as insert, get, filter, create, update and delete. Also, to explore the seamless asset management features Cloudinary has to offer.
Below are some of what we will be working on within this project:
- NextJS: Our Javascript framework of choice. We will use this framework to build our front end.
- Xata: Secure serverless data platform where we will be creating databases
- Cloudinary: A cloud assets storage service where we will be storing images
Below will be the initial screen displayed of our application.
The source code of the project is available on GitHub.
Here is the live link to the deployed application we will be building
Project Live Demonstration
Below is a video demonstration should what we will be building in this article
Project setup
Let's set up our front-end and back-end projects.
Setting up a NextJS project.
The source code of the project is available on GitHub. Feel free to clone or fork. However, to follow through with the tutorial, bootstrap a new Next.js App.
Run the below command on the terminal in our project folder.
npx create-next-app accommodate
accommodate in the above indicate the project name.
Then, we should move to the project directory by running the following:
cd accommodate
Install packages
This project will require the following packages, so let's install them, in our terminal let’s run
npm install @xata.io/cli -g
This will install Xata CLI globally, allowing the Xata command to run on our device.
npm install axios
This will install axios which we will be using to make API calls.
Setting up a Cloudinary Account
Next, signup to Cloudinary with a google account, GitHub account, or email; once signup is completed, we will be redirected to the Xata dashboard console, where we can create databases, tables, and records.
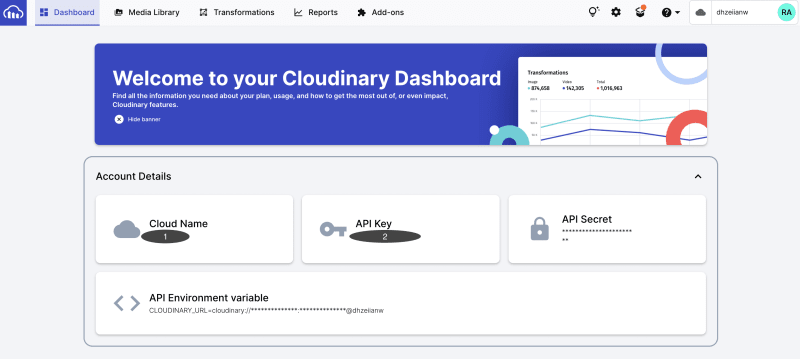
We should get a page like so.
Take note of the Cloud Name and the API Key these are the value we will be using to query Cloudinary APIs.
Setting up a Xata Account
Next, signup on to Xata with a google account, GitHub account, or email; once signup is completed, we will be redirected to the Xata dashboard console, where we can create databases, tables, and records.
With the above steps complete, we are all set. Next, let's create our database.
Creating a Xata database:
To create a Xata database, check out the guide from the Xata documentation. I believe this work guide is simple and easy to follow; however, if you have any questions, feel free to drop them in the comment section.
Click Add a database and specify the database name. Next, create tables.
In this project, we will be creating two tables.
- Users table - To store user information.
- Homes table - To store home information.
Users table
Table name - users
| Field name | Data Type |
|---|---|
| fullname | String |
| String | |
| password | String |
Homes table
Table name - homes
| Field name | Data type |
|---|---|
| title | String |
| price | String |
| location | String |
| dateFrom | String |
| dateTill | String |
| lng | Decimal number |
| lat | Decimal number |
| price | Decimal number |
| category | String |
| image | Multiple select |
| host | Link (link to users table) |
Check out https://xata.io/docs/intro/getting-started for more information on the data types.
Connecting to Xata database:
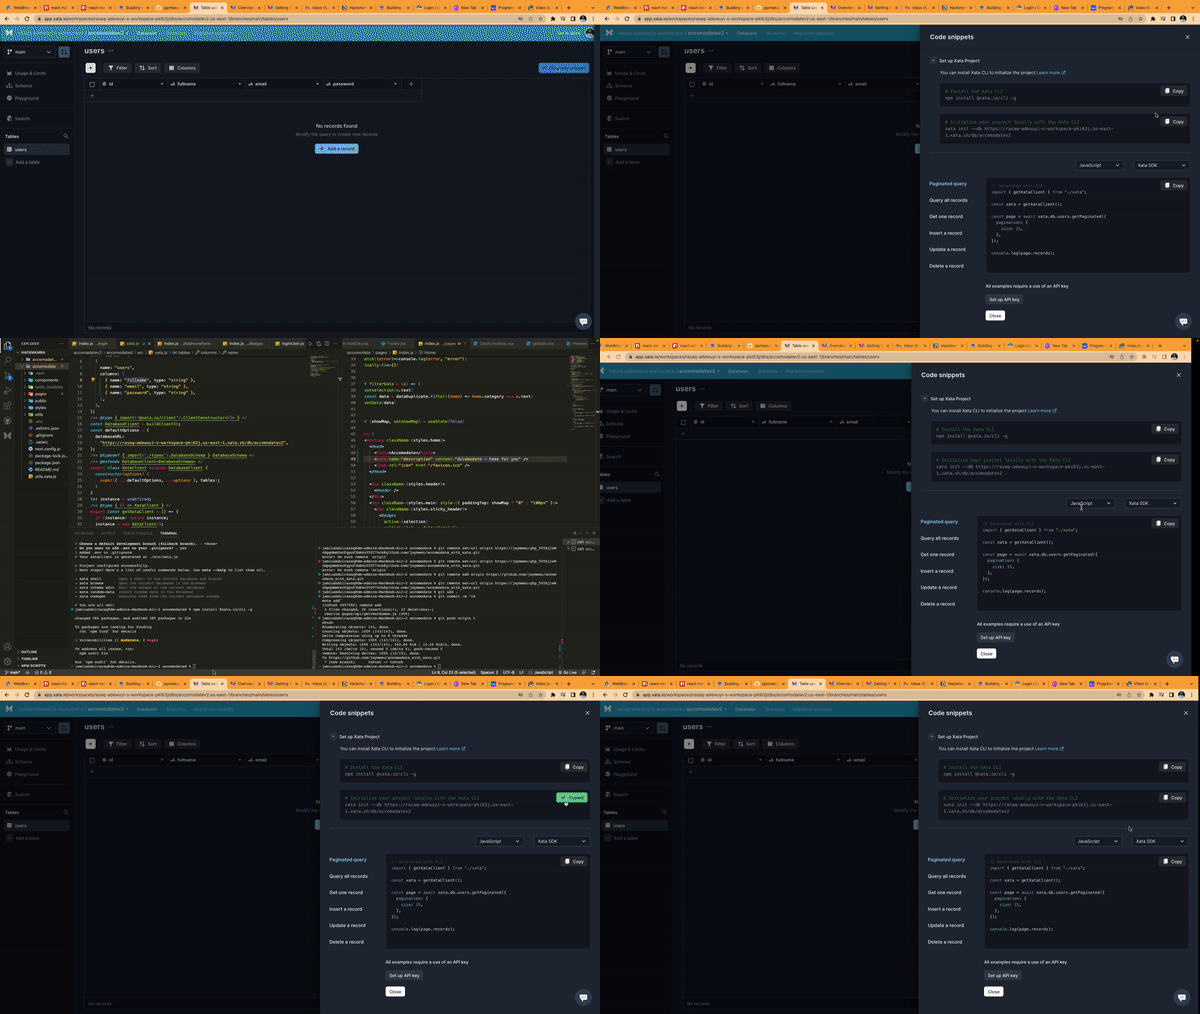
Once the above steps are completed, connect to the created Xata database. To connect, let’s open our project and follow the steps below.
- On our Xata dashboard, click on the
Get code snippetbutton at the top-right corner of the page - Click on the
Setup Xata Projectdropdown button. - Copy the Xata init command; the command should look like so
xata init --db https://**********************.*******.xata.sh/db/accomodate
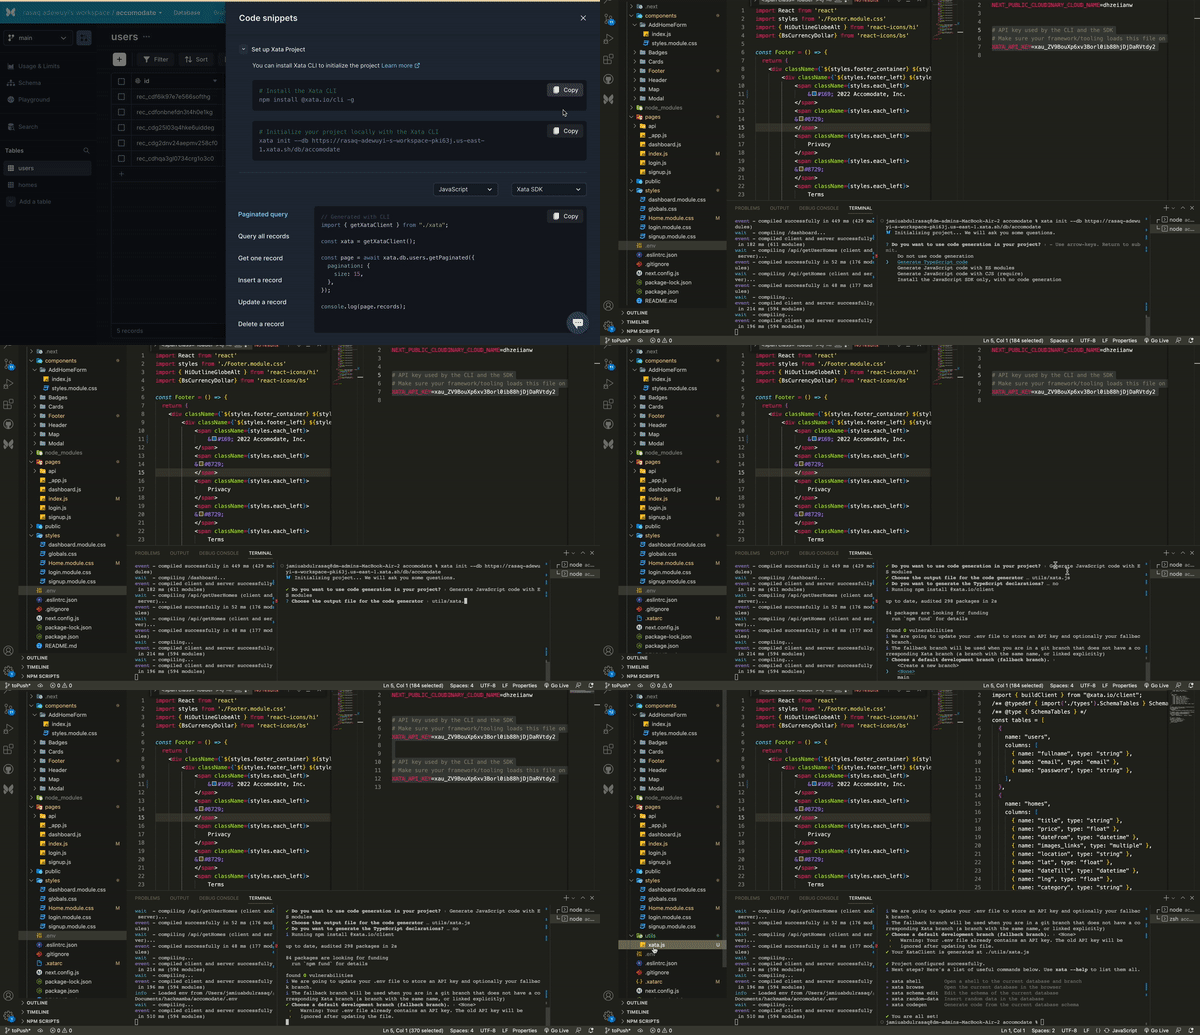
- Then in our project terminal, let’s run the copied Xata init command. This will initialize and pull the database to our project.

To initialize our project, Xata CLI will ask questions allowing it to create configuration files. Kindly supply responses as below:
- Do you want to use code generation in your project? : Generate JavaScript code with ES modules
- Choose the output file for the code generator : utils/xata.js
- Do you want to generate the TypeScript declarations? › N
- Choose a default development branch (fallback branch). : none
Once the pull is done, we should get a message ✔ You are all set!
With this pulled successfully, we can start querying our Xata database.
Let's go ahead to populate our user's table with some records.
From the Xata console, let’s click on our database, then click on the table we want to populate, and next click on the plus sign at the last row of our table.
Fill in the record information and click Create record to continue. We can add as many records as we want.
Now, let's run our first Xata query command.
Query Xata database
In our, NextJS project, open pages/api, let create a file, getUsers.js add code as shown below:
Update index.js like so.
The above shows the simple code snippet to get all records in our user's table. Firstly we import getXataClient for our Xata configuration file generated earlier.
Next, we create an instance of getXataClient using the query command.
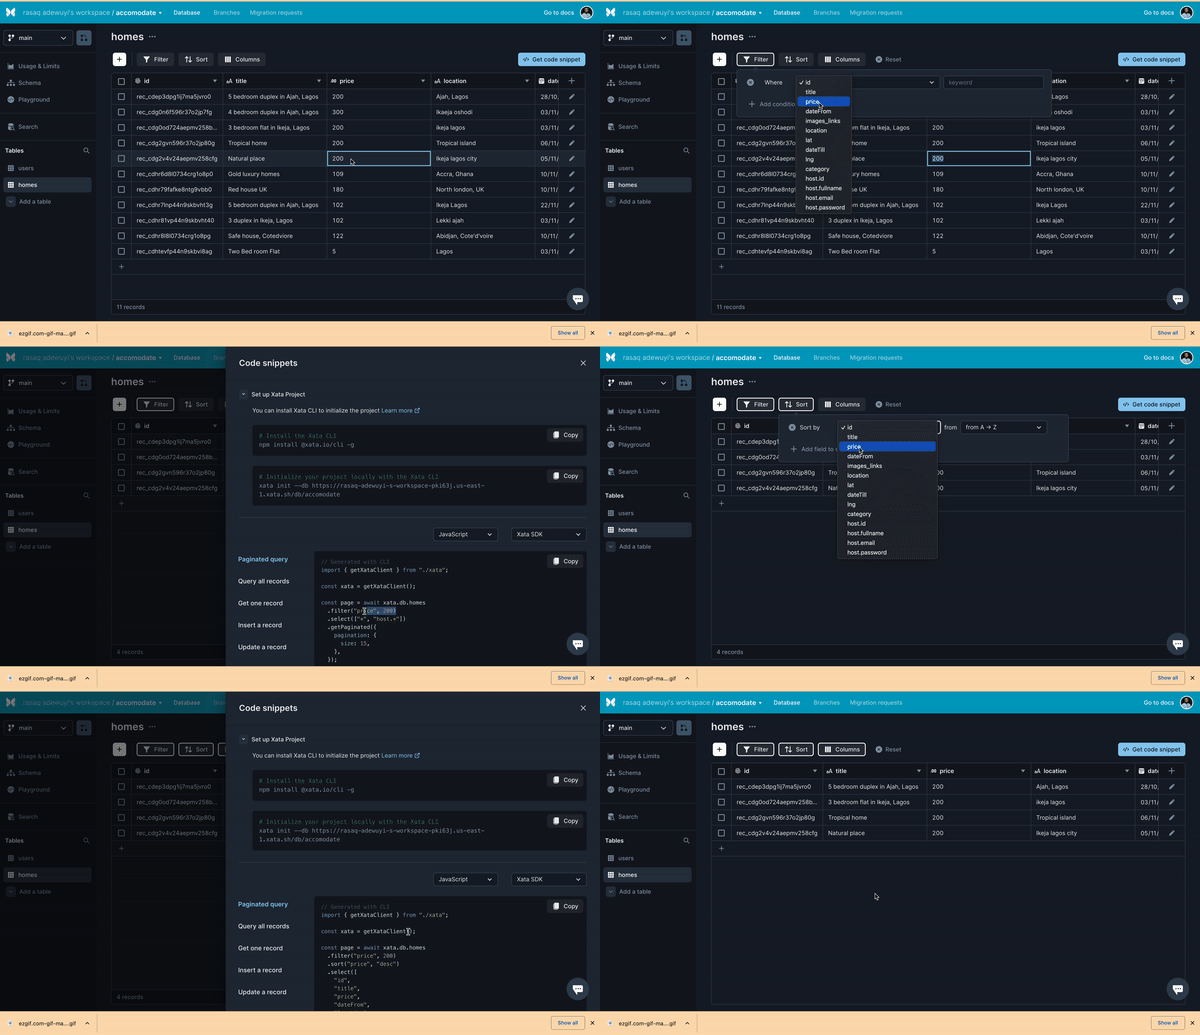
The question is, how do we get the query commands? Xata provides a getting code snippet panel where we can get our query commands, and the code snippet reflects the state of the table.
Check out the illustration below.
Project implementation
With these done, let's start implementing our project.
Project structure
The project structure looks like so.
Create API requests
Let's create an API to get all records from the homes table
In the pages/api folder, let's create a file, getHomes.js, and add code as shown below.
Let's create an API to get homes records added by a specific user
In the pages/api folder, let's create a file, getUserHomes.js, and add code as shown below.
Let's create an API to add new records to the homes table
In the pages/api folder, let's create a file, registerUser.js, and add code as shown below.
Let's create an API to authenticate a user.
In the pages/api folder, let's create a file, namely loginUser.js, and add code as shown below.
Let's create an API to create a user.
In the pages/api folder, let's create a file, registerUser.js, and add code as shown below.
Consume API request
With all these APIs created, the next is to consume them.
Let's consume getHomes API by updating the pages/index.js file as below:
Let's consume getUserHomes API by updating the pages/dashboard.js file as below:
Let's consume loginUser API by updating the pages/login.js file as below:
Let's consume registerUser API by updating the pages/signup.js file as below:
Let's consume addHome API by updating the components/AddHomeForm/index.js file as below:
| Note: the above are code snippets from our code. The complete code can be found on GitHub |
And that is all. We have now completed the implementation of our home provider application.
Now we can deploy the application to our preferred hosting platform. In our case Netlify.
Deploying our app on Netlify
To deploy to a NextJS application on Netlify, follow this article on the Netlify blog post.
Conclusion
I hope you enjoyed this article the same as I did. In this exciting article, I explained how I built a home provider application with NextJS (JavaScript framework), Xata (a Secure serverless data platform), and Cloudinary(A cloud assets storage service).
In this article, we can learn:
- How to create a NextJS application
- How to sign up on Xata
- How to create a Xata database and tables
- How to get code snippets from Xata tables
- How to query Xata
- How to sign up on Cloudinary
- How to insert assets into Cloudinary
- And many more.
What Next?
This is the end of this article, but it won't be my last contribution to the project. The project can still be improved in many ways, such as
- Users requesting home
- Users paying for home
- Getting latitude and longitude from home address
- Host delivering request
If you would like to contribute to this project, you are welcome to Git fork the project and modify it.
You are welcome to connect with me on Twitter. This will enable you to stay up to date with more exciting articles that will be posted here.
Happy coding!
Resources and reference
- Xata documentation
- Deploy Nextjs on Netlify
- UI design ideas and some assets for Airbnb
- Cloudinary documentation

Posted on November 23, 2022
Join Our Newsletter. No Spam, Only the good stuff.
Sign up to receive the latest update from our blog.


