Gregory Ledray
Posted on October 14, 2021

I took a system which used to have ~120 resources, deleted half of it, and replaced those resources with one VM. The new system isn’t just simpler - it performs better than the old one.
Oftentimes when I read infrastructure guides for deploying a workload on AWS the guide is walking me through how to use and coordinate a half dozen AWS services to do something simple, like run an API. Don’t do that. Do what I did. Apply KISS (Keep It Simple Stupid) to your infrastructure to meet your infrastructure needs.
The Service: IntelligentRx.com
https://intelligentrx.com gives people discount coupons for prescriptions. It is written in Vue.js and .NET and runs on AWS.
Infrastructure Goals
- It must run the code, preferably the same way it works on localhost
- It must have a high uptime
- It must tell me when it is not working
- It should be easy to set up
- It should be easy to maintain
- It should be inexpensive
- It should be secure
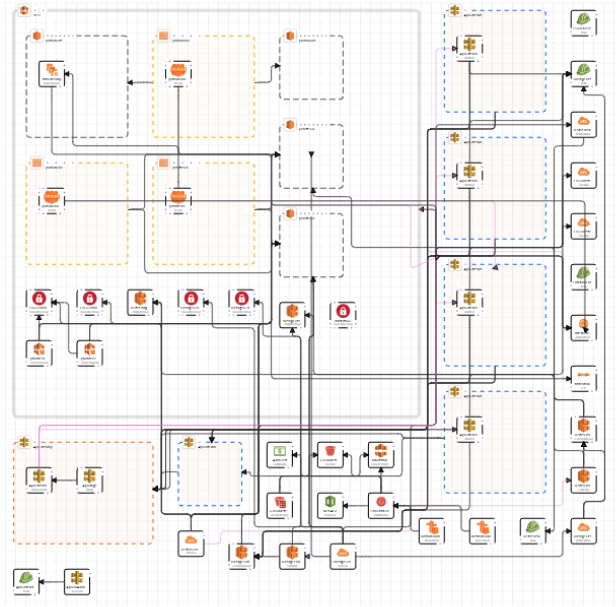
When I started, I inherited a complex CloudFormation infrastructure which I expanded horizontally as I added more services. A few weeks ago the site’s CloudFormation infrastructure looked like this:
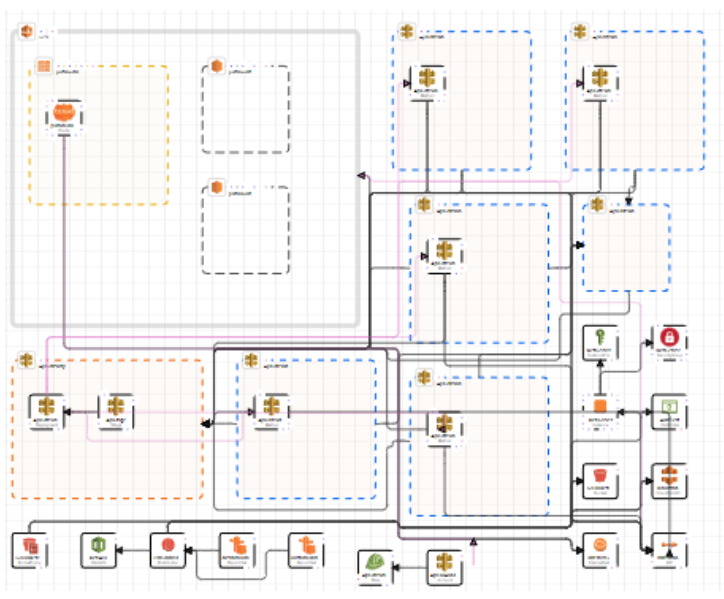
Today, it looks like this:
It now contains half of the resources it used to contain.
Let’s compare these two setups based on the original goals.
- Runs my code: Both. Runs my code the same way I run on localhost? Only the new setup.
- High uptime: The new setup may have a higher uptime O.O
- Uptime notifications: Both.
- Setup cost: The original setup was 1,200 lines of infrastructure-as-code yml. The second setup is 680 lines of infrastructure-as-code yml. The original setup contained about 120 Resources managed by CloudFormation. The second setup contains 66 Resources. Not only is the new system easier to set up because it has fewer moving parts, but the parts which are used are less complex.
- Maintenance: Fewer parts => less maintenance and less knowledge needed for maintenance. The deployment time has gone from ~15 minutes to ~5 minutes for each deployment. Naturally, this shaves 10 minutes off my dev cycle every time I make an infrastructure change.
- Cost: Fewer parts => cheaper.
- Security: Fewer parts => fewer opportunities to mess up configuration & less attack surface => more secure.
The second setup is the clear winner.
What Changed?
The old setup deployed into ECS (Elastic Container Service [runs container images on EC2 for you]). The new setup builds a new container image, restarts the website which is hosted on a t2.large EC2 VM, and then the VM automatically pulls the new image and runs it with Docker Compose.
Yep, that’s right: I took a system which used to have ~70 CloudFormation resources between ECS and the networking resources and Redis and put it all on one chonky VM. Right about now some of you are thinking I’m crazy. Let’s look at the most obvious questions / potential problems with this setup.
What About Scalability?
My biggest fear with this change was that the website would not be able to handle a sudden influx of requests. ECS is more complex, but it also scales. With a single VM on EC2 “scaling” involves manually changing the VM size. That’s not practical if the site has a sudden burst of traffic.
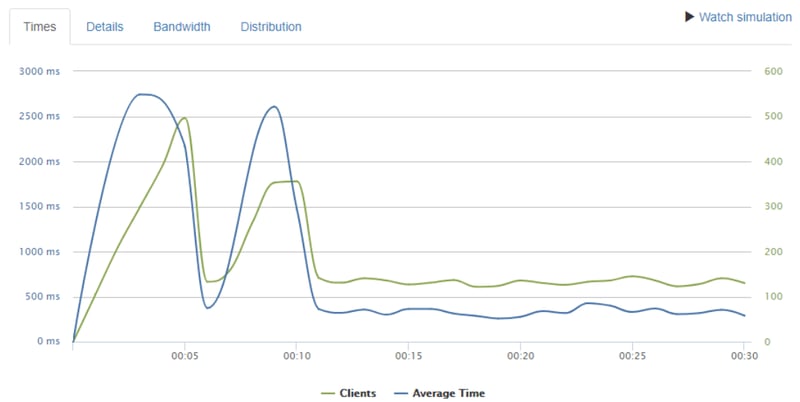
To test if the new system can scale, I used https://loader.io/ to try to figure out how much of a load that one VM can handle. What happens if it receives 100 requests per second? 400 requests per second? As it turns out, this one chonky VM can handle 100 requests per second, every second, for 30 seconds without a sweat:
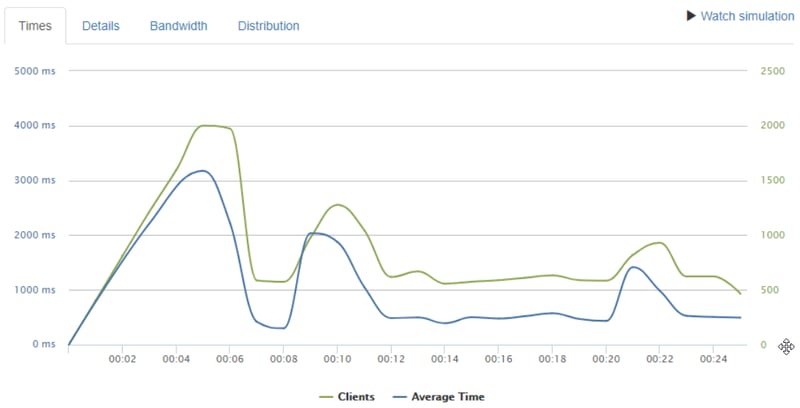
It can handle 400 requests per second too, although the average response time jumps to 1.1 seconds per request:
Regardless, being able to service 400 requests per second is more than enough for this website.
But What About Other Stress Tests?
Other stress tests can cause the website to fail, but not for want of trying: the parts which fail are 3rd party, not this VM or the AWS infrastructure.
So You Traded Away Reliability and Scalability For Simplicity?
Yes. With EC2, the website goes down for 2 - 3 minutes whenever I deploy a change. If the underlying VM fails, the VM is automatically restarted and the website comes up shortly thereafter.
[Edit] When you restart the VM, isn't there downtime?
Yes. As commenters pointed out, this does cause prod downtime while the VM restarts, pulls the new image, etc (1 - 3 minutes in my experience). I compensate in my frontend code with (pseudocode):
if (prodAPICallFailed) {
  fetchWithRetries('staging.example.com/api/endpoint');
}
This only works if your frontend is hosted somewhere else, like in CloudFront. Readers of this post, please recognize that this approach has some asterisks. There are good performance, observability, and reliability reasons for why I still have 600 lines of yml in my CloudFormation template. For example, I use CloudFront to distribute the frontend's code, stored in S3, via a CDN. However, these other features and components have been easy to maintain and deploy quickly, unlike the dozens of components required to set up load balancing to auto-scaling ECS, which this post's approach replaces.
Does This Really Save Time?
YES! Ways I have saved time:
- I went from 15 minutes to test infrastructure changes down to 5 minutes because deployments are faster.
- By using Docker Compose, I know that code which works on my machine works the same way on this VM, giving me a lot of peace of mind. I also gained the ability to make and test some configuration changes locally.
- I’m resolving infrastructure bugs faster because the key part of the infrastructure - where I run the code - is now using widely used open source technologies like Docker and Systemd. Googling for answers to my problems has become trivial instead of a headache.
How It Works
When I make a code change and push, the CI/CD pipeline kicks off:
- The continuous deployment pipeline creates a new docker image or three and pushes it / them to ECR.
- CloudFormation is updated (CloudFormation still holds most of the infrastructure)
- The VM which runs the code is restarted.
- When booting up, the VM runs a systemd daemon.
- The daemon’s pre-start script pulls the updated container image into the VM.
- The daemon’s command runs
docker-compose up - As the application generates logs, they are sent to CloudWatch.
These are the steps you can take to develop such a system yourself:
- Create or refactor an app to use Docker Compose.
- Test with
docker-compose upon localhost. - In your Continuous Deployment stage of your CI/CD pipeline, build a Docker image and push it into an ECR repository called “dev” or “prod” or whatever you call your environment.
- In your deployment script, run these commands or something similar AFTER you have pushed the new image:
INSTANCE_ID=$(aws ec2 describe-instances --filters Name=tag:Name,Values=host-$CURRENT_ENVIRONMENT --region us-east-1 --output text --query 'Reservations[*].Instances[*].InstanceId')

echo $INSTANCE_ID

aws ec2 reboot-instances --instance-ids $INSTANCE_ID
- In AWS, create a VM.
- Install Docker on the VM.
- Set up logging so that your Docker Compose logs flow to CloudWatch.
- Create a Systemd file which runs Docker Compose at startup.
- Edit that Systemd file to include
ExecStartPre=/home/ec2-user/docker-compose-setup.sh - Create /home/ec2-user/docker-compose-setup.sh with these contents so that when your VM restarts & the systemd file is run, the first thing it does is pull an up to date copy of your Docker image:
#!/bin/sh
/usr/local/bin/aws ecr get-login-password --region us-east-1 | /usr/bin/docker login --username AWS --password-stdin [your-aws-account-number].dkr.ecr.us-east-1.amazonaws.com
# Note: The production image (AMI) uses the following line:
# /usr/bin/docker pull [your-aws-account-number].dkr.ecr.us-east-1.amazonaws.com/prod:latest
/usr/bin/docker pull [your-aws-account-number].dkr.ecr.us-east-1.amazonaws.com/dev:latest
/usr/local/bin/docker-compose down
chmod +x /home/ec2-user/docker-compose-setup.sh- Restart the VM.
- Your application should now be running on localhost. You can test if the website is publicly accessible via its ephemeral IP address. You can also attach an elastic IP address and then point your website at this IP address.
- Create an image of this VM. If you are using CloudFormation or another service, reference this AMI (Amazon Machine Image) and you can integrate this VM into your CloudFormation / other service template.
Recap
I cut deployment times, made debugging easier, and did it all in just a couple billable hours. When I started, I didn’t know anything about systemd or EC2 or Docker Compose, but now that I’ve experienced these tools I’m definitely going to use them again. I’d encourage you to give it a try too! Perhaps you will see the same time savings I am currently enjoying.

Posted on October 14, 2021
Join Our Newsletter. No Spam, Only the good stuff.
Sign up to receive the latest update from our blog.


