Using CORS for Cross-Domain Requests

Mary Gathoni
Posted on August 4, 2021

Cover image by Hillary Black on Unsplash
If you have ever opened your browser's console and you saw No ‘Access-Control-Allow-Origin’ header is present on the requesting resource. error message in all red then this post might help you a bit.
You get that error when you try to access a resource from another domain using your browser which is not allowed.
This is due to the same-origin policy which only allows a browser to make requests to the same domain.
The policy is important as it prevents malicious scripts from accessing resources on other domains.
For instance, if you are making a request to http://domain1.com from http://domain1.com/api, the request will go through.
If you instead make the request to another domain say, www.domain2.com/api, the browser will block your request.
So what do you do in a case where you have to make a request to another domain? You use CORS!
What is CORS anyway?
CORS is an acronym for Cross-Origin Resource Sharing.
It allows servers to make cross-domain requests which are otherwise restricted due to the same-origin policy.
How it works
Before a browser makes a request to a server, it first sends a preflight request to check whether that domain and request method is allowed.
If it is, the request is made. If not, the request is blocked.
Enabling CORS
If you have access to the server, then you can enable cors on it and whitelist the domain you are making the request from.
You do this by setting the header, Access-Control-Allow-Origin, to a wildcard(*) character such that it allows any domain to make a request or to a specified list of domains.
{Access-Control-Allow-Origin: '*'}
or
(Access-Control-Allow-Origin: 'http://domain2.com'}
What if you don't have access to the server?
You could use a proxy server that will make the request on your behalf. Your origin will therefore be hidden.
One such proxy is the cors-anywhere proxy. To use it, you only need to prefix the API URL with https://cors-anywhere.herokuapp.com.
Our request URL will now look like this, https://cors-anywhere.herokuapp.com/http://domain2.com
fetch('https://cors-anywhere.herokuapp.com/www.domain2.com`)
.then(response => {
// response
})
.catch(error => console.log(error))
```
This is not the best solution though.
Think about this... if the data you are expecting is location-specific, you will get data according to the location of the proxy server and I assume that won't help you as much.
Also, using a proxy you have no control over can get risky in production.
#### Create your own server
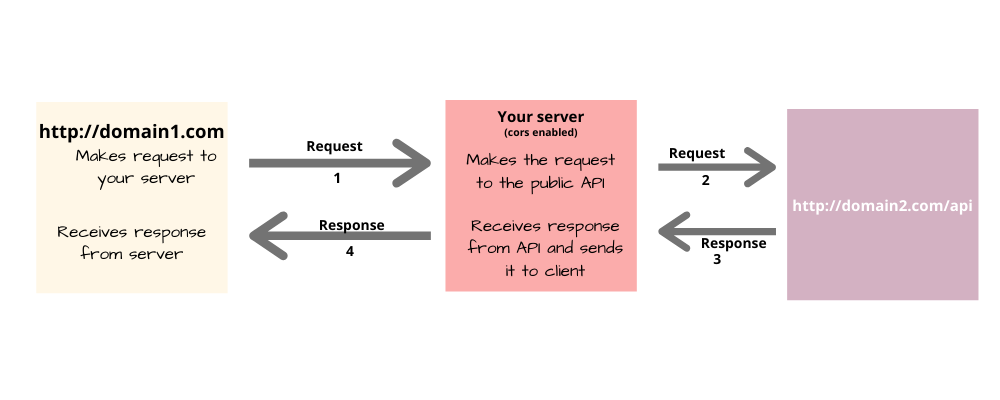
Using a server-side programming language like node js, you can simply create a server you have control over meaning you can directly enable CORS on it.
The server to server request works because the **same-origin policy** does not apply.
To get access to the data from your script:
* Send a request to your server telling it to call the public API
* Your server receives the request because you have enabled cors
* Your server calls the public API
* Since same-origin policy does not apply for server to server requests, it receives a response back
* Your server then sends the response back to you
* You receive and use the response data

I hope this article helped you.
Happy coding :)

Posted on August 4, 2021
Join Our Newsletter. No Spam, Only the good stuff.
Sign up to receive the latest update from our blog.

