feranmiodugbemi
Posted on May 19, 2023

Chatbots have revolutionized the way businesses interact with their customers, providing efficient and personalized assistance. In this tutorial, we will guide you through the process of building a chatbot powered by FaunaDB and the OpenAI GPT-3.5 turbo model. By following the steps outlined below, you'll be able to create an intelligent chatbot that can engage in meaningful conversations with users. Let's get started!
Prerequisites
To follow and fully understand this tutorial, you will need to have:
- Python 3.6 or a newer version.
- A text editor(VS code preferably).
- An understanding of Fauna and Telegram bots.
Step 1: Setting Up the Environment
Before we begin, let's ensure that our development environment is properly set up. We'll need the following libraries:
-
telebot: A Python library for interacting with the Telegram Bot API. -
faunadb: A Python driver for FaunaDB, a serverless cloud database. -
openai: A Python library for accessing the OpenAI models. -
dotenv: A Python library for loading environment variables from a .envfile. Make sure you have these libraries installed. You can usepipto install them:
pip install pyTelegramBotAPI faunadb openai python-dotenv
Next, create a .env file in your project directory to store your environment variables. We'll use this file to store sensitive information like API keys.
Step 2: Setting Up the Fauna database
The first thing you need to get started with Fauna is to create an account on the official website. You can do that using either your email address or your github or netlify account here: https://dashboard.fauna.com/accounts/register
We'd need the fauna database to store and retrieve user's messages for effective communication with our chatbot
Creating our database

After creating our account with fauna, we will be creating a database to store our Users and Messages. Here we'd be asked for our database name and we are going to name it MyChatBot and our region is going to be set to Classic and like that we've created our database, easy right😌. Then, we should be presented with a screen like this one below:
Creating our collection
Next, we'd be creating our collections, which is basically Tables in the SQL world but with a twist in our context.

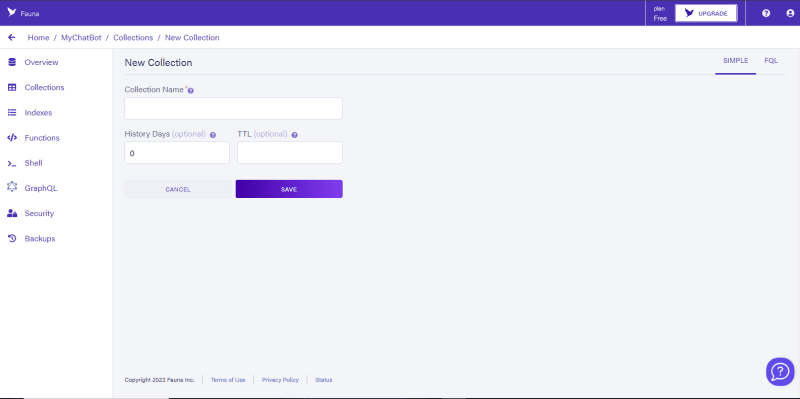
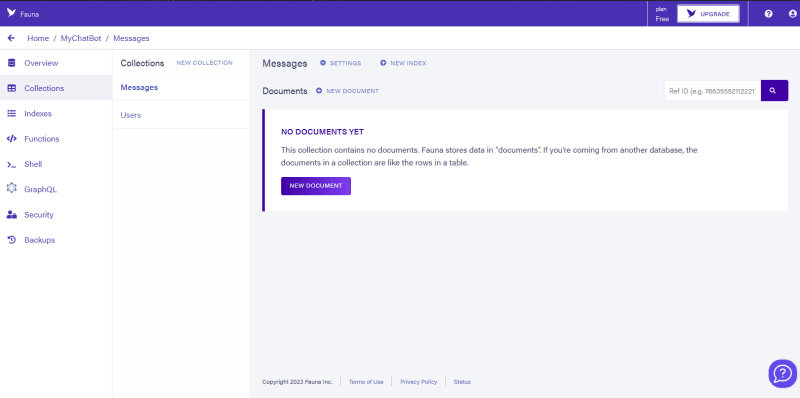
To create our Collection, click on the Create Collection button on the home page and give it a name, but since we'd be creating two collections we'd be naming them Users and Messages. The Users collection is for storing our user's data and ID from telegram, while the Messages collection is for storing the user's chat history with the bot. You will be asked for History Days and TTL. The History Days is used to define the number of days Fauna should retain a historical record of any data in that particular collection while the TTL serves as an expiry date for data in the collection. For example, if the TTL is set to 7, any data stored in that collection will be automatically deleted 7 days after its last modified date, but for this tutorial we'll not be needing it so it will be left untouched. After creating the two collections, we should be seeing this:

Creating our Index
Wondering what an Index is🤔?, Well an Index is simply a way to browse data in our collection more efficiently by organizing it based on specific fields or criteria, allowing for faster and targeted retrieval of information. To create our Index, we'll navigate to the Index tab and we should see something like this:

To create our Index, we first of all need to Select a Collection, then specify our Terms, which is the specific data the Index is only allowed to browse. But for this tutorial we will be creating two Indexes, users_by_id which would be under our Users collection for registering users and users_messages_by_username which would be filtering our user's messages by their username. The Terms for users_by_id would be set to data.user_id while the Terms for users_messages_by_username will be set to data.username, then click SAVE to continue.
Getting our Database key
Before we begin building a Python app that uses Fauna, we need to create an API key that would allow our application to easily communicate with our database. To create an API key, we need to navigate to the security tab on the Fauna sidebar (on the left side of the screen).

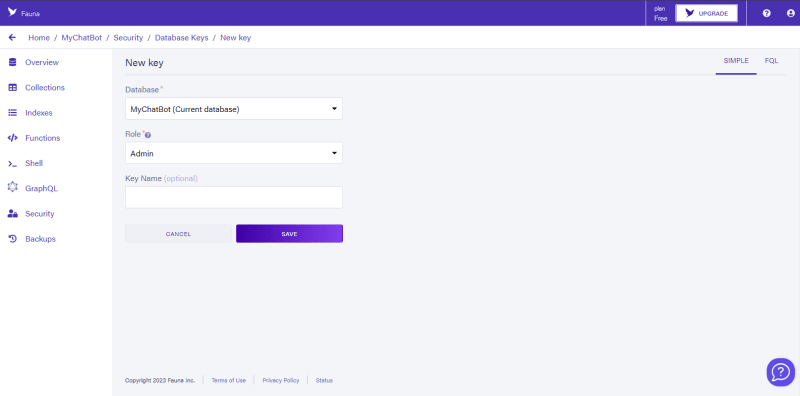
Next, we are to click on the NEW KEY button that will navigate us to the page below:

Here, we would set our key role to Server instead of Admin and set our Key name to our database name which is optional, then click on SAVE and we'd be navigated to a page where our database key would be displayed and meant to be copied immediately. We should see something like this:

After getting the API KEY, store it in the .env file we created earlier in a FAUNA_SECRET_KEY variable.
Step 3: Creating our telegram bot
A Telegram bot is an automated program that operates within the Telegram messaging platform. It is designed to interact with users and perform various tasks, such as providing information, delivering updates, answering queries, and executing commands. These bots are created using Telegram's Bot API and can be integrated into group chats or used in one-on-one conversations.
Conversation with BotFather
BotFather is an essential bot created by the developers of Telegram for creating and managing other bots on the Telegram platform. To interact with BotFather, we need to have a Telegram account. We can search for "@botfather" in the Telegram app to initiate a conversation.

Conversation with BotFather
To create a new bot with BotFather, we will use the /newbot and then supply the name of our bot and we'll then be given our bot API KEY which is the HTTP API access token in the image. We will the store our token key in our .env file in a BOT_SECRET variable. Now, we can now fully proceed to writing code🤩.


Step 4: Importing necessary packages:
As mentioned previously, we require certain packages to develop our bot. Now, we will proceed to import these packages.
import telebot
from faunadb import query as q
from faunadb.objects import Ref
from faunadb.client import FaunaClient
import openai
from dotenv import load_dotenv
import json
import os
load_dotenv()
bot = telebot.TeleBot(os.getenv("BOT_SECRET"))
The load_dotenv() is to load our environment variables and the bot = telebot.TeleBot(os.getenv("BOT_SECRET")) is to create a bot object for our telegram bot.
Step 5: Creating our commands:
Commands in Telegram bots are specific keywords or phrases that trigger the bot to perform a certain action or provide a specific response. For instance, when we utilized the /newbot command during our interaction with BotFather, it initiated a function that facilitated the creation of a new bot. Now, copy and paste the code down below:
def chat(question, user):
    userid = user.from_user.id
    username = user.from_user.username
    return question

def image(prompt, user):
    userid = user.from_user.id
    return image

user_state = {}
@bot.message_handler(commands=['start'])
def start_message(message):
    user_id = message.from_user.id
    username = message.from_user.username
    bot.reply_to(message, "Hello")
@bot.message_handler(commands=['chat'])
def chat_message(message):
    # Set the user's state to 'help' and output a help message
    user_state[message.chat.id] = 'chat'
    bot.reply_to(message, "Hello, how may i help you: ")


@bot.message_handler(commands=['image'])
def image_message(message):
    # Set the user's state to 'help' and output a help message
    user_state[message.chat.id] = 'image'
    bot.reply_to(message, "What kind of image are you creating today: ")


@bot.message_handler(commands=['reset'])
def reset_message(message):
    # Set the user's state to 'help' and output a help message
    user_state[message.chat.id] = 'reset'
    bot.reply_to(message, "Resetting chat......... ")

@bot.message_handler(func=lambda message: True)
def echo_all(message):
    if message.chat.id in user_state and user_state[message.chat.id] == 'chat':
        chat_message = message.text
        user = message
        bot.reply_to(message, chat(chat_message, user))

    elif message.chat.id in user_state and user_state[message.chat.id] == 'start':
        user = message
        bot.reply_to(message, user)
        user_state[message.chat.id] = None

    elif message.chat.id in user_state and user_state[message.chat.id] == 'image':
        image_prompt = message.text
        user = message
        bot.reply_to(message, image(image_prompt, user))
        user_state[message.chat.id] = 'image'
        bot.send_message(message.chat.id, "What Image are you creating again?")

    elif message.chat.id in user_state and user_state[message.chat.id] == 'reset':
        chat_reset = message.text
        bot.reply_to(message, reset())
        user_state[message.chat.id] = None


bot.polling()
Now, let's now go through the functionalities of the code above
The bot responds to user commands such as /start, /chatand /image, while maintaining the conversation state for each user using the user_state dictionary. Upon receiving the /start command, the bot sends a "Hello" reply and resets the user's state. Similarly, when the /chat command is received, the bot asks how it can help and sets the user's state to 'chat'. In the case of the /image command, the bot prompts the user for the type of image and sets the state to 'image'. For any other messages, the bot checks the user's state and responds accordingly, such as echoing the message in the 'chat' state, requesting the image prompt again in the 'image' state, providing user information and resetting the state in the 'start' state. The bot continuously listens for incoming messages using bot.polling().
Step 5: Updating our commands
The code provided in step 4 was only a small portion of our chatbot implementation. Presently, we will be enhancing our code to develop a fully operational chatbot.
The /start command
The /start command will serve as the initial entry point for our chatbot. It will verify whether a user exists in our faunadb User collection using the users_by_id index we created earlier, and if not, it will add the user to the User collection and then send a message that will redirect the user to our /chat which handles our chat functionalities. This process involves retrieving the user's username and ID from our Telegrambot API. The updated code:
@bot.message_handler(commands=['start'])
def start_message(message):
    client = FaunaClient(
        secret=os.getenv('FAUNA_SECRET_KEY')
    )
    user_id = message.from_user.id
    username = message.from_user.username
    user_exists = client.query(
        q.exists(q.match(q.index("users_by_id"), user_id)))
    if not user_exists:
        client.query(
            q.create(
                q.collection("Users"),
                {
                    "data": {
                        "user_id": user_id,
                        "username": username
                    }
                }
            )
        )
    bot.reply_to(message, "🌿🤖 Hello! Welcome to the fauna and gpt3 powered bot! 🌟💫\nTo begin, type /chat or click on it")
The /chat command
To create our chatbot, we will first create a faunadb client using the FaunaClient class and our secret key from an environment variable. Then, we will prepare a data object containing the username and the user's question, and insert it into the Messages collection in FaunaDB.
Next, we will retrieve the previous messages associated with the username by executing an index query. This query will retrieve all documents from the Messages collection that match the username, and we will extract the content of each message and store them in a list called "messages".
After that, we will set up the OpenAI API by configuring the API key from an environment variable. We will also define the persona of the assistant within a system message.
Then, we will construct the conversation prompt by combining the system message, user messages, and assistant messages from the messages list. We will use this conversation prompt to generate a response from the GPT-3.5 Turbo model, and then extract the generated reply from the API response.
We will then prepare the data for the assistant's reply and insert it into the Messages collection within FaunaDB. Finally, we will return the generated reply as the output of our chatbot.
def prompt(username, question):
    # Create a FaunaDB client
    client = FaunaClient(secret=os.getenv('FAUNA_SECRET_KEY'))
    data = {
        "username": username,
        "message": {
            "role": "user",
            "content": question
        }
    }
    result = client.query(
        q.create(
            q.collection("Messages"),
            {
            "data": data
            }
        )
    )
    index_name = "users_messages_by_username"
    username = username
    # Paginate over all the documents in the collection using the index
    result = client.query(
        q.map_(
            lambda ref: q.get(ref),
            q.paginate(q.match(q.index(index_name), username))
        )
    )

    messages = []

    for document in result['data']:
        message = document['data']['message']
        messages.append(message)

    # Set up OpenAI API
    openai.api_key = os.getenv('OPENAI_SECRET_KEY')

    # Define the assistant's persona in a system message
    system_message = {"role":"system", "content" : "A helpful assistant that provides accurate information."}

    # Construct the conversation prompt with user messages and the system message
    prompt_with_persona = [system_message] + [
        {"role": "user", "content": message["content"]} if message["role"] == "user"
        else {"role": "assistant", "content": message["content"]} for message in messages
    ]

    # Generate a response from the model
    response = openai.ChatCompletion.create(
        model="gpt-3.5-turbo",
        messages=prompt_with_persona
    )

    # Extract the generated reply from the API response
    generated_reply = response["choices"][0]["message"]["content"]

    newdata = {
        "username": username,
        "message": {
            "role": "assistant",
            "content": generated_reply
        }
    }
    result = client.query(
        q.create(
            q.collection("Messages"),
            {
            "data": newdata
            }
        )
    )

    return generated_reply
If the user exists, the preceding steps will take place, which is why we created a prompt function to handle this scenario. In our chat function, if the user exists, the prompt function is executed. However, if the user does not exist, they are redirected back to the /start command in order to register them. The updated chat function:
def chat(question, user):
    client = FaunaClient(
        secret=os.getenv('FAUNA_SECRET_KEY')
    )
    global chat_list
    userid = user.from_user.id
    username = user.from_user.username
    user_exists = client.query(
        q.exists(q.match(q.index("users_by_id"), userid)))
    if user_exists:
        reply = prompt(username, question)
        return reply
    else:
        return "🌿🤖 Hello! Welcome to the fauna and gpt3 powered bot! 🌟💫\nThis user is not logged in , type /start or click on it to login"
The /image command
The /image command is utilized to transform user text into images. Here's how it operates: First, it verifies if the user exists in the database. If the user exists, it proceeds to generate and return the image url output using the openAI Dall-E 2 model. The updated code:
def image(prompt, user):
    client = FaunaClient(
        secret=os.getenv('FAUNA_SECRET_KEY')
    )
    userid = user.from_user.id
    openai.api_key = os.getenv('OPENAI_SECRET_KEY')
    user_exists = client.query(
        q.exists(q.match(q.index("users_by_id"), userid)))
    if user_exists:
        generated_image = openai.Image.create(
            prompt=prompt,
            n=1,
            size="1024x1024"
        )
        image_url = generated_image['data'][0]['url']
        return image_url
    else:
        return "🌿🤖 Hello! Welcome to the fauna and gpt3 powered bot! 🌟💫\nThis user is not logged in , type /start or click on it to login"
Having completed the necessary implementations, it is now time to put our bot to the test and ensure its full functionality.

Conclusion
Congratulations! You have successfully built an intelligent chatbot using FaunaDB and the OpenAI GPT-3.5 turbo model. By integrating FaunaDB for message storage and retrieval, and leveraging the power of GPT-3.5 turbo for generating responses, your chatbot can engage in meaningful conversations with users.
Feel free to customize and enhance your chatbot by adding more features, improving the conversation flow, or integrating it with other platforms. The possibilities are endless!
Remember to handle security considerations, such as protecting sensitive data and managing access to API keys, to ensure the secure operation of your chatbot.
Happy bot-building!
Link to code: https://github.com/feranmiodugbemi/Fauna-chat-bot

Posted on May 19, 2023
Join Our Newsletter. No Spam, Only the good stuff.
Sign up to receive the latest update from our blog.
