F53
Posted on November 24, 2022
MetaIntro:
Early this year I made a mod that adds a Custom CSS to Slack inspired by Discord mods that do the same.
I was happy enough with how the mod worked to release it proper, but never got the blog for installing it done. Because of MacOS being stupid.
I am abandoning SlackMod, but it will keep working for a LONG time because of the way I made it.
The following is the blog I was never proud of enough to publish, going over how to install the mod.
Intro:
If you are interested in the development process I have went through, take a look at my other blogs on the mod.
After a whole lot of work, I am finally happy enough to do an official release for the mod!
Slack Mod Prerequisites:
Slack Mod needs Python 3 and Git to work, if you already have those installed, click here to jump ahead
Installing Python 3:
Download the Python installer relevant to your OS and go through its setup process.
If you did that right, running python3 --version in your console should output something like Python 3.XX.X
Installing Git (if you dont already have it)
Download the git installer relevant to your OS and go through its setup process.
If you did that right, running git --version in your console should output something like git version X.XX.X
Installing Slack Mod
Downloading the mod
First, open a terminal and cd to a directory you dont often delete everything and are ok with having ~14kb inside of.
Then, clone SlackMod into that directory:
git clone https://github.com/CodeF53/SlackMod
Installing needed Python libraries:
cd into the directory you cloned SlackMod into
cd SlackMod
Then, install the needed python libraries:
python3 -m pip install -r requirements.txt
Running Slack Mod
Manually
To start the mod, run the Python launch script in your SlackMod directory:
python3 slack_launch.py
Doing this every time you want to launch Slack can be cumbersome, to make it easier you can make some launch scripts:
Making Launch Scripts:
Windows Launch Scripts:
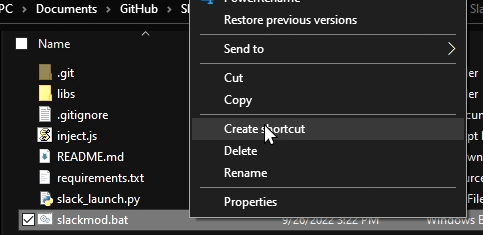
Right click slackmod.bat and click Create shortcut:
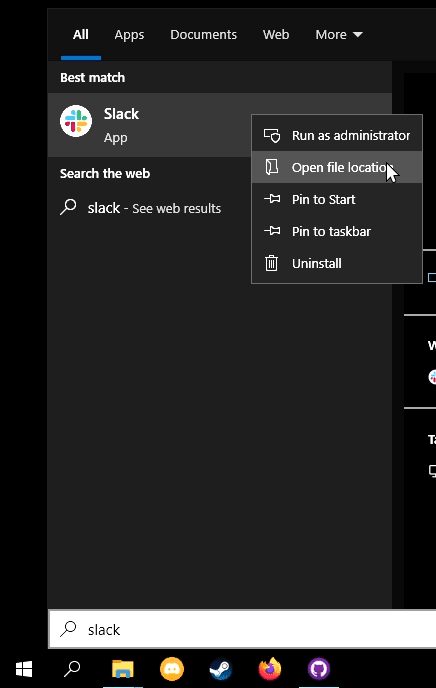
Press the windows key, type slack, then right click Slack and click Open file location:
Click and drag slackmod.bat - Shortcut to the folder you just opened.
Now, when you search "slack" in the windows search thing slackmod.bat shows up.
Optional - Making it look a tad nicer:
If you dont want it to be called slackmod.bat or want it to have a nice icon, follow this:
Right click slackmod.bat - Shortcut, click Rename, then type in whatever you want it to show up as:
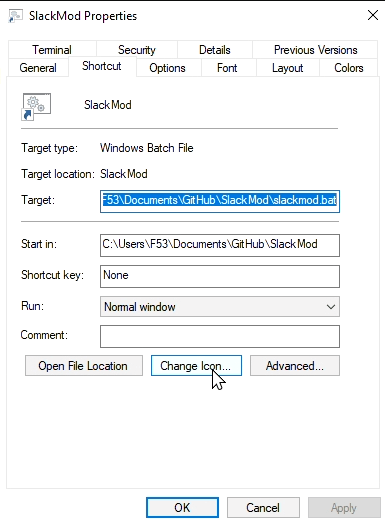
Right click whatever you just renamed the shortcut to, click Properties, then click Change Icon...
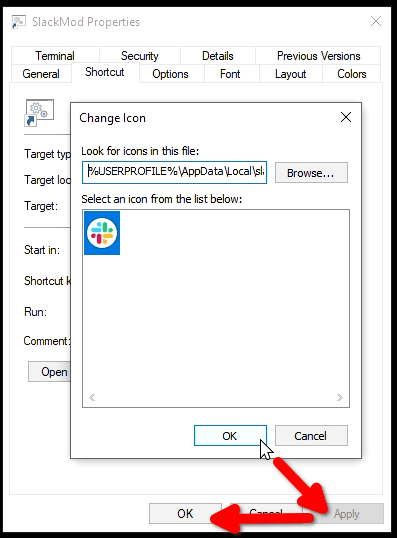
Then, paste the following into the bar below Look for icons in this file:, making sure to replace it's old contents.
%USERPROFILE%\AppData\Local\slack\slack.exe
Then, click OK > Apply > OK
Putting it on the desktop:
Click your SlackMod shortcut, ctrl+c, click on your desktop, ctrl+v
MacOS Launch Scripts:
I am currently working on finding a neat way to make launch scripts on macos.
Currently, if you are on mac, you just have to live with closing slack manually and running the command.
Linux Launch Scripts:
Start by starting a superuser shell because we will be creating files where we need it:
sudo -i
Then, cd to wherever your distro stores .desktop files for it's start menu, for manjaro this is /usr/share/applications
cd /usr/share/applications
Then, make SlackMod.desktop with this command:
echo "[Desktop Entry]
Type=Application
Icon=slack
Name=SlackMod
Terminal=false
Hidden=false
Keywords=slack;slackmod
Exec=python3 slack_launch.py
Path=[path to your slackmod directory]" > SlackMod.desktop
Make sure to fill Path=[path to your slackmod directory] with a valid path, for example:
Path=/home/f53/Projects/SlackMod
Double check your work by trying to get the contents of the new desktop file
cat SlackMod.desktop
Your output should look like this:
Updating Slack Mod:
If you see that there have been new updates to the mod you want to try out, updating is pretty easy! Simply open a terminal in your SlackMod directory and run the following command:
git pull

Posted on November 24, 2022
Join Our Newsletter. No Spam, Only the good stuff.
Sign up to receive the latest update from our blog.


