A thousand ways to deploy Machine learning models - A.P.I

Oluwafemi Tairu
Posted on January 24, 2020

Originally posted here
“What use is a machine learning model if you don’t deploy to production “ — Anonymous
You have done a great work building that awesome 99% accurate machine learning model but your work most of the time is not done without deploying. Most times our models will be integrated with existing web apps, mobile apps or other systems. How then do we make this happen?
I said a thousand, I guess I have just a few. I am guessing you would have found the right one for you before you get past the first two or three. Or do you think there are more? Do let me know, let’s see if we can get a thousand 😄.
Let’s start, how do we deploy Machine learning models or integrate with other systems?
1. Via an A.P.I
This involves making your models accessible via an Application Programming Interface (A.P.I).
First, I will be deploying a deep learning model built by Rising Odegua to classify malaria cells. The notebook can be found here.
Then I will also deploy a simple Nigerian movie review classifier model built by Aminu Israel. The notebook can be found here.
Deployment of a deep learning model via an A.P.I
After building and testing your deep learning model the next thing to do is to save your model. This can simply be done by adding this line of code.
cnn_model.save('model_name.h5')
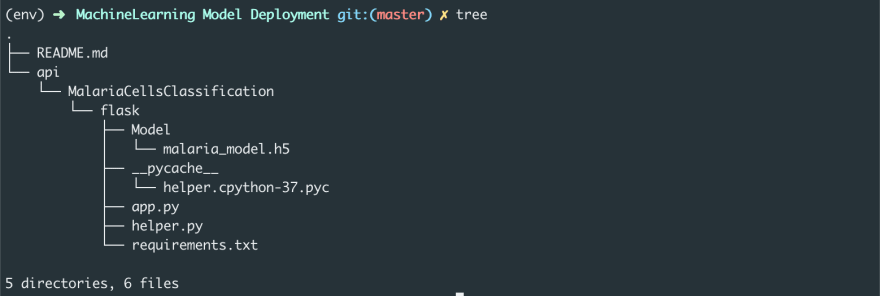
You can move your saved model to the folder accessible to your A.P.I code. I will be using Flask for deployment but Django, Starlette or any other python frameworks can be used. Here is what my folder structure looks like -
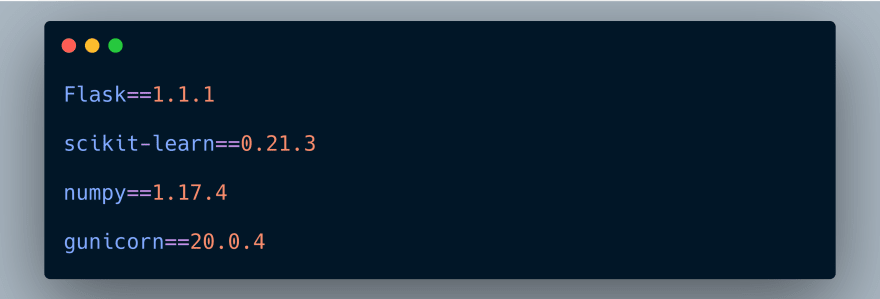
Coming over to our A.P.I folder (powered by Flask) first thing you will want to do is install the requirements. I saved the requirements in requirements.txt. Here is what it looks like
You can install these requirements simply by running this in your terminal
pip install -r requirements.txt
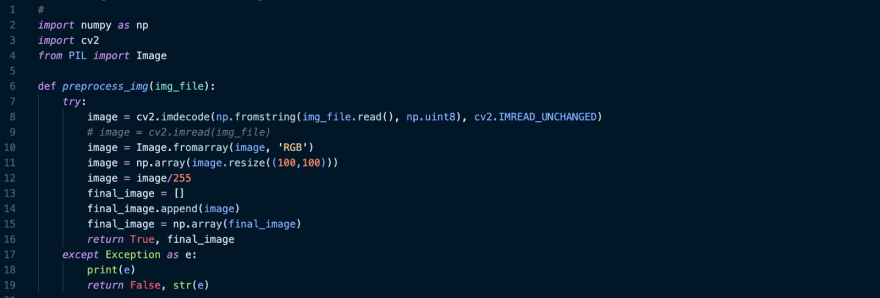
Just as we preprocessed images before passing them to our neural network for training, we would also preprocess all input images we collect via our A.P.I endpoint.
On line 8 we converted the image collect via the A.P.I endpoint to an array. You will notice a little difference in what you would have done on a norm and that’s simply because of Flask’s data storage. Using the code on Line 9 would do the same on a Framework like Django or if you are loading from a path on your machine.
From lines 10–15 we get an RBG version of our image, resized the image to 100x100 and convert the image to a numpy array. We also scaled our image to the range [0, 1] and return a tuple containing True if no error occurs and an array with our image in it.
The image above shows the function that performs the magic.
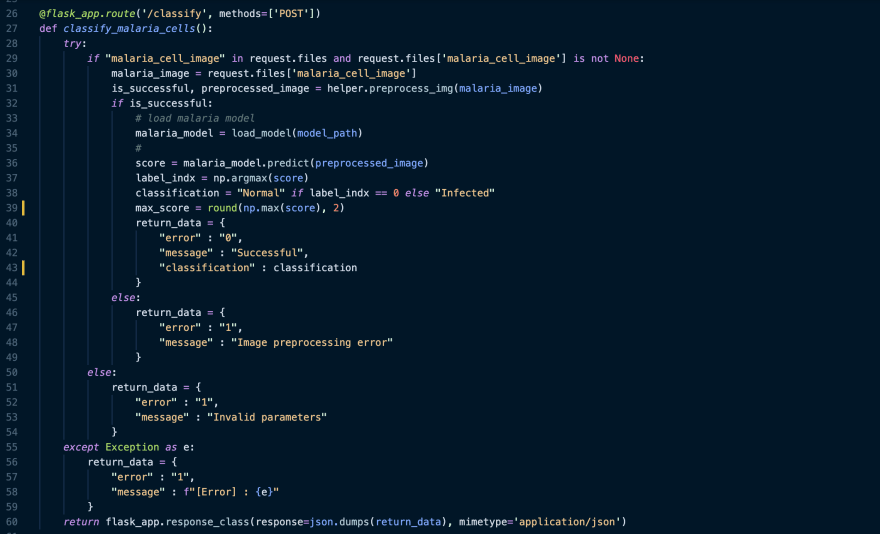
Line 26 simply means that the function “classify_malaria_cells” would be executed when the “classify” endpoint is called.
On line 29 we are checking to see if the request contains an image file. Then we preprocess that image using the helper function we created.
The saved model can be loaded using
from keras.models import load_model
# OR
# from tensorflow.keras.models import load_model
malaria_model = load_model(MODEL_PATH)
From lines 34 to 39, we loaded the saved model, performed prediction to determine the class for the image and get an accuracy score for the prediction. On line 40 the result from the model is saved in a python dictionary that will be sent back as a JSON response on line 60.
We end our A.P.I with:
if __name__ == “__main__”:
    flask_app.run(port=8080, debug=False, threaded=False)
With this, we have successfully built our A.P.I and it is ready for deployment to any cloud platform.
Deploying to Google Cloud
- Create a Google Cloud Account — https://cloud.google.com/
- Create a new Google Cloud Platform project. You can follow the steps here
- Go to the root of this flask project in your terminal and run:
python gcloud app deploy
** I have also added a Procfile for deployment to Heroku, just follow the steps here to deploy.
Deployment of a machine learning model via an A.P.I
This is almost the same as with the deep learning model. However, saving your models here is quite different. You could save your model using —
import pickle
FILENAME = 'filename.pkl'
pickle.dump(trained_model, open(FILENAME, 'wb'))
or
import joblib
FILENAME = 'filename.joblib'
joblib.dump(trained_model, FILENAME)
It is advised that joblib be used to save models rather than using pickle because of its efficiency on objects that carry large numpy arrays internally.
Just as we did with the deep learning model, save your model in a folder accessible to your Flask A.P.I code. Here is what my file structure looks like
Our requirements are a little different here.
You can install these requirements simply by running this in your terminal again.
pip install -r requirements.txt
Next, we would import the required modules and initialise some variables.
In the helper function above, we split the sentence into words, removed the stop words loaded from the pickled file on Line 10. On line 18, a HashingVectorizer is used to the tokenized words into a matrix. The output of this is a scipy.sparse matrix.
Our movie review will be in text format. In Line 24 we check to see if the required form data is been sent and then we assign a variable name to the form data on Line 25. On line 28, we opened and loaded our movie review classifier with pickle(you can achieve the same with joblib). On lines, 29–36 we passed the vectorized movie review into our movie review classifier for prediction, calculated a prediction probability score and created a python dictionary to pass out the results of our prediction. The output is then sent back as a JSON response on Lines 47.
We have successfully built a movie review classification A.P.I and it is ready for deployment to any cloud platform. I have also added a config file for deployment to both Google Cloud and Heroku.
That’s all on model deployment via an A.P.I. You can find the codes used in this article here.
In my next article, I will share how to deploy machine learning models to Apps with TensorFlow Lite.
Thanks for reading 👍

Posted on January 24, 2020
Join Our Newsletter. No Spam, Only the good stuff.
Sign up to receive the latest update from our blog.
Related

November 17, 2024

November 14, 2024


