Hello XState Part 2: Exploring the XState Viz example

Eka
Posted on July 13, 2020
In my previous post, I discussed why I wanted to learn to use state machines via the XState library.

Hello XState Part 1: Learning state machines for frontend web development
Eka ・ Jul 12 ・ 5 min read
XState is well-documented with ready-to-fork templates for vanilla JS and popular JS frameworks. It also has a cool feature called the XState Viz (Visualizer) which, as the name suggests, displays our machine as a diagram with a live sandbox. It’s available in a web-based version and as a package to run locally.
Now let’s open the web-based XState Viz and go over the default example to learn foundational concepts of a machine in XState.
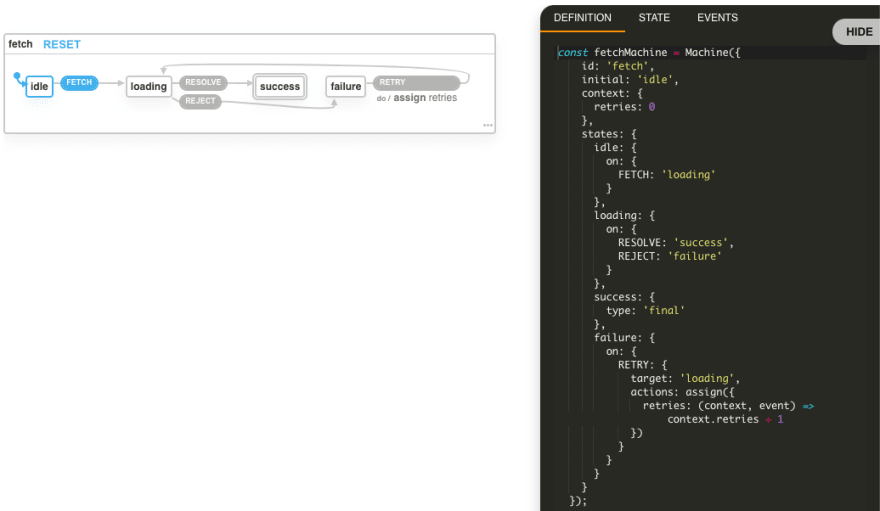
On the left we have a diagram illustrating the machine, called fetch. On the right we have 3 tabs: Definition, State, and Events.
Defining the machine
The Definition tab contains… well, the machine’s definition 😬. Here we use the Machine() factory function that creates a state machine or statechart. We pass a configuration object there, like so.
const fetchMachine = Machine({
  // Machine identifier
  id: 'fetch',

  // Initial state ...

  // Local context for entire machine ...

  // State definitions ...
});
We use the id fetch to identify our machine, which is reflected in the top-left diagram label.
States
A state is an abstract representation of a system (such as an application) at a specific point in time.
https://xstate.js.org/docs/guides/states.html
The fetch machine has 4 states. In the diagram, a state is represented by a bordered rectangle. The current active state is indicated by a blue border.
The states are:
-
idle— This is the initial state, as shown by the blue border as well as the start arrow on the left. loadingsuccessfailure
We define the states in the states property and the initial state mode in the initial property.
const fetchMachine = Machine({
  id: 'fetch',

  // Initial state
  initial: 'idle',

  // Local context for entire machine ...

  // State definitions
  states: {
    idle: {},
    loading: {},
    success: {},
    failure: {},
  }
});
State types
There are five types of state nodes, which indicate whether a node has child states, initial states, etc. We only see one type here, final. As the name suggests, it represents the “terminal” or the last state, indicated by double border in the diagram.
const fetchMachine = Machine({
  // other properties truncated
  states: {
    // other states truncated
    success: {
      type: 'final'
    },
  }
});
XState Viz - "State" Tab
Open the State tab to see the current active state and context data (more on that below) as a JSON object.
Click FETCH in the diagram. When the active state change to loading, the JSON State object gets updated.
Transitions and Events
A state transition defines what the next state is, given the current state and event.
https://xstate.js.org/docs/guides/transitions.html
===
An event is what causes a state machine to transition from its current state to its next state. All state transitions in a state machine are due to these events...
https://xstate.js.org/docs/guides/events.html
To move from one state to another, we need transitions and events. Transitions are defined in the on property of each state node, which contains event objects in UPPERCASE. In the diagram, a transition is indicated by an arrow and an event is indicated by a pill (box with rounded border and solid background).
- in
idlestate:-
FETCHevent, transition toloadingstate
-
- in
loadingstate:-
RESOLVEevent, transition tosuccessstate -
REJECTevent, transition tofailurestate
-
- in
failurestate:-
RETRYevent, transition toloadingstate
-
- No transition in
successstate as it has afinaltype.
const fetchMachine = Machine({
  // other properties truncated
  states: {
    idle: {
      on: {
        FETCH: 'loading'
      }
    },
    loading: {
      on: {
        RESOLVE: 'success',
        REJECT: 'failure'
      }
    },
    // success truncated
    // more on failure state below
  }
});
We configure our machine states in accordance to our app logic, that it’s not possible to go from idle state to success or failure. This is what I like about state management solutions—be it state machines library like this one or libraries like Redux and Vuex—as opposed to, say, the useState hook. It provides better assurance regarding our states behavior and minimizes nested conditionals in the UI.
Heads up: Shorthands ✋🏼
You can write the transition as an object or using a shorthand string; they do the same thing.
idle: {
  on: {
    // state transition - shorthand
    FETCH: 'loading'

    // OR

    // state transition - object
    FETCH: {
      target: 'loading'
    }
  }
}
XState Viz - "Events" Tab
Open the Events tab to see the list of events that have been run.
Context and Actions
Actions are fire-and-forget "side effects". For a machine to be useful in a real-world application, side effects need to occur to make things happen in the real world, such as rendering to a screen.
https://xstate.js.org/docs/guides/actions.html
===
[S]tate that represents quantitative data (e.g., arbitrary strings, numbers, objects, etc.) that can be potentially infinite is represented as extended state [...]. In XState, extended state is known as context.
https://xstate.js.org/docs/guides/context.html
Often, we need to store and update data associated with this machine other than the state name. We use context to do this. Context data are updated with the assign() action in a state’s transition.
In the diagram, the assign action and the associated context is printed under a transition event.
Our fetch machine has one context object, retries, set at the initial value of 0. It is incremented by 1 whenever RETRY transition event runs from the failure state to the loading state.
Setting up the retries context object and initial value:
const fetchMachine = Machine({
  // other properties truncated
  context: {
    retries: 0
  }
});
Updating retries in the RETRY transition:
failure: {
  on: {
    RETRY: {
      target: 'loading', // state transition with object
      actions: assign({
        retries: (context, event) => context.retries + 1
      })
    }
  }
}
Conclusion
The XState Viz machine example helps us understand the most basic usage of concepts like states, transitions, events, actions, and context. The diagram helps us visualize the interaction between those concepts. At this point, we don’t have to deal with importing packages or complicated syntax/API beyond basic vanilla JS.
Of course, in order to grok the concepts beyond this example, we need to read the documentation, follow tutorials, and practice. To be honest, I still need to re-read the docs to get a better understanding of some parts that just go whoosh over my head so far.
In the next post, I’m going to create my own machine from scratch in XState Viz. Stay tuned and thank you for reading!
Bonus Track
 10:02 AM - 11 Jun 2020
References
XState official documentation

Posted on July 13, 2020
Join Our Newsletter. No Spam, Only the good stuff.
Sign up to receive the latest update from our blog.


