How YOU can use an ORM in .NET Core and C# to type less SQL -starring Entity Framework

Chris Noring
Posted on August 1, 2019

We all love SQL right? No? Well sometimes a good SQL query is the best approach but most of the time it's the same CRUD operations that you need to carry out, Create, Read, Update, Delete, on each new entity. With an ORM, an Object Relational Mapper, you are able to define what the structure in your database should look like, using code. Additionally, you can use code for your queries as well. The main ORM for .Net and .Net Core is called Entity Framework and that's what we are covering in this article.
I just wanted to say a very important thing. A tool like an ORM should NEVER replace learning SQL. An ORM is there to make your life easier so when you end up writing SQL it's for the important things like a reporting query or a query that needs to be really performant. The idea is for the ORM to take care of simpler SQL like creating tables and doing simple inserts. If you use this without a decent knowledge of SQL then please have a look here and try grasp the basics first:
TLDR; This article is somewhat lengthy but it starts from the beginning to teach you Entity Framework and covers a lot of really great topics, worth the read.
In this article we will cover:
- WHY an ORM, we always need to ask ourselves why we use something. ORM can really shine if you have a lot of simple interaction to a database. You can really speed up your operation using it.
- WHAT it can help you with.
- Install and Set up
- A CRUD Demo. We will go through reading data, creating, updating and deleting data
Resources
Database providers
You can work with quite a number of different databases using Entity Framework. The whole idea is to have an agnostic approach so you, in theory, could replace one database for another and your code remains the same. We all know we almost never do that but it's a nice idea.Beginner EF Core article
This article is partly based on this one even if we take it a step furtherEager loading
We cover the basics of how this works in the article but there is always more to learn.
Why ORM
Using an ORM is about beeing faster, more productive and about knowing exactly what goes into a database.
So when do I use it, always or?
Well for most simple applications it's definitely good to use. For applications that need really performant queries you can definitely still use it but you need to be more observant on what SQL your ORM produces. Sometimes it's good enough and sometimes you need to write those queries by hand using SQL. Typically reporting queries is something I personally don't use ORMs for as they tend to be complex and hard to express in code. But everyone is different. I've seen even complex queries being authored in code.
The ORM landscape
There is more than one ORM choice for .Net. Entity Framework is the most known one but there are other ones. You have to decide which one fits your project.
Linq 2 db
Offers a similar experience to Entity Framework if you look at the syntax alone. Some say the syntax is close to what you get in actual SQLDapper
It has been descriptions like Object Mapper and Micro ORMNHibernate
.Net port of Hibernate. One of the oldest ORMs out there.
There are more ORMs out there but the three above are well-known choices.
What
Most ORMs lets you define the table structure in code and you can map a class so that it corresponds to a table. The columns are simply properties on the class. Depending on the ORM several approaches are possible
- Schema first, in this scenario you define a schema of what tables you have, how they relate like 1-1, 1-Many, Man-to-Many and so on. You end up generating code from the schema.
- Code first, In this approach, you define the code first. Every table corresponds to a class and you can express how everything relates in code. Your ORM will then take a look at your code and generate structural SQL from it.
Migrations
A lot of ORMs comes with a concept called migrations. A migration is simply a piece of script that either alters the structure of the database or runs a piece of SQL that affects the data like for example seeding the database with some initial data. The idea is that every time you do a change of the database that should be a small transactional change captured in a migration. That migration can then be applied to the database and thereby the database will be altered in the desired way. For example, adding a Customer table to database would be a migration that when applied would create the table in the Database. A Migration can either be expressed as SQL or in Code.
Install and Set up
To get started with Entity Framework we need a couple of NuGet packages but also a project that we can install the NuGet packages to. So for this exercise, we will do the following:
- Create a solution
- Scaffold a Console project and add a reference to the solution
- Install the needed NuGet packages to the Console project
Create a solution
This is quite simply done. First, we need a directory. So create a directory, you can choose the name yourself but here is an example.
mkdir demo
Then we need to place ourselves in the directory like so:
cd demo
Scaffold a Console project
Next up we need to create our Console project. Again you can choose the name but we go with App. Type the following:
dotnet new console -o App
This will create a new project of type console with name App.
Lastly we add this project to the solution like so:
dotnet sln add App/App.csproj
Install and Set up
For this we will install the core library for Entity Framework but also support for the database type SqlLite. Note, there is support for different databases, have a look at the full list of supported databases here:
SqlLite is a very simple database that just stores structure and data in a file on your hard drive.
But I'm working with a real database, what about me, will I benefit from this article?
Yes, what we are showing is generic knowledge that is widely applicable regardless of database type.
Ok then let's first navigate into our Console app directory, like so:
cd App
Then install the needed NuGet libraries:
dotnet add package Microsoft.EntityFrameworkCore.Sqlite
dotnet add package Microsoft.EntityFrameworkCore.Design
This will add references to your project. Open up App.csproj and you should find something like this:
<ItemGroup>
  <PackageReference Include="Microsoft.EntityFrameworkCore.Design" Version="2.2.6" />
  <PackageReference Include="Microsoft.EntityFrameworkCore.Sqlite" Version="2.2.6" />
</ItemGroup>
Now we need to actually install the libraries, we do that with the following command:
dotnet restore
A CRUD Demo
We will show how to do the full CRUD, Create, Read, Update and Delete.
Here we will attempt the following:
- Create the database
- Create a migration that represents the structure of the database and then apply it to create the database
- Read from the database
- Write to the database
- Seed our database with initial data
Create the database
First off we need a Database so let's create one.
We will create a file called Database.cs with the following content:
// Database.cs

using Microsoft.EntityFrameworkCore;
using System;
using System.Collections.Generic;

namespace App
{
  public class DatabaseContext : DbContext
  {
    public DbSet<Product> Products { get; set; }

    public DbSet<OrderItem> OrderItems { get; set; }

    public DbSet<Order> Orders { get; set; }

    protected override void OnConfiguring(DbContextOptionsBuilder optionsBuilder)
    {
      optionsBuilder.UseSqlite("Data Source=database.db");
    }
  }

  public class Order
  {
    public int OrderId { get; set; }

    public DateTime? Created { get; set; }

    public ICollection<OrderItem> Items { get; set; }
  }

  public class OrderItem
  {
    public int OrderItemId { get; set; }
    public int Quantity { get; set; }
    public virtual Product Product { get; set; }
  }

  public class Product
  {
    public int ProductId { get; set; }
    public double Price { get; set; }
    public string Description { get; set; }
  }
}
As you can see from the above code we have the following classes:
- Order, this is a class representing orders.
-
OrderItem, an Order has many OrderItems and each OrderItem has a
Quantityproperty and reference to aProduct -
Product, this represents the Product we are trying to order. It has information on it like
PriceandDescription.
Let's comment on some interesting constructs in the code.
1-Many
We are expressing a 1-Many relationship by the following construct on the Order class:
public ICollection<OrderItem> Items { get; set; }
Above we are saying that we a list of of OrderItems on the Order.
Foreign key
We are also expressing another database concept namely Foreign key. In the OrderItem entity we are saying that we have a reference to a Product. In code, we write this as:
public virtual Product Product { get; set; }
DbContext and DbSet
Let's also comment on first DbContext. When we want a new Database we should inherit from this class like so:
public class DatabaseContext : DbContext
DbSet represents a table in a Database. It's a generic that takes a type as a template argument, like so:
public DbSet<OrderItem> OrderItems { get; set; }
Create a migration
Now we have saved our file Database.cs. It's time to create the database. To do that we need to do two things:
Generate a migration, this takes a snapshot of the current state of your code and diff this to any previous snapshot. If it doesn't have a previous snapshot, generating a migration will simply create the initial migration.
Apply the migration, this will run the migration. Depending on the content of the migration it will either, create a database, affect the database structure or alter the data.
Generate a migration
Let's create our migration with the following command:
dotnet ef migrations add InitialCreate
The last argument is the name of the migration and we can call it what we want but it's good to give it a descriptive name like InitialCreate.
Running the command should give the following result in the terminal:
As you can see above it's nice enough to tell us how to undo what we just di with the command ef migrations remove.
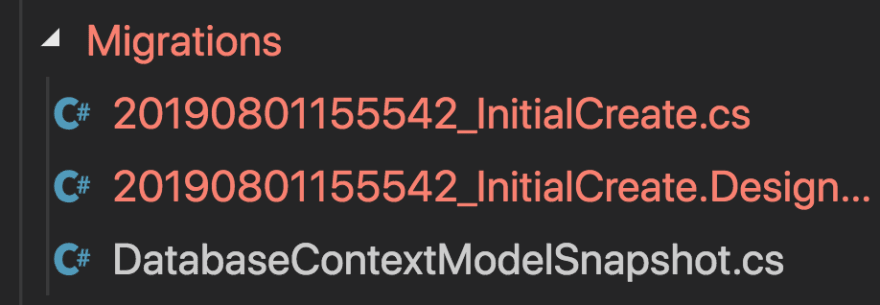
This created some files for us namely the following:
Above you can see that we got our migration InitialCreate but that the name is being prepended by a timestamp. This is so Entity Framework knows what to run and in what order. We can also see that we have two versions of this file, a .cs and a Designer.cs file. We only care about the first one. Let's have a look at it:
using System;
using Microsoft.EntityFrameworkCore.Migrations;

namespace App.Migrations
{
    public partial class InitialCreate : Migration
    {
        protected override void Up(MigrationBuilder migrationBuilder)
        {
            migrationBuilder.CreateTable(
                name: "Orders",
                columns: table => new
                {
                    OrderId = table.Column<int>(nullable: false)
                        .Annotation("Sqlite:Autoincrement", true),
                    Created = table.Column<DateTime>(nullable: true)
                },
                constraints: table =>
                {
                    table.PrimaryKey("PK_Orders", x => x.OrderId);
                });

            migrationBuilder.CreateTable(
                name: "Products",
                columns: table => new
                {
                    ProductId = table.Column<int>(nullable: false)
                        .Annotation("Sqlite:Autoincrement", true),
                    Price = table.Column<double>(nullable: false),
                    Description = table.Column<string>(nullable: true)
                },
                constraints: table =>
                {
                    table.PrimaryKey("PK_Products", x => x.ProductId);
                });

            migrationBuilder.CreateTable(
                name: "OrderItems",
                columns: table => new
                {
                    OrderItemId = table.Column<int>(nullable: false)
                        .Annotation("Sqlite:Autoincrement", true),
                    Quantity = table.Column<int>(nullable: false),
                    ProductId = table.Column<int>(nullable: true),
                    OrderId = table.Column<int>(nullable: true)
                },
                constraints: table =>
                {
                    table.PrimaryKey("PK_OrderItems", x => x.OrderItemId);
                    table.ForeignKey(
                        name: "FK_OrderItems_Orders_OrderId",
                        column: x => x.OrderId,
                        principalTable: "Orders",
                        principalColumn: "OrderId",
                        onDelete: ReferentialAction.Restrict);
                    table.ForeignKey(
                        name: "FK_OrderItems_Products_ProductId",
                        column: x => x.ProductId,
                        principalTable: "Products",
                        principalColumn: "ProductId",
                        onDelete: ReferentialAction.Restrict);
                });

            migrationBuilder.CreateIndex(
                name: "IX_OrderItems_OrderId",
                table: "OrderItems",
                column: "OrderId");

            migrationBuilder.CreateIndex(
                name: "IX_OrderItems_ProductId",
                table: "OrderItems",
                column: "ProductId");
        }

        protected override void Down(MigrationBuilder migrationBuilder)
        {
            migrationBuilder.DropTable(
                name: "OrderItems");

            migrationBuilder.DropTable(
                name: "Orders");

            migrationBuilder.DropTable(
                name: "Products");
        }
    }
}
The first thing we see is that we inherit from the class Migration. The second thing is that we have two methods Up() and Down(). Up() is run when we want to apply something. Down() is run when we want to undo the migration. Looking at our Up() method we can see that we invoke CreateTable() once for each of the tables Order, OrderItem and Product. We can also see that it defines all the Foreign keys needed. The Down() method calls DropTable() to undo our table creation.
Apply the Migration
Ok, we have a Migration, let's apply it. We do that with the following command:
dotnet ef database update
This will first create the database if needed and then apply the migration.
We can see in our file structure that we got a new file created database.db. We can either use a SQlLite client or why not write some code to connect to it ? :)
Read from the database
Ok, now we want to see if we can connect to our database and maybe read out out some data. Open up Program.cs and go to the method Main() and add the following:
using (var db = new DatabaseContext())
{
}
This will establish a connection to our database. To read from the database we only need to read from it like this:
using (var db = new DatabaseContext())
{
  var orders = db.Orders;
  foreach(var order in orders)
  {
    Console.WriteLine("Order: order.Created");
  }
}
Shall we try it out?
Ok, we got no orders :(.
Well, this is expected, we didn't put anything in the database. How bout we change that?
Write to the Database
Ok, we know how to connect to the Database. What about writing to it?
Well to be able to create an Order, we need a little data first in the form of at least one Product and one OrderItem. If you want to save something to the database you need to call db.SaveChanges().
We need to take all of this in steps cause there are some moving parts.
Creating a Product
First, we will create a Product.
Let's add the following code:
using (var db = new DatabaseContext())
{

    var product = new Product(){ Price = 100, Description = "Movie" };
    db.Products.Add(product);
    db.SaveChanges();

    foreach(var p in db.Products)
    {
        Console.WriteLine("{0} {1} {2}", p.ProductId, p.Description, p.Price);
    }

}
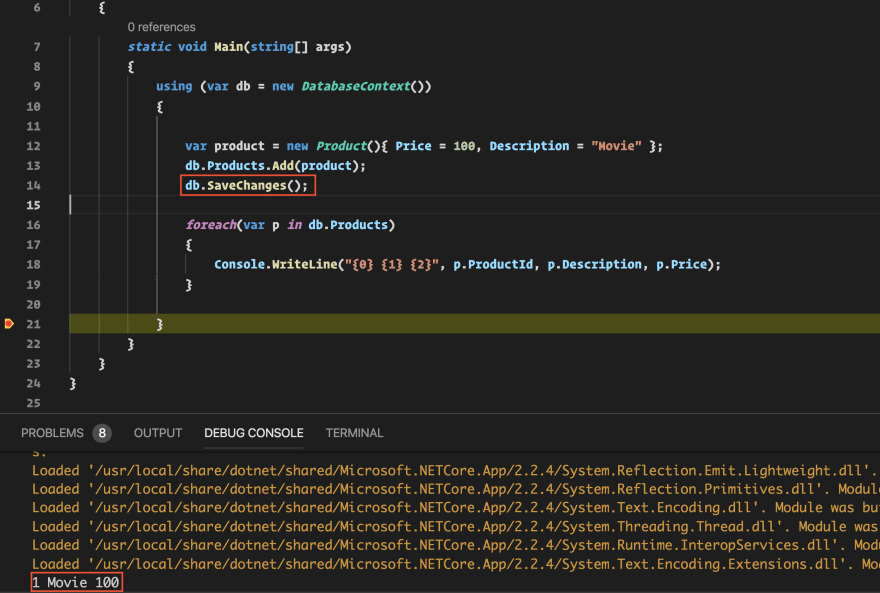
The above will create our Product and by invoking db.SaveChanges() we make sure to persist it to the database.
Running the code leads to
OrderItem
Ok, that bit works. What about creating an OrderItem? Well that's just as easy, we just need the following code:
using (var db = new DatabaseContext())
{
    var product = db.Products.SingleOrDefault();

    if(product != null)
    {
        var item = new OrderItem
        {
            Quantity = 1,
            Product = product
        };
        db.OrderItems.Add(item);
        db.SaveChanges();

        Console.WriteLine("{0} {1} Product: {2}", item.OrderItemId, item.Quantity, item.Product.Description);
    }
}
Let's try to highlight the important parts.
Above we can see that we first read out a product from the database. The next thing we do is to assign that same product to the Product property on the OrderItem. Then we save it all by adding our OrderItem to db.OrderItems followed by calling db.SaveChanges().
Create an Order
By now we have a Product and an OrderItem in the database. So how do we go about creating an Order containing those two entities?
Well creating an Order is not just creating an Order, it's creating an Order AND associate the OrderItem with the Order.
The association part can be done in two different ways:
- Add the OrderItem to
order.Items - Add a foreign key to our OrderItem and assign our Order id.
Both of the above solutions require us to know a bit more about Entity Framework.
Load related entities
Let's start with the first approach. For that, we need to know how to load related entities.
Why?
Well, when you have an Order instance its Items will be null unless we tell it explicitly to be filled with something. For this approach to work, we need it to be an empty list at least so we can add our OrderItem.
Ok, think you better show me.
Sure, have a look at the following code below:
var item = db.OrderItems.SingleOrDefault();
var order = new Order() { Created = DateTime.Now };
db.Orders.Add(order);
db.SaveChanges();
This creates an Order. What about adding our item? Well, we have a problem:
Were we to attempt to our item at after we save our Order at row 49 our order.Items would be null and we would get a runtime exception. To solve that we need to use the method Include(). Include() takes a lambda where we need to point out what we want to load. In this case, we want to load the property Items on our Order.
Let's run this code:
At this point our order.Items is an empty array and we can add our OrderItem without the code crashing as you can see because we make it to line 54.
Add a foreign key to OrderItem
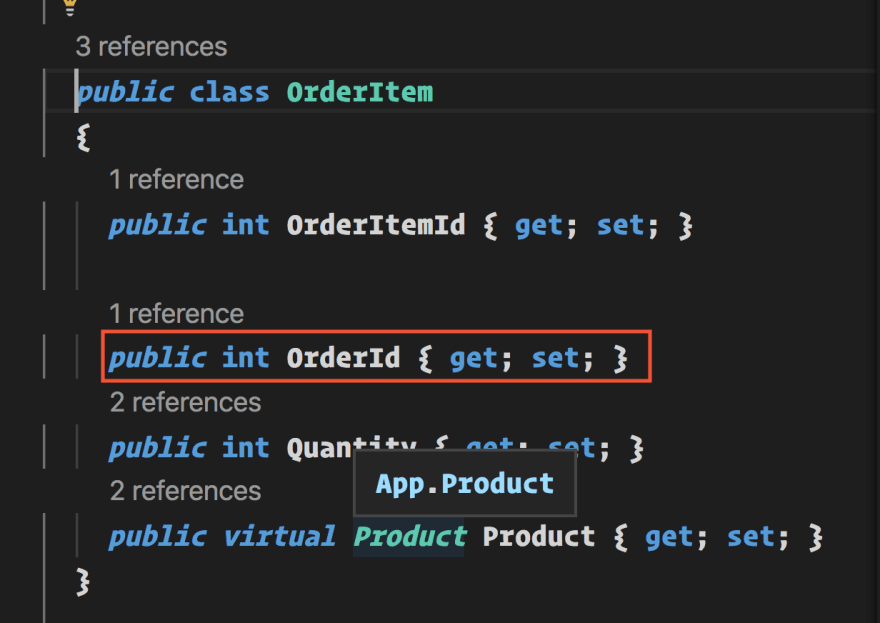
Behind the scenes, we have already gotten a foreign key on OrderItem. We can see that if we open up our migration:
Our problem right now is that it doesn't exist as a property on our OrderItem, so how do we solve that?
Well, we just added to the class definition:
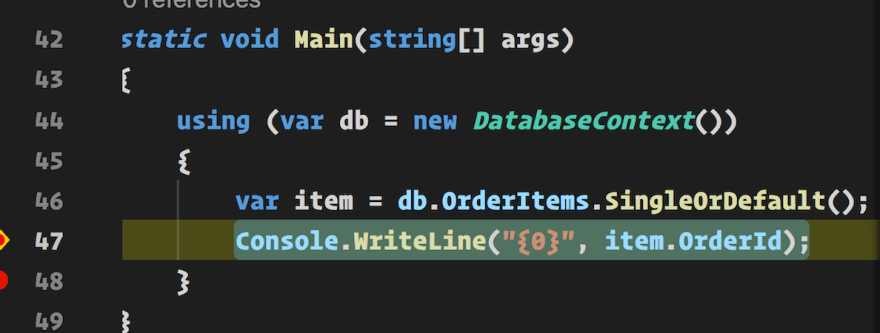
Then because we have an existing Order that's associated with an OrderItem the following is actually populated item.OrderId:
Had we wanted to make the connection between the Order and the OrderItem, and there already wasn't one, we could easily have done so with the following code:
using(var db = new DatabaseContext())
{
  var order = db.Orders.SingleOrDefault();
  var item = db.OrderItems.SingleOrDefault();
  item.OrderId = order.OrderId;
  db.SaveChanges();
}
Update
Updating is as easy as following the second creating scenario we did for an Order. That is read up an entity, set a property and call db.SaveChanges(). Like so:
using(var db = new DatabaseContext())
{
  var item = db.OrderItems.SingleOrDefault();
  item.Quantity++;
  db.SaveChanges();
}
Deletion
Deleting is as easy as removing something from a list. If we want to delete a Product we just need to do the following:
using(var db = new DatabaseContext())
{
  var product = db.Products.SingleOrDefault();
  db.Products.Remove(product);
  db.SaveChanges();
}
It should be noted that if your Product is part of an OrderItem you would need to remove that connection first like so:
using(var db = new DatabaseContext())
{

  var item = db.OrderItems.Include(i => i.Product)SingleOrDefault();

  item.Product = null;
  db.SaveChanges();

  var product = db.Products.SingleOrDefault();
  db.Products.Remove(product);
  db.SaveChanges();
}
Summary
This where we stop. We learned a ton in this article if we started from absolute zero
We learned:
- What an ORM is
- Define our database structure
- Create a migration and apply it
- Read data
- Create data
- Update data
- Delete data
- Load related entities
- Foreign keys
That's a lot for one article. Hopefully, you are now so interested that you want to learn more. Have a look at the Resources section to learn more if you want to learn more advanced concepts and about dealing with different kinds of databases.

Posted on August 1, 2019
Join Our Newsletter. No Spam, Only the good stuff.
Sign up to receive the latest update from our blog.
Related

August 1, 2019


