Build a Presentation Coaching Application with Recall.ai

Kevin Lewis
Posted on October 24, 2022

Recall provides a developer API to get real-time meeting data from a number of different platforms. It does this by sending Recall bots into meetings to observe what is happening and then provide data on-demand or in real-time. As well as transcripts, they provide metadata including a participant list and linked calendar invite.
In this tutorial, you will build a virtual presentation coaching application. The application will allow you to send a Recall bot into a Zoom call, remove them, and get insights once the call is over. One of the great things about Recall is their support of other platforms like Google Meet, Microsoft Teams, and WebEx with no additional code.
For this project, we'll complete the following steps:
- Add a bot to a Zoom call
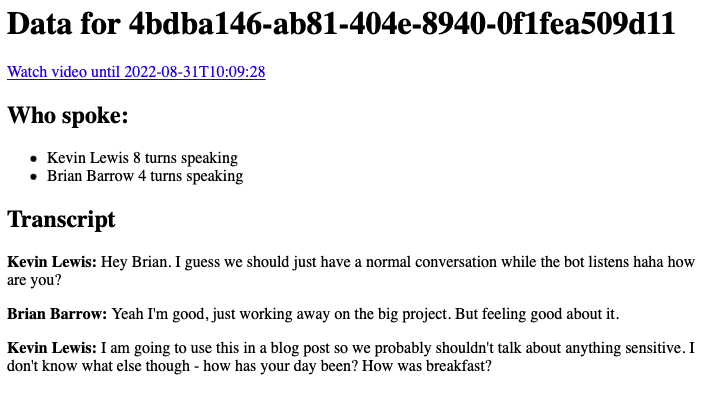
- Get data about speakers in the call
- Calculate speaker turn counts (to see if you took up more turns than others)
- Create a speaker-separated transcript
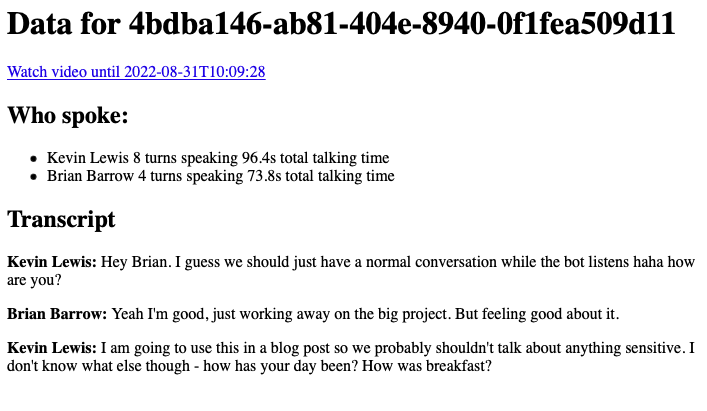
- Calculate talk-time per speaker
Before You Start
Make sure you have Node.js installed. You will need a Deepgram API Key and a Recall API Key.
Create a new directory for this project and open it in a code editor. Create a .env file and populate it with your keys:
RECALL_API_KEY=your-key-here
DEEPGRAM_API_KEY=your-key-here
Create a package.json file with npm init -y and then install our dependencies:
npm install dotenv express hbs axios
Create an index.js file and open it in your code editor.
Set Up Application
Import your dependencies:
import 'dotenv/config'
import axios from 'axios'
import express from 'express'
Set up your express application:
const app = express()
app.set('view engine', 'hbs')
app.use(express.urlencoded({ extended: false }))

// Further code goes here

const PORT = process.env.PORT || 3000
app.listen(PORT, () => console.log(`Listening on port ${PORT}`))
Create a route handler to load the initial page. Firstly, create a views directory and an index.hbs file inside of it. .hbs files use Handlebars to add conditional and looping logic to HTML files. In the new view file, add:
<h1>Call Coacher</h1>
Inside of index.js, render the view:
app.get('/', (req, res) => res.render('index'))
Start your server with node index.js, visit localhost:3000, and you should see Call Coacher.
Create a Recall.ai Helper Function
Recall's API Reference shows all of the available endpoints to manage bots - your application will use four of them. To make your code more readable, create a reusable recall() helper method at the very bottom of your index.js file:
async function recall(method, path, data) {
  try {
    const payload = {
      method,
      url: `https://api.recall.ai/api/v1${path}`,
      headers: {
          Authorization: `Token ${process.env.RECALL_API_KEY}`
      }
    }
    if(data) payload.data = data
    const response = await axios(payload)
    return response.data
  } catch(error) {
    throw error
  }
}
Now, for example, endpoints can be accessed like so:
const bots = await recall('get', '/bot')
const newBot = await recall('post', '/bot', { meeting_url: '...' })
Use Recall.ai To Add a Bot to a Zoom Call
Add a new form to views/index.hbs:
<h2>Add a bot to a call</h2>
<form action="/join" method="post">
    <label for="meeting_url">Meeting URL</label>
    <input type="text" id="meeting_url" name="meeting_url"><br>

    <label for="bot_name">Bot Name</label>
    <input type="text" id="bot_name" name="bot_name">

    <input type="submit" value="join">
</form>
Providing a bot name is optional, but your application will allow users to specify it. When submitted, this form will send a POST request to /join. Its payload will contain meeting_url and bot_name.
Add the following to index.js underneath the existing route handler for the homepage:
let bots = []
app.post('/join', async (req, res) => {
    try {
        const { meeting_url, bot_name } = req.body
        // Adds bot to call, returned data does not include meeting_url
        const bot = await recall('post', '/bot', { meeting_url, bot_name })
        // Add new bot to bots array
        bots.push({ ...bot, meeting_url })
        // Re-render the homepage, making a message available to the template
        res.render('index', { message: 'The bot has joined your call' })
    } catch(error) {
        console.log(error)
        res.render('index', { message: 'There has been a problem adding the bot' })
    }
})
Being able to send dynamic data into templates is a feature available by including handlebars in our application. At the bottom of index.hbs show the message:
<p>{{ message }}</p>
The message is empty (leaving an empty paragraph) when initially loading the page and will show the message after submitting the form.
Try it out! Restart your server, create a new Zoom call, get the meeting invite URL and submit it in the form. You should have a bot immediately join you with the bot name you specified.
Make a Recall.ai Bot Leave a Zoom Call
Currently, the only way to make the bot leave the call is to end it for everyone (or manually remove it in the Zoom interface). Recall also provide an endpoint to remove a bot. Add a new form below the previous one in index.hbs:
<h2>Leave call</h2>
<form action="/leave" method="post">
    <label for="meeting_url">Meeting URL</label>
    <input type="text" id="meeting_url" name="meeting_url">
    <input type="submit" value="leave">
</form>
In index.js create a new route handler:
app.post('/leave', async (req, res) => {
  try {
    const { meeting_url } = req.body
    // Get the bot from the bots array with matching meeting_url
    const { id } = bots.find(bot => bot.meeting_url == meeting_url)
    // Remove bot form call
    await recall('post', `/bot/${id}/leave_call`)
    // Redirect to /:botId
    res.redirect(`/${id}`)
  } catch(error) {
    console.log(error)
    res.render('index', { message: 'There has been a problem removing the bot' })
  }
})
Restart your server and try to add and remove a bot. The bot should leave the call when the new form is submitted, and you should be redirected to a new page (causing an error because it does not yet exist.)
Show Data From Call
Create a new data.hbs file in the views directory:
<h1>Data for {{ id }}</h1>
{{#if video_url}}
  <a href="{{video_url}}">Watch video until {{ media_retention_end }}</a>
{{/if}}
In index.js add a new route handler:
app.get('/:botId', async (req, res) => {
  try {
    // Get bot data
    const bot = await recall('get', `/bot/${req.params.botId}`)
    // Get transcript (each object is one speaker turn)
    const turns = await recall('get', `/bot/${req.params.botId}/transcript`)

    // Further code here

    // Return all properties in bot object
    res.render('data', bot)
  } catch(error) {
    res.send('There has been a problem loading this bot data')
  }
})
Restart your server, start a new Zoom call (preferably with someone else), speak for a couple of minutes, remove the bot with the form, and you should be redirected to a page.
Get All Speaker Usernames
A full timeline for the call including who spoke and when is made available as part of the bot object. Extract just usernames and de-duplicate the list by adding the following:
const { timeline } = bot.speaker_timeline
let usernames = [...new Set(timeline.map(turn => { username: turn.users[0].username }))]
Update the res.render() method to the following:
res.render('data', { ...bot, usernames })
Finally, add a list of who spoke to the bottom of data.hbs:
<h2>Who spoke:</h2>
<ul>
  {{#each usernames}}
    <li>
      <span>{{ this.username }}</span>
    </li>
  {{/each}}
</ul>
Show Each Speaker's Turn Count
Below where usernames is defined, add the following:
for(let i=0; i<usernames.length; i++) {
  let userTurns = timeline.filter(turn => turn.users[0].username == usernames[i])
  usernames[i] = {
    username: usernames[i],
    turns: userTurns.length
  }
}
Now each username in the usernames array also has a turns property, which is equal to the number of times they spoke in the call. Update the loop to show the new data:
{{#each usernames}}
  <li>
    <span>{{ this.username }}</span>
    <span>{{ this.turns }} turns speaking</span>
  </li>
{{/each}}
Display Call Transcript with Usernames
Recall is a Deepgram customer and provides our accurate AI-powered transcription within their product. The transcript is already available in our application in the turns variable. Add the following below the for loop in index.js:
let transcript = []
for(let i=0; i<turns.length; i++) {
  // Get all words for this turn
  const turnWords = turns[i].words
  // Form a single stream of words
  const words = turnWords.map(w => w.text).join(' ')
  // Add to transcript array along with speaker username
  transcript.push({ speaker: turns[i].speaker, words })
}
Add the transcript to the rendered data:
res.render('data', { ...bot, usernames, transcript })
Finally, in data.hbs, add the following to the bottom:
<h2>Transcript</h2>
{{#each transcript}}
  <p><b>{{ this.speaker }}: </b>{{ this.words }}</p>
{{/each}}
Calculate Each Speaker's Speaking Time
Each word in the transcript is accompanied by a word's start and end time. Using this data, each speaker's 'talking time' can be calculated. Firstly, turns is added to usernames[i], add a new speakTime value:
usernames[i] = {
  username: usernames[i],
  turns: userTurns.length,
  speakTime: 0
}
Calculate the speakTime just after you add transcripts with transcripts.push(), and add it to the speaker's entry in the username array:
const speakTime = +(turnWords[turnWords.length-1].end_timestamp - turnWords[0].start_timestamp).toFixed(2)
const user = usernames.findIndex(u => u.username == turns[i].speaker)
usernames[user].speakTime += speakTime
Finally, update data.hbs to contain this new data just below where each speaker's turns are shown:
<span>{{ this.speakTime }}s total talking time</span>
The World Is Your Oyster
This application only scratches the surface of the analysis you can perform with data returned by Recall and Deepgram. You may choose to detect non-inclusive language, summarize what has been said, and more. Recall provides a developer-friendly way to avoid writing 'glue' into various conferencing platforms, so if you want to use Google Meet, Microsoft Teams, WebEx, or others, there is no more code to write. Fab!
If you have any questions, please don't hesitate to get in touch. We love to help!

Posted on October 24, 2022
Join Our Newsletter. No Spam, Only the good stuff.
Sign up to receive the latest update from our blog.


