Créer simplement un cluster k8s dans PhoenixNAP avec Rancher en quelques clics …

Karim
Posted on April 24, 2022
J’avais déjà parlé de PhoenixNAP, ce fournisseur de serveur Bare Metal dans cet article précédent :
OpenStack sur LXD avec Juju et k3sup dans phoenixNAP …
phoenixNAP: Data Center, Dédié Servers, Cloud, & Colocation
Il est possible de créer en quelques clics un cluster avec SUSE Rancher avec ce fournisseur :
Rancher Servers Now Available on Bare Metal Cloud
Comme cela est précisé, déployer et gérer des environnements Kubernetes sur Bare Metal Cloud (BMC) est aussi simple que de cliquer sur un bouton.
Avec la sortie de Rancher Server on BMC, vous pouvez désormais mettre en place des environnements Kubernetes sans installation manuelle. Cette nouvelle fonctionnalité de BMC fait tout le travail à votre place en faisant tourner une puissante machine physique sur laquelle Rancher est exécuté.
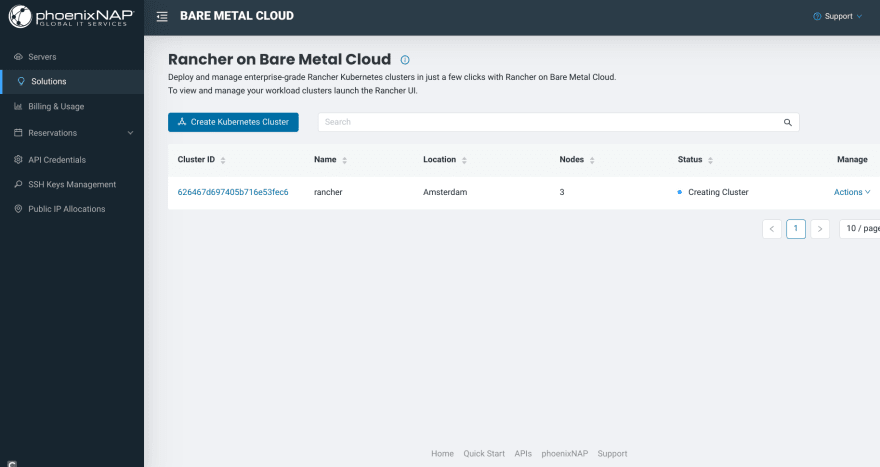
Je commence donc par la création de ce cluster Rancher depuis l‘espace d’accueil de PhoenixNAP :
Je pars des premiers serveurs Bare Metal de la gamme avec cette configuration …
Et le cluster est en cours de création, tout simplement …
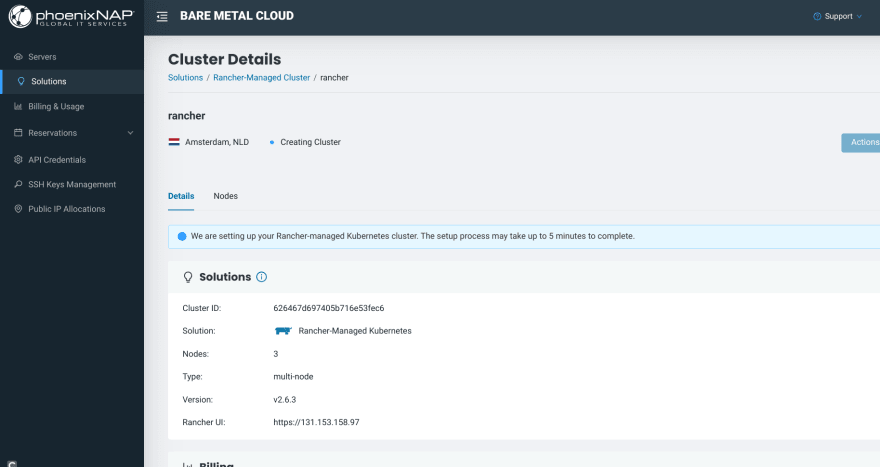
Et il devient opérationnel avec trois noeuds Bare Metal qui composent ce cluster :
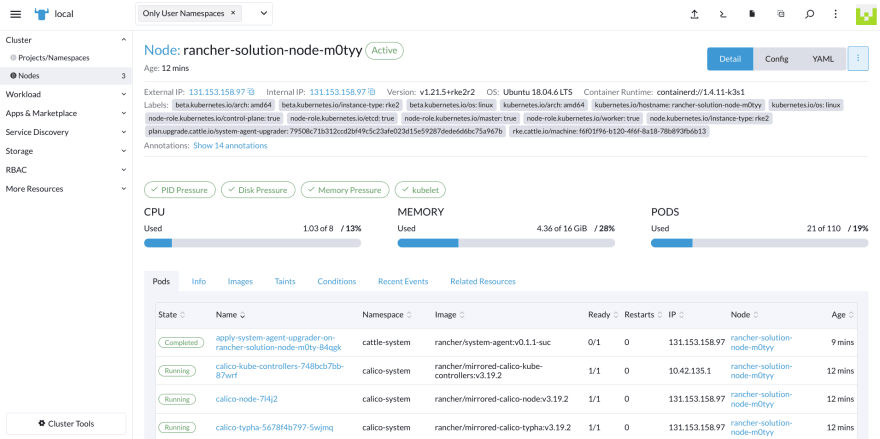
J’accède au dashboard du cluster Rancher sur un simple clic :
Avec les détails du cluster :
Il est alors possible d’interagir avec ce cluster via une console et le client Kubectl déjà installé et configuré :
On peut aussi activer Istio d’un simple clic :
avec Helm en arrière fond …
    helm install --namespace=istio-system --timeout=10m0s --values=/home/shell/helm/values-rancher-istio-100.1.0-up1.11.4.yaml --version=100.1.0+up1.11.4 --wait=true rancher-istio /home/shell/helm/rancher-istio-100.1.0-up1.11.4.tgz
    W0423 21:30:30.427767      28 warnings.go:70] policy/v1beta1 PodSecurityPolicy is deprecated in v1.21+, unavailable in v1.25+
    W0423 21:30:30.431535      28 warnings.go:70] policy/v1beta1 PodSecurityPolicy is deprecated in v1.21+, unavailable in v1.25+
    W0423 21:30:30.434705      28 warnings.go:70] policy/v1beta1 PodSecurityPolicy is deprecated in v1.21+, unavailable in v1.25+
    W0423 21:30:30.437888      28 warnings.go:70] policy/v1beta1 PodSecurityPolicy is deprecated in v1.21+, unavailable in v1.25+
    W0423 21:30:30.441066      28 warnings.go:70] policy/v1beta1 PodSecurityPolicy is deprecated in v1.21+, unavailable in v1.25+
    creating 37 resource(s)
    W0423 21:30:30.608518      28 warnings.go:70] policy/v1beta1 PodSecurityPolicy is deprecated in v1.21+, unavailable in v1.25+
    W0423 21:30:30.608567      28 warnings.go:70] policy/v1beta1 PodSecurityPolicy is deprecated in v1.21+, unavailable in v1.25+
    W0423 21:30:30.608599      28 warnings.go:70] policy/v1beta1 PodSecurityPolicy is deprecated in v1.21+, unavailable in v1.25+
    W0423 21:30:30.608599      28 warnings.go:70] policy/v1beta1 PodSecurityPolicy is deprecated in v1.21+, unavailable in v1.25+
    W0423 21:30:30.609042      28 warnings.go:70] policy/v1beta1 PodSecurityPolicy is deprecated in v1.21+, unavailable in v1.25+
    beginning wait for 37 resources with timeout of 10m0s
    Deployment is not ready: istio-system/rancher-istio-tracing. 0 out of 1 expected pods are ready
    Deployment is not ready: istio-system/rancher-istio-tracing. 0 out of 1 expected pods are ready
    Deployment is not ready: istio-system/rancher-istio-tracing. 0 out of 1 expected pods are ready
    Deployment is not ready: istio-system/rancher-istio-tracing. 0 out of 1 expected pods are ready
    Starting delete for "istioctl-installer" Job
    jobs.batch "istioctl-installer" not found
    creating 1 resource(s)
    Watching for changes to Job istioctl-installer with timeout of 10m0s
    Add/Modify event for istioctl-installer: ADDED
    istioctl-installer: Jobs active: 0, jobs failed: 0, jobs succeeded: 0
    Add/Modify event for istioctl-installer: MODIFIED
    istioctl-installer: Jobs active: 1, jobs failed: 0, jobs succeeded: 0
    Add/Modify event for istioctl-installer: MODIFIED
    Starting delete for "istioctl-installer" Job
    NAME: rancher-istio
    LAST DEPLOYED: Sat Apr 23 21:30:29 2022
    NAMESPACE: istio-system
    STATUS: deployed
    REVISION: 1
    TEST SUITE: None

    ---------------------------------------------------------------------
    SUCCESS: helm install --namespace=istio-system --timeout=10m0s --values=/home/shell/helm/values-rancher-istio-100.1.0-up1.11.4.yaml --version=100.1.0+up1.11.4 --wait=true rancher-istio /home/shell/helm/rancher-istio-100.1.0-up1.11.4.tgz
    --------------------------------------------------------------------
Je procède à l’installation de Kubevirt :
KubeVirt Installation with Virtual Machine Examples
KubeVirt.io
    > kubectl create namespace kubevirt

    > kubectl apply -f https://github.com/kubevirt/kubevirt/releases/download/v0.52.0/kubevirt-operator.yaml
    namespace/kubevirt created
    customresourcedefinition.apiextensions.k8s.io/kubevirts.kubevirt.io created
    priorityclass.scheduling.k8s.io/kubevirt-cluster-critical created
    clusterrole.rbac.authorization.k8s.io/kubevirt.io:operator created
    serviceaccount/kubevirt-operator created
    role.rbac.authorization.k8s.io/kubevirt-operator created
    rolebinding.rbac.authorization.k8s.io/kubevirt-operator-rolebinding created
    clusterrole.rbac.authorization.k8s.io/kubevirt-operator created
    clusterrolebinding.rbac.authorization.k8s.io/kubevirt-operator created
    deployment.apps/virt-operator created

    > kubectl apply -f https://github.com/kubevirt/kubevirt/releases/download/v0.52.0/kubevirt-cr.yaml
    kubevirt.kubevirt.io/kubevirt created

    > kubectl get po,svc
    NAME                          READY   STATUS    RESTARTS   AGE
    pod/virt-launcher-vm1-hdmlk   2/2     Running   0          73s
    pod/virt-launcher-vm2-vgvjs   2/2     Running   0          50s
    pod/virt-launcher-vm3-ptkhz   2/2     Running   0          34s
    pod/virt-launcher-vm4-hjl7v   2/2     Running   0          16s

    NAME                 TYPE        CLUSTER-IP      EXTERNAL-IP   PORT(S)                       AGE
    service/kubernetes   ClusterIP   10.43.0.1       <none>        443/TCP                       37m
    service/vm1-svc      NodePort    10.43.153.20    <none>        22:32277/TCP,1234:31082/TCP   73s
    service/vm2-svc      NodePort    10.43.172.243   <none>        22:32401/TCP,1234:31242/TCP   50s
    service/vm3-svc      NodePort    10.43.228.1     <none>        22:32676/TCP,1234:32563/TCP   34s
    service/vm4-svc      NodePort    10.43.122.229   <none>        22:30054/TCP,1234:32213/TCP   16s
Quatre machines virtuelles sont alors en exécution via ce manifest YAML :
et de cette image Docker créer à partir du disque QCOW2 d’Ubuntu 20.04 officiel fourni par Canonical :
Ubuntu 20.04 LTS (Focal Fossa) Daily Build [20220419]
Docker Hub
Ne pas oublier d’y insérer la clé publique nécessaire à la connexion SSH …
Les VMs sont alors visibles dans le dashboard du cluster Rancher :
et depuis Kiali :
avec ces services activés :
Je peux me connecter avec le port fourni via NodePort à la première machine virtuelle :
J’y installe le langage Julia accompagné d’un Notebook avec Pluto.jl :
GitHub - JuliaLang/juliaup: Julia installer and version multiplexer
GitHub - JuliaPluto/PlutoUI.jl
GitHub - fonsp/Pluto.jl: 🎈 Simple reactive notebooks for Julia
    ubuntu@vm1:~$ curl -fsSL https://install.julialang.org | sh -

    info: downloading installer
    Welcome to Julia!

    This will download and install the official Julia Language distribution
    and its version manager Juliaup.

    Juliaup will be installed into the Juliaup home directory, located at:

    /home/ubuntu/.juliaup

    The julia, juliaup and other commands will be added to
    Juliaup bin directory, located at:

    /home/ubuntu/.juliaup/bin

    This path will then be added to your PATH environment variable by
    modifying the profile files located at:

    /home/ubuntu/.bashrc
      /home/ubuntu/.profile

    Julia will look for a new version of Juliaup itself every 1440 seconds when you start julia.

    You can uninstall at any time with juliaup self uninstall and these
    changes will be reverted.

    ✔ Do you want to install with these default configuration choices? · Proceed with installation

    Now installing Juliaup
    Installing Julia 1.7.2+0 (x64).
    Julia was successfully installed on your system.

    Depending on which shell you are using, run one of the following
    commands to reload the the PATH environment variable:

    . /home/ubuntu/.bashrc
      . /home/ubuntu/.profile

pkg> add https://github.com/JuliaPluto/PlutoUI.jl
         Cloning git-repo `[https://github.com/JuliaPluto/PlutoUI.jl`](https://github.com/JuliaPluto/PlutoUI.jl`)
        Updating git-repo `[https://github.com/JuliaPluto/PlutoUI.jl`](https://github.com/JuliaPluto/PlutoUI.jl`)
       Resolving package versions...
       Installed Reexport ─────────────── v1.2.2
       Installed IOCapture ────────────── v0.2.2
       Installed AbstractPlutoDingetjes ─ v1.1.4
       Installed JSON ─────────────────── v0.21.3
       Installed Hyperscript ──────────── v0.0.4
       Installed FixedPointNumbers ────── v0.8.4
       Installed HypertextLiteral ─────── v0.9.3
       Installed Parsers ──────────────── v2.3.0
       Installed ColorTypes ───────────── v0.11.0
        Updating `~/.julia/environments/v1.7/Project.toml`
      [7f904dfe] + PlutoUI v0.7.38 `[https://github.com/JuliaPluto/PlutoUI.jl#main`](https://github.com/JuliaPluto/PlutoUI.jl#main`)
        Updating `~/.julia/environments/v1.7/Manifest.toml`
      [6e696c72] + AbstractPlutoDingetjes v1.1.4
      [3da002f7] + ColorTypes v0.11.0
      [53c48c17] + FixedPointNumbers v0.8.4
      [47d2ed2b] + Hyperscript v0.0.4
      [ac1192a8] + HypertextLiteral v0.9.3
      [b5f81e59] + IOCapture v0.2.2
      [682c06a0] + JSON v0.21.3
      [69de0a69] + Parsers v2.3.0
      [7f904dfe] + PlutoUI v0.7.38 `[https://github.com/JuliaPluto/PlutoUI.jl#main`](https://github.com/JuliaPluto/PlutoUI.jl#main`)
      [189a3867] + Reexport v1.2.2
      [a63ad114] + Mmap
      [2f01184e] + SparseArrays
      [10745b16] + Statistics
    Precompiling project...
      10 dependencies successfully precompiled in 23 seconds (24 already precompiled)
pkg> add https://github.com/fonsp/Pluto.jl
J’y installe également ClusterManagers.jl pour bénéficier d’un système distribué avec Julia :
GitHub - JuliaParallel/ClusterManagers.jl
    ubuntu@vm2:~$ julia
                   _
       _       _ _(_)_     |  Documentation: [https://docs.julialang.org](https://docs.julialang.org)
      (_)     | (_) (_)    |
       _ _   _| |_  __ _   |  Type "?" for help, "]?" for Pkg help.
      | | | | | | |/ _` |  |
      | | |_| | | | (_| |  |  Version 1.7.2 (2022-02-06)
     _/ |\__'_|_|_|\__'_|  |  Official [https://julialang.org/](https://julialang.org/) release
    |__/                   |

    ([@v1](http://twitter.com/v1).7) pkg> add ClusterManagers
      Installing known registries into `~/.julia`
        Updating registry at `~/.julia/registries/General.toml`
       Resolving package versions...
       Installed ClusterManagers ─ v0.4.2
        Updating `~/.julia/environments/v1.7/Project.toml`
      [34f1f09b] + ClusterManagers v0.4.2
        Updating `~/.julia/environments/v1.7/Manifest.toml`
      [34f1f09b] + ClusterManagers v0.4.2
      [0dad84c5] + ArgTools
      [56f22d72] + Artifacts
      [2a0f44e3] + Base64
      [ade2ca70] + Dates
      [8ba89e20] + Distributed
      [f43a241f] + Downloads
      [b77e0a4c] + InteractiveUtils
      [b27032c2] + LibCURL
      [76f85450] + LibGit2
      [8f399da3] + Libdl
      [56ddb016] + Logging
      [d6f4376e] + Markdown
      [ca575930] + NetworkOptions
      [44cfe95a] + Pkg
      [de0858da] + Printf
      [3fa0cd96] + REPL
      [9a3f8284] + Random
      [ea8e919c] + SHA
      [9e88b42a] + Serialization
      [6462fe0b] + Sockets
      [fa267f1f] + TOML
      [a4e569a6] + Tar
      [cf7118a7] + UUIDs
      [4ec0a83e] + Unicode
      [deac9b47] + LibCURL_jll
      [29816b5a] + LibSSH2_jll
      [c8ffd9c3] + MbedTLS_jll
      [14a3606d] + MozillaCACerts_jll
      [83775a58] + Zlib_jll
      [8e850ede] + nghttp2_jll
      [3f19e933] + p7zip_jll
    Precompiling project...
      4 dependencies successfully precompiled in 1 seconds
J’obtiens une variante d’installation d’un cluster distribué avec Julia dans Kubernetes vis à vis de l’article précédent :
IA et Calcul scientifique dans Kubernetes avec le langage Julia, K8sClusterManagers.jl
Je peux alors lancer le Notebook Pluto sur la première machine virtuelle :
    ubuntu@vm1:~$ julia
                   _
       _       _ _(_)_     |  Documentation: [https://docs.julialang.org](https://docs.julialang.org)
      (_)     | (_) (_)    |
       _ _   _| |_  __ _   |  Type "?" for help, "]?" for Pkg help.
      | | | | | | |/ _` |  |
      | | |_| | | | (_| |  |  Version 1.7.2 (2022-02-06)
     _/ |\__'_|_|_|\__'_|  |  Official [https://julialang.org/](https://julialang.org/) release
    |__/                   |

    julia> using Pluto, PlutoUI;

    julia> Pluto.run(
                           launch_browser=false,
                           host="0.0.0.0",
                           port=1234,
                           require_secret_for_open_links=false,
                           require_secret_for_access=false,
                           workspace_use_distributed=false,
                         )
    [ Info: Loading...
    ┌ Info:
    └ Go to [http://0.0.0.0:1234/](http://0.0.0.0:1234/) in your browser to start writing ~ have fun!
    ┌ Info:
    │ Press Ctrl+C in this terminal to stop Pluto
    └
    [ Info: It looks like you are developing the Pluto package, using the unbundled frontend...
        Updating registry at `~/.julia/registries/General.toml`
        Updating registry done ✓
Je modifie les VMs pour inclure dans ses services, le port TCP 1235 qui va être nécessaire à ClusterManagers.jl :
Et depuis le Notebook Pluto, je lance ElasticManager.jl :
Readme · ClusterManagers.jl
avec cette formule :
    julia> em = ElasticManager(addr=:auto, port=1235)

    ElasticManager:
      Active workers : []
      Number of workers to be added  : 0
      Terminated workers : []
      Worker connect command :
        /home/ubuntu/.julia/juliaup/julia-1.7.2+0~x64/bin/julia --project=/home/ubuntu/.julia/environments/v1.7/Project.toml -e 'using ClusterManagers; ClusterManagers.elastic_worker("MGrq5ZqLXE5BCHj1","10.42.197.15",1235)'
Et je prends la formule indiquée pour joindre les autres VMs dans un cluster avec Julia :
ubuntu@vm2:~$ julia --project=/home/ubuntu/.julia/environments/v1.7/Project.toml -e 'using ClusterManagers; ClusterManagers.elastic_worker("MGrq5ZqLXE5BCHj1","10.42.197.15",1235)'
qui sont alors visibles …
    ElasticManager:
      Active workers : [ 2,3,4]
      Number of workers to be added  : 0
      Terminated workers : []
      Worker connect command :
        /home/ubuntu/.julia/juliaup/julia-1.7.2+0~x64/bin/julia --project=/home/ubuntu/.julia/environments/v1.7/Project.toml -e 'using ClusterManagers; ClusterManagers.elastic_worker("MGrq5ZqLXE5BCHj1","10.42.197.15",1235)'
On peut alors lancer des actions sur ce cluster via Pluto :

Julia Distributed Computing in the Cloud
Et notamment des projets relatifs à l’IA (via Julia par exemple) comme le devine PhoenixNAP :
6 Cloud Computing Trends For 2022 And Beyond
À suivre !

Posted on April 24, 2022
Join Our Newsletter. No Spam, Only the good stuff.
Sign up to receive the latest update from our blog.
Related
April 24, 2022


