Let's Build a BMI Calculator App with Flutter Part - 2

Coding Monkey
Posted on January 26, 2021

Hey All👋,
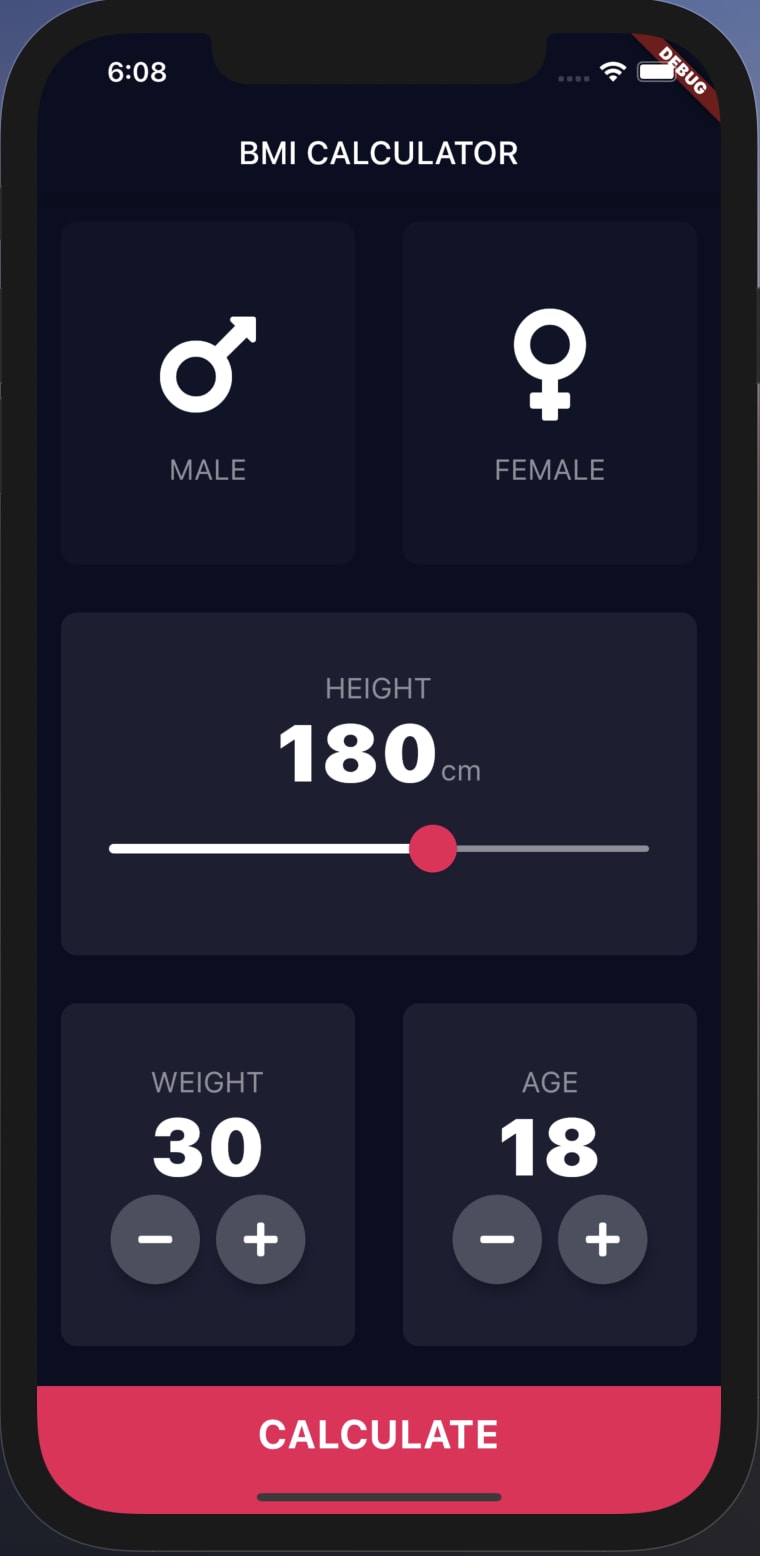
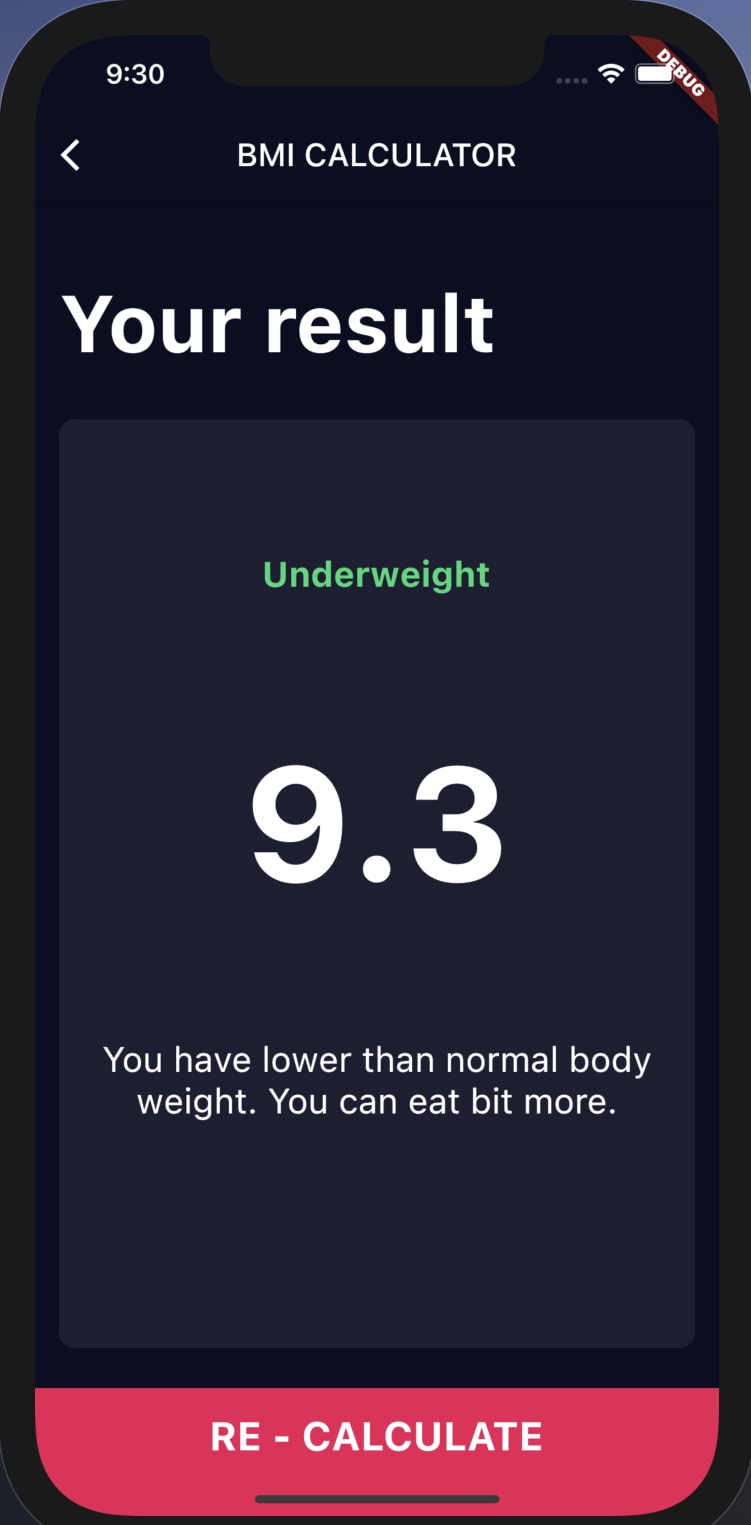
I am writing this post in continuation of the previous post where I started creating a BMI Calculator app. which is going to see something like this
| Input Page | Result Page |
|---|---|
 |
 |
And stopped when our App looked like this
Things To Be Implemented
So as we continue our app development now we need to fill 2 containers to get the weight data and the age of the user.
- RoundIconButton custom widget created using the
RawMaterialButton - Routes for page navigation
- GestureDetector to detect any user interaction with our widget
- BMI calculation functions
Building App
Add Weight Input Widget
So as we have collected the user height data now let's collect users weight data but this time around we are going to use the button to get data instead of the sliders.
          Expanded(
            child: Row(
              children: [
                Expanded(
                  child: new ReusableCard(
                    colour: kActiveCardColor,
                    cardChild: Column(
                      mainAxisAlignment: MainAxisAlignment.center,
                      children: [
                        Text(
                          'WEIGHT',
                          style: kLabelStyle,
                        ),
                        Text(
                          weight.toString(),
                          style: kNumberTextStyle,
                        ),
                        Row(
                          mainAxisAlignment: MainAxisAlignment.center,
                          children: [
                            RoundIconButton(
                              icon: FontAwesomeIcons.minus,
                              onPressed: () {
                                setState(() {
                                  if (weight > 30) weight--;
                                });
                              },
                            ),
                            SizedBox(
                              width: 10.0,
                            ),
                            RoundIconButton(
                              icon: FontAwesomeIcons.plus,
                              onPressed: () {
                                setState(() {
                                  weight++;
                                });
                              },
                            ),
                          ],
                        ),
                      ],
                    ),
                  ),
                ),
class RoundIconButton extends StatelessWidget {
  RoundIconButton({@required this.icon, @required this.onPressed});
  final IconData icon;
  final Function onPressed;
  @override
  Widget build(BuildContext context) {
    return RawMaterialButton(
      child: Icon(icon),
      onPressed: () {
        onPressed();
      },
      shape: CircleBorder(),
      fillColor: Color(0xFF4C4F5E),
      constraints: BoxConstraints.tightFor(
        width: 56.0,
        height: 56.0,
      ),
      elevation: 6.0,
    );
  }
}
To the Next Expanded widget in the container now we have to add the required widgets to have the text weight then the weight data below it the positive and negative buttons to change the weight value we take the most of the info from the previously created widget such as the text style.
Also, we have created a new class to get those round buttons to increase or decrease the weight. Here we are going to create the button using the RawMaterialButton which is the base widget for all the button widgets in the flutter.
In this widget, we taking 2 data one in the icon for the button and onPressed method which tells us what to do when the user clicks on that button. Also some Styling for the button such as the shape of the button elevation and colour of the button.
Same created custom RoundIconButton can be used for the age container. Also, let's move this class to a new file naming it round_button_icon.
               Expanded(
                  child: new ReusableCard(
                    colour: kActiveCardColor,
                    cardChild: Column(
                      mainAxisAlignment: MainAxisAlignment.center,
                      children: [
                        Text(
                          'AGE',
                          style: kLabelStyle,
                        ),
                        Text(
                          age.toString(),
                          style: kNumberTextStyle,
                        ),
                        Row(
                          mainAxisAlignment: MainAxisAlignment.center,
                          children: [
                            RoundIconButton(
                              icon: FontAwesomeIcons.minus,
                              onPressed: () {
                                setState(() {
                                  if (age > 1) age--;
                                });
                              },
                            ),
                            SizedBox(
                              width: 10.0,
                            ),
                            RoundIconButton(
                              icon: FontAwesomeIcons.plus,
                              onPressed: () {
                                setState(() {
                                  age++;
                                });
                              },
                            ),
                          ],
                        ),
                      ],
                    ),
                  ),
                ),
              ],
            ),
          ),
So this was simple since the only thing we had to change was changing all the place where we weighted age 😅.
Implement Button To Calculate BMI
So let's create a button upon clicking the button the BMI calculation will be done so let's do it
          Container(
            margin: EdgeInsets.only(top: 10.0),
            color: kBottomContainerColor,
            height: kBottomContainerHeight,
            width: double.infinity,
          )
As we already got many Custom styles implemented so we didn't have to make any changes the global variable to be implemented are
import 'package:flutter/material.dart';

const kBottomContainerHeight = 80.0;
const kBottomContainerColor = Color(0xFFEB1555);
const kActiveCardColor = Color(0xFF1D1E33);
const kInActiveCardColor = Color(0xFF111328);

const kLabelStyle = TextStyle(
  fontSize: 18.0,
  color: Color(0xFF8D8E98),
);

const kNumberTextStyle = TextStyle(
  fontSize: 50.0,
  fontWeight: FontWeight.w900,
);

const kLargeButtonTextStyle = TextStyle(
  fontSize: 25.0,
  fontWeight: FontWeight.bold,
);
Now our input page looks like this
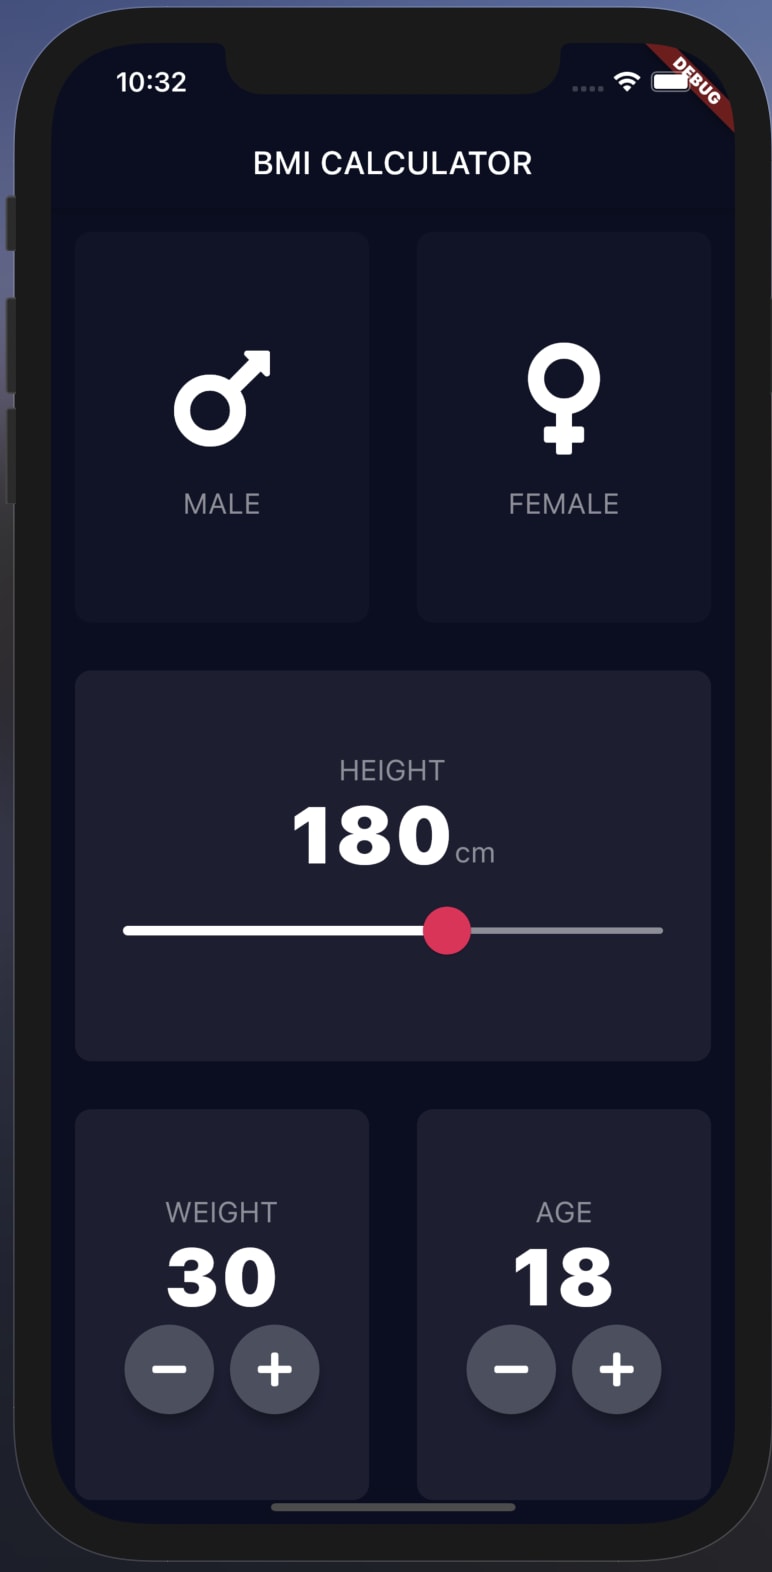
Now it's time to add some logic so that when we click on this button it will take us to result page where we show the result of the BMI calculations
But first, to use the multiple pages first we have to mention the routes we are going to use in the MaterialApp widget under the routes parameter.
MaterialApp(
      theme: ThemeData.dark().copyWith(
        primaryColor: Color(0xFF0A0E21),
        scaffoldBackgroundColor: Color(0xFF0A0E21),
      ),
      home: InputPage(),
      routes: {
        '/result': (context) => ResultPage(),
      },
    );
In the MaterialApp widget app we mention that when we use the /result route then ResultPage() should be loaded.
Now let's use this route by implementing the GestureDetector on the newly created button at the bottom of the app.
          GestureDetector(
            onTap: () {
              Navigator.pushNamed(context, '/result');
            },
            child: Container(
              child: Text(
                'CALCULATE',
                style: kLabelStyle,
              ),
              margin: EdgeInsets.only(top: 10.0),
              color: kBottomContainerColor,
              height: kBottomContainerHeight,
              width: double.infinity,
            ),
As you can see when we click on the button we are passing the route /result which in turns load the ResultPage class for us but we haven't created any ResultPage class so now let's create a basic class with Scaffold widget
import 'package:flutter/material.dart';

class ResultPage extends StatelessWidget {
  @override
  Widget build(BuildContext context) {
    return Scaffold(
        appBar: AppBar(
          title: Text('BMI CALCULATOR'),
        ),
        body: Text('Hello'));
  }
}
So as of now when clicks on the Calculate button we will be displayed with hello 😎 in the top left side of the app. Now let's start implementing our result page design.
import 'package:BMI_calculator/reusable_card.dart';
import 'package:BMI_calculator/constant.dart';
import 'package:flutter/cupertino.dart';
import 'package:flutter/material.dart';

import '../components/bottom_button.dart';

class ResultPage extends StatelessWidget {
  @override
  Widget build(BuildContext context) {
    return Scaffold(
      appBar: AppBar(
        title: Text('BMI CALCULATOR'),
      ),
      body: Column(
        mainAxisAlignment: MainAxisAlignment.spaceEvenly,
        crossAxisAlignment: CrossAxisAlignment.stretch,
        children: [
          Expanded(
            child: Container(
              alignment: Alignment.bottomLeft,
              padding: EdgeInsets.all(15.0),
              child: Text(
                'Your result',
                style: kTitleTextStyle,
              ),
            ),
          ),
          Expanded(
            flex: 5,
            child: ReusableCard(
              colour: kActiveCardColor,
              cardChild: Column(
                mainAxisAlignment: MainAxisAlignment.spaceEvenly,
                crossAxisAlignment: CrossAxisAlignment.center,
                children: [
                  Expanded(
                    child: Center(
                      child: Text('OVERWEIGHT', style: kResultTextStyle),
                    ),
                  ),
                  Expanded(
                    child: Text(
                      '28.4',
                      style: kBMITextStyle,
                    ),
                  ),
                  Expanded(
                    child: Text(
                      'You have more weight than normal body weight. Try exercising more.',
                      textAlign: TextAlign.center,
                      style: kBodyTextStyle,
                    ),
                  ),
                ],
              ),
            ),
          ),
          BottomButton(
            buttonText: 'RE - CALCULATE',
            route: '/',
          ),
        ],
      ),
    );
  }
}
So I have provided the whole code of our result page design since most of our code is repeated which we did for the input page with few changes such as flex value 😅(it's been a long post so just want to complete it fast 😣 sorry).
Time To Create Brain of The App
So as we are done with the design part now it's time to give some brainpower to our app so what we want to do now is just to take the height and weight of the user calculate the BMI value based on that and some interpretation based on the BMI value.
import 'dart:math';

class CalculatorBrain {
  CalculatorBrain({this.height, this.weight});

  final int height;
  final int weight;
  double _bmi;

  String calculateBMI() {
    _bmi = weight / pow(height / 100, 2);
    return _bmi.toStringAsFixed(1);
  }

  String getResult() {
    if (_bmi >= 25) {
      return 'Overweight';
    } else if (_bmi > 18.5) {
      return 'Normal';
    } else {
      return 'Underweight';
    }
  }

  String getInterpretation() {
    if (_bmi >= 25) {
      return 'You have higher than normal body weight. Try exercising more.';
    } else if (_bmi > 18.5) {
      return 'You have a normal body weight. Good job!.';
    } else {
      return 'You have lower than normal body weight. You can eat bit more.';
    }
  }
}
so now we have created a total of 3 methods one to calculate BMI another to check if your is overweight or underweight and the last one to pass interpretation to the user based on BMI value.
So let's make those change to use these methods in our app
          BottomButton(
            buttonText: 'CALCULATE',
            onTap: () {
              CalculatorBrain calc =
                  CalculatorBrain(height: height, weight: weight);
              Navigator.pushNamed(
                context,
                ResultPage.routeName,
                arguments: ResultPage(
                  bmiResult: calc.calculateBMI(),
                  resultText: calc.getResult(),
                  interpretation: calc.getInterpretation(),
                ),
              );
            },
          ),
Also Now let's use those methods to display our result page.
import 'package:BMI_calculator/reusable_card.dart';
import 'package:BMI_calculator/constant.dart';
import 'package:flutter/cupertino.dart';
import 'package:flutter/material.dart';

import '../bottom_button.dart';

class ResultPage extends StatelessWidget {
  static const routeName = '/result';
  ResultPage({this.bmiResult, this.resultText, this.interpretation});

  final String bmiResult;
  final String resultText;
  final String interpretation;
  @override
  Widget build(BuildContext context) {
    final ResultPage resultPage = ModalRoute.of(context).settings.arguments;
    return Scaffold(
      appBar: AppBar(
        title: Text('BMI CALCULATOR'),
      ),
      body: Column(
        mainAxisAlignment: MainAxisAlignment.spaceEvenly,
        crossAxisAlignment: CrossAxisAlignment.stretch,
        children: [
          Expanded(
            child: Container(
              alignment: Alignment.bottomLeft,
              padding: EdgeInsets.all(15.0),
              child: Text(
                'Your result',
                style: kTitleTextStyle,
              ),
            ),
          ),
          Expanded(
            flex: 5,
            child: ReusableCard(
              colour: kActiveCardColor,
              cardChild: Column(
                mainAxisAlignment: MainAxisAlignment.spaceEvenly,
                crossAxisAlignment: CrossAxisAlignment.center,
                children: [
                  Expanded(
                    child: Center(
                      child: Text(
                        resultPage.resultText,
                        style: kResultTextStyle,
                      ),
                    ),
                  ),
                  Expanded(
                    child: Text(
                      resultPage.bmiResult,
                      style: kBMITextStyle,
                    ),
                  ),
                  Expanded(
                    child: Text(
                      resultPage.interpretation,
                      textAlign: TextAlign.center,
                      style: kBodyTextStyle,
                    ),
                  ),
                ],
              ),
            ),
          ),
          BottomButton(
            buttonText: 'RE - CALCULATE',
            onTap: () {
              Navigator.pushNamed(
                context,
                '/',
              );
            },
          ),
        ],
      ),
    );
  }
}
First, let's create a constructor which takes the BMI result, result text and interpretations. also we are going to implement navigation to input page when use click on the RECALCULATE button.
You can get the complete code from this repo
Thank you
So by Now you also might have the BMI calculator app in your phone. Also, there are so many things that could be added such as using the gender data we are storing and age of the user. Also, we can add more comprehensive interpretation to the user and many more.
It was quite a long post which was divided into 2 parts. If you liked it leave like or comment (Both are fine by me). If you find any mistakes do leave a comment for me so I can correct myself also comments on improving my article are most welcomed. 😁
Soon I will come with a new post as I continue to learn the flutter by following the Angela Yu courses.

Posted on January 26, 2021
Join Our Newsletter. No Spam, Only the good stuff.
Sign up to receive the latest update from our blog.
