End to end development of a MEAN stack application

Vishnu Sivan
Posted on August 30, 2022

MEAN is an acronym for MongoDB, Express, Angular and Node.js. MEAN is one of the popular technology stacks used to develop web apps. It uses Javascript in the frontend and backend. All the MEAN stack components are open-sourced and the developer has the freedom to customize them. Angular uses MVC architecture to organize the application thereby providing rapid development to your app.
There are variations to the MEAN stack such as MERN (replacing Angular.js with React.js) and MEVN (using Vue.js).
In this article, we will create a basic MEAN application for storing and retrieving employee information from the database (basic CRUD operations).
Getting Started
Setup the environment
Requirements
- Node.Js [download]
- MongoDB [download]
- Postman [download]
- Visual Studio Code or Any text editor [download]
If you have not installed the listed softwares, download and install them from the official site on your machine. Ensure that you have added mongodb and node.js path in the environment variables.

Verify the node.js and mongodb versions using the following command.
npm --version
mongo --version
Part1 - Setup a Node.JS Backend
We can organize the backend and frontend files in separate folders. For which, create and navigate to the backend folder using the following command.
mkdir backend
cd backend
Initialize the backend nodejs project using the following command.
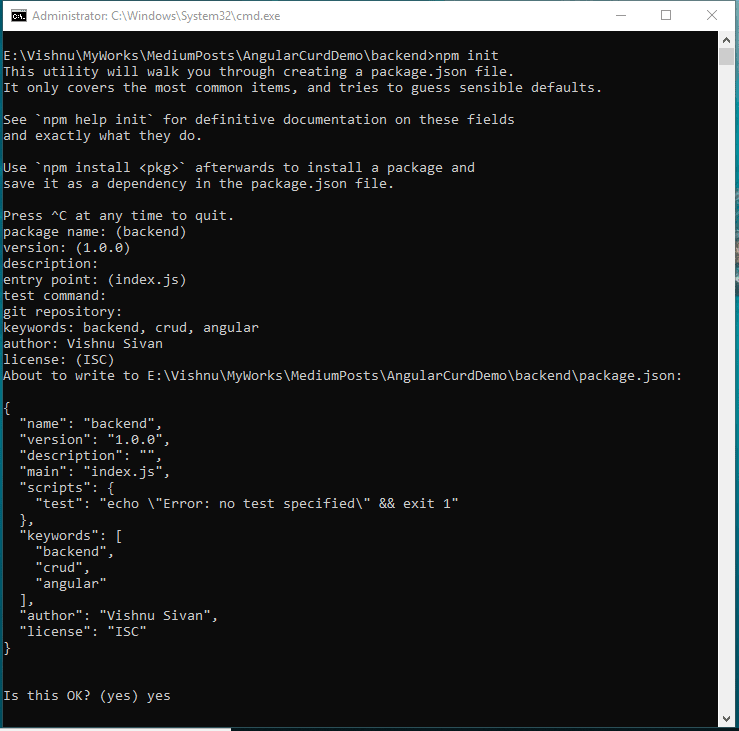
npm init
npm init will prompt you to enter some basic information such as the app name, description, version, author, and keyword. Enter this information and press enter to complete the process. After the project creation, you will get a package.json file in the directory which contains the basic project information as well as the project dependencies.
Add a start command in the package.json file. For which, open VSCode and add the following script to it.
"start": "node index.js"
- Create a file named
index.jsto write the server code. - Create three folders -
models,controllers, androutes. - Create a file named
employee.jsin all three folders.
The final project structure looks like this:
Install the required packages
Execute the following command in the terminal in the root folder to add body-parser, cors, express and mongoose packages to the project.
npm install body-parser cors express mongoose
-
body-parser: A JSON parsing middleware that helps in parsing JSON data, plain text, or a whole object. -
Express.js: A node framework for creating web applications and RESTful APIs. -
Cors: An express middleware for enabling CORS in the project. -
Mongoose: MongoDB ODM to interact with MongoDB database.
Create the model
We will start with defining a schema for employee collection. The employee collection contains name, email, designation and phoneNumber.
To define the employee model, add the following code in the backend > models > employee.js file.
const mongoose = require('mongoose');
const Schema = mongoose.Schema;
// Define collection and schema
let Employee = new Schema({
   name: {
      type: String
   },
   email: {
      type: String
   },
   designation: {
      type: String
   },
   phoneNumber: {
      type: Number
   }
}, {
   collection: 'employees'
})
module.exports = mongoose.model('Employee', Employee)
Setting up the controller
The controller contains the business logic to access data from the database using different routes. Here, we will be using mongoose to perform CRUD operations on the MongoDB database.
To create a controller, add the following code in the backend > controllers > employee.js file.
var mongoose = require('mongoose'),
  Employee = mongoose.model('Employee');
exports.listAllEmployee = function(req, res) {
  Employee.find({}, function(err, Employee) {
    if (err)
      res.send(err);
    res.json(Employee);
  });
};
exports.createEmployee = function(req, res) {
  var emp = new Employee(req.body);
  emp.save(function(err, result) {
    if (err)
      res.send(err);
    res.json(result);
  });
};
exports.readEmployee = function(req, res) {
  Employee.findById(req.params.employeeId, function(err, result) {
    if (err)
      res.send(err);
    res.json(result);
  });
};
exports.updateEmployee = function(req, res) {
  Employee.findOneAndUpdate({_id: req.params.employeeId}, req.body, {new: true}, function(err, result) {
    if (err)
      res.send(err);
    res.json(result);
  });
};
exports.deleteEmployee = function(req, res) {
  Employee.remove({
    _id: req.params.employeeId
  }, function(err, result) {
    if (err)
      res.send(err);
    res.json({ message: 'Employee successfully deleted' });
  });
};
Setting up the routes
Routes are the ways to access the data from the database with the help of controllers.
To create routes, add the following code in the backend > routes > employee.js file.
module.exports = function(app) {
    var employee = require('./../controllers/employee');
    app.route('/')
      .get(employee.listAllEmployee)
    app.route('/employee')
      .get(employee.listAllEmployee)
      .post(employee.createEmployee);
    app.route('/employee/:employeeId')
      .get(employee.readEmployee)
      .put(employee.updateEmployee)
      .delete(employee.deleteEmployee);
};
Setting up the server
We have specified the model, controllers and routes for storing and retrieving the employee data in the code. Write a server file to combine all these information. For which, open the backend > index.js and add the following code to it.
var express = require('express'),
   app = express(),
   port = process.env.PORT || 3000,
   mongoose = require('mongoose'),
   cors = require('cors'),
   bodyParser = require('body-parser'),
   Employee = require('./models/employee');
   mongoose.Promise = global.Promise;
   mongoose.connect('mongodb://localhost:27017/empdb',  {   useNewUrlParser: true, useUnifiedTopology: true })
   .then(() => {
      console.log('Database sucessfully connected')
   },
   error => {
      console.log('Database could not connected: ' + error)
   }
)
// Setting up configurations
app.use(bodyParser.json());
app.use(bodyParser.urlencoded({ extended: false }));
app.use(cors());
// Setting up the routes
var employeeRoute = require('./routes/employee');
//importing route
employeeRoute(app);
//register the route
app.listen(port, () => {
  console.log('Connected to port ' + port)
})
// Find 404 and hand over to error handler
app.use((req, res, next) => {
   next(createError(404));
});
// error handler
app.use(function (err, req, res, next) {
  console.error(err.message);
  if (!err.statusCode) err.statusCode = 500;
// If err has no specified error code, set error code to 'Internal Server Error (500)'
  res.status(err.statusCode).send(err.message);
// All HTTP requests must have a response, so let's send back an error with its status code and message
});
Understand the code,
- Initialized variables for express app, cors, body-parser, mongodb, and the model.
- Created a connection between server and mongodb database using mongoose.connect() method by specifying mongodb url as the argument.
- Set up cors configurations for the server.
- Set up the routes for apis by importing and registering the route with express app.
- Run the server on port 3000.
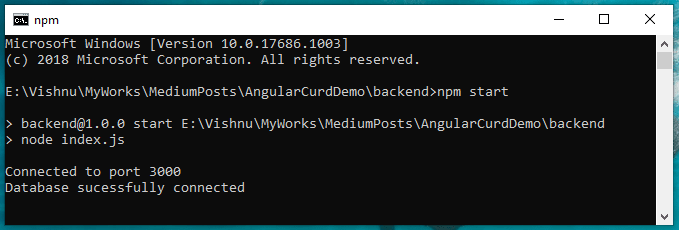
Execute the following command to start the node.js server.
npm start
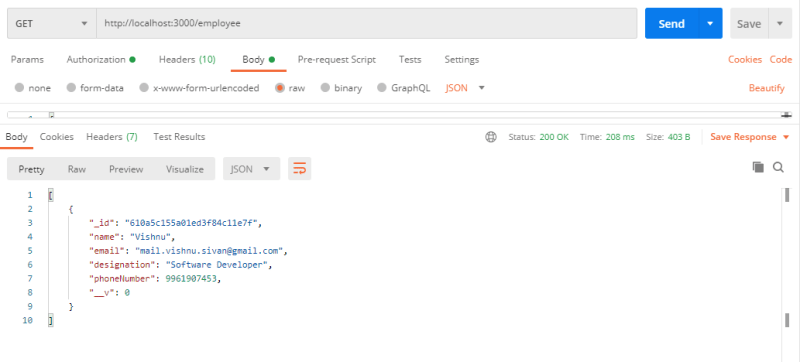
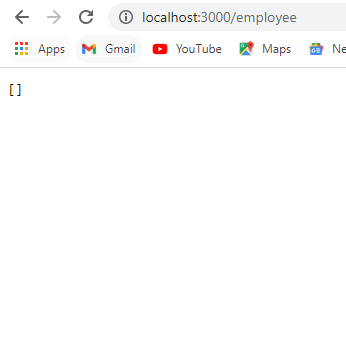
Use postman to access the apis. Alternately, load the url http://localhost:3000/employee on your browser. If the server is up and running, you will get an empty array [].
Part2 - Set up the Angular frontend
Angular is a typescript based open source development platform for building web apps. It uses a command line interface called Angular CLI to develop and maintain Angular applications directly from a terminal.
Install angular-cli in your machine using the following command, ignore if already installed.
npm install -g @angular/cli
Create an angular project
Create a folder named frontend to hold the angular project.
Create an angular app using the ng new command.
mkdir frontend
cd frontend
ng new mean-stack-crud-app
Angular CLI asks for the following while setting up the project.
- Would you like to add Angular routing? Select y and hit enter.
- Which stylesheet format would you like to use?
Choose CSS by arrow keys and hit enter.
Navigate to the project folder (mean-stack-crud-app) and open the visual studio code there.
cd mean-stack-crud-app
code .
Bootstrap integration
Bootstrap is an open-source tool for creating responsive web apps. We will be using bootstrap templating for this project.
Install bootstrap to the project using the following command,
npm install bootstrap
Add the following code to "styles": [ ] array in the angular.json file.
"styles": [
          "node_modules/bootstrap/dist/css/bootstrap.min.css",
          "src/styles.css"
         ]
Generate components
Components are the building blocks of an Angular application. Each component consists of an HTML template which renders the page and a typescript class which implements the behavior.
Generate components to add, update and view the employee details using the following commands.
ng g c components/employee-create
ng g c components/employee-edit
ng g c components/employee-list
Activate Routing Service
Routing is an essential tool for navigating between various components. Angular-cli will create a default routing for your app if you enable routing while creating the project. For which, it creates app-routing.module.ts and registers it in the src > app > app.module.ts file.
We have created 3 components for managing the employee data. To create different routes for accessing the same, replace the app.module.ts code with the following code.
import { NgModule } from '@angular/core';
import { Routes, RouterModule } from '@angular/router';
import { BrowserModule } from '@angular/platform-browser';
import { FormsModule, ReactiveFormsModule } from '@angular/forms';
import { AppRoutingModule } from './app-routing.module';
import { AppComponent } from './app.component';
import { EmployeeCreateComponent } from './components/employee-create/employee-create.component';
import { EmployeeEditComponent } from './components/employee-edit/employee-edit.component';
import { EmployeeListComponent } from './components/employee-list/employee-list.component';import { HttpClientModule } from '@angular/common/http';
import { ApiService } from './service/api.service';const routes: Routes = [
  { path: '', pathMatch: 'full', redirectTo: 'create-employee' },
  { path: 'create-employee', component: EmployeeCreateComponent },
  { path: 'edit-employee/:id', component: EmployeeEditComponent },
  { path: 'employees-list', component: EmployeeListComponent }
];
@NgModule({
  declarations: [
    AppComponent,
    EmployeeCreateComponent,
    EmployeeEditComponent,
    EmployeeListComponent
  ],
  imports: [
    BrowserModule,
    AppRoutingModule,
    FormsModule,
    ReactiveFormsModule,
    RouterModule.forRoot(routes),
    HttpClientModule,
  ],
  exports: [RouterModule],
  providers: [ApiService],
  bootstrap: [AppComponent]
})
export class AppModule { }
app.component.html contains some dummy codes. To access the router links in the component, add a router-outlet tag to the HTML file.
Replace the app.component.html file content with the following code.
<nav>
  <a routerLinkActive="active" routerLink="/employees-list">View Employees</a>
  <a routerLinkActive="active" routerLink="/create-employee">Add Employee</a>
</nav><router-outlet></router-outlet>
Create Angular Service
In angular, services are typescript classes with @Injectable decorator. It is used to organize and share data with different components of an Angular application.
Configure the HttpClientModule
We need to import HttpClientModule service in app.module.ts file to manage data using the httpClient object in the service file.
import { HttpClientModule } from '@angular/common/http';
@NgModule({
  imports: [
    HttpClientModule
   ]
})
Create an employee model file
Create src > model > employee.ts file using the following command,
ng g cl model/employee
Add the following code to it.
export class Employee {
    name: string;
    email: string;
    designation: string;
    phoneNumber: number;

    constructor(name: string, email: string, designation: string, phoneNumber: number){
        this.name = name;
        this.email = email;
        this.designation = designation;
        this.phoneNumber = phoneNumber;
    }
 }
Create the service
Create a angular service using the following command,
ng g s service/api
Add the following code to it.
import { Injectable } from '@angular/core';
import { Observable, throwError } from 'rxjs';
import { catchError, map } from 'rxjs/operators';
import { HttpClient, HttpHeaders, HttpErrorResponse } from '@angular/common/http';
@Injectable({
  providedIn: 'root'
})
export class ApiService {
  baseUri:string = 'http://localhost:3000';
  headers = new HttpHeaders().set('Content-Type', 'application/json');constructor(private http: HttpClient) { }
  // Create
  createEmployee(data: any): Observable<any> {
    let url = `${this.baseUri}/employee`;
    return this.http.post(url, data)
      .pipe(
        catchError(this.errorMgmt)
      )
  }
  // Get all employees
  getEmployees() {
    return this.http.get(`${this.baseUri}`);
  }
  // Get employee by id
  getEmployee(id: any): Observable<any> {
    let url = `${this.baseUri}/employee/${id}`;
    return this.http.get(url, {headers: this.headers}).pipe(
      map((res: any) => {
        return res || {}
      }),
      catchError(this.errorMgmt)
    )
  }
  // Update employee
  updateEmployee(id: any, data: any): Observable<any> {
    let url = `${this.baseUri}/employee/${id}`;
    return this.http.put(url, data, { headers: this.headers }).pipe(
      catchError(this.errorMgmt)
    )
  }
  // Delete employee
  deleteEmployee(id: any): Observable<any> {
    let url = `${this.baseUri}/employee/${id}`;
    return this.http.delete(url, { headers: this.headers }).pipe(
      catchError(this.errorMgmt)
    )
  }
  // Error handling
  errorMgmt(error: HttpErrorResponse) {
    let errorMessage = '';
    if (error.error instanceof ErrorEvent) {
      // Get client-side error
      errorMessage = error.error.message;
    } else {
      // Get server-side error
      errorMessage = `Error Code: ${error.status}\nMessage: ${error.message}`;
    }
    console.log(errorMessage);
    return throwError(errorMessage);
  }}
Add the service to the providers array of app.module.ts file.
import { ApiService } from './service/api.service';
@NgModule({
  providers: [ApiService]
})
Register an Employee
We have configured the angular app and created services for the same. Now, we can focus on the business logic to register employee component and employee view component. In this tutorial, we will be using the Reactive Forms to register an employee.
Angular ReactiveForms
Open the components > employee-create > employee-create.component.ts file in VSCode and add the following code to it.
import { Router } from '@angular/router';
import { ApiService } from './../../service/api.service';
import { Component, OnInit, NgZone } from '@angular/core';
import { FormGroup, FormBuilder, Validators } from "@angular/forms";
@Component({
  selector: 'app-employee-create',
  templateUrl: './employee-create.component.html',
  styleUrls: ['./employee-create.component.css']
})
export class EmployeeCreateComponent implements OnInit {
  submitted = false;
  employeeForm: FormGroup;
  EmployeeProfile:any = ['Finance', 'BDM', 'HR', 'Sales', 'Admin']

  constructor(
    public fb: FormBuilder,
    private router: Router,
    private ngZone: NgZone,
    private apiService: ApiService
  ) {
    this.employeeForm = this.fb.group({
      name: ['', [Validators.required]],
      email: ['', [Validators.required, Validators.pattern('[a-z0-9._%+-]+@[a-z0-9.-]+\.[a-z]{2,3}$')]],
      designation: ['', [Validators.required]],
      phoneNumber: ['', [Validators.required, Validators.pattern('^[0-9]+$')]]
    })
  }
  ngOnInit() { }
  // Choose designation with select dropdown
  updateProfile(e: any){
    var element = e.target as HTMLSelectElement
    this.employeeForm?.get('designation')?.setValue(element.value, {
      onlySelf: true
    })
  }
  // Getter to access form control
  get myForm(){
    return this.employeeForm.controls;
  }
  onSubmit() {
    this.submitted = true;
    if (!this.employeeForm.valid) {
      return false;
    } else {    this.apiService.createEmployee(this.employeeForm.value).subscribe(
        (res) => {
          console.log('Employee successfully created!')
          this.ngZone.run(() => this.router.navigateByUrl('/employees-list'))
        }, (error) => {
          console.log(error);
        });
      return true;
    }
  }}
Open the employee-create.component.html file and add the following code to it.
<div class="row justify-content-center">
    <div class="col-md-4 register-employee">
      <!-- form card register -->
      <div class="card-body">
        <form [formGroup]="employeeForm" (ngSubmit)="onSubmit()">
          <div class="form-group">
            <label for="inputName">Name</label>
            <input class="form-control" type="text" formControlName="name">
            <!-- error -->
            <div class="invalid-feedback" *ngIf="submitted && myForm.name.errors?.required">
              Name is required.
            </div>
          </div>

          <div class="form-group">
            <label for="inputEmail3">Email</label>
            <input class="form-control" type="text" formControlName="email">
            <!-- error -->
            <div class="invalid-feedback" *ngIf="submitted && myForm.email.errors?.required">
              Enter your email.
            </div>
            <div class="invalid-feedback" *ngIf="submitted && myForm.email.errors?.pattern">
              Enter a valid email.
            </div>
          </div>

          <div class="form-group">
            <label for="inputPassword3">Designation</label>
            <select class="custom-select form-control" (change)="updateProfile($event)"
              formControlName="designation">
              <option value="">Choose...</option>
              <option *ngFor="let employeeProfile of EmployeeProfile" value="{{employeeProfile}}">{{employeeProfile}}
              </option>
            </select>
            <!-- error -->
            <div class="invalid-feedback" *ngIf="submitted && myForm.designation.errors?.required">
              Choose designation.
            </div>
          </div>

          <div class="form-group">
            <label for="inputVerify3">Mobile No</label>
            <input class="form-control" type="text" formControlName="phoneNumber">
            <!-- error -->
            <div class="invalid-feedback" *ngIf="submitted && myForm.phoneNumber.errors?.required">
              Enter your phone number.
            </div>
            <div class="invalid-feedback" *ngIf="submitted && myForm.phoneNumber.errors?.pattern">
              Enter Numbers Only
            </div>
          </div>

          <div class="form-group">
            <button class="btn btn-success btn-lg btn-block" type="submit">Register</button>
          </div>
        </form>

      </div>
    </div>
    <!-- form card register -->
  </div>
Show Employee list
Open src/app/components/employee-list/employee-list.component.ts file and add the following code to it.
import { Component, OnInit } from '@angular/core';
import { ApiService } from './../../service/api.service';
@Component({
  selector: 'app-employee-list',
  templateUrl: './employee-list.component.html',
  styleUrls: ['./employee-list.component.css']
})
export class EmployeeListComponent implements OnInit {

  Employee:any = [];constructor(private apiService: ApiService) {
    this.readEmployee();
  }
ngOnInit() {}
readEmployee(){
    this.apiService.getEmployees().subscribe((data) => {
     this.Employee = data;
    })
  }
removeEmployee(employee: any, index: number) {
    if(window.confirm('Are you sure?')) {
       this.apiService.deleteEmployee(employee._id).subscribe((data) => {
          this.Employee.splice(index, 1);
        }
      )
    }
  }}
Open the employee-list.component.html file and add the following code to it.
<div class="container">
    <!-- No data message -->
    <p *ngIf="Employee.length <= 0" class="no-data text-center">There is no employee added yet!</p>

    <!-- Employee list -->
    <table class="table table-bordered" *ngIf="Employee.length > 0">
      <thead class="table-success">
        <tr>
          <th scope="col">Employee ID</th>
          <th scope="col">Name</th>
          <th scope="col">Email</th>
          <th scope="col">Designation</th>
          <th scope="col">Phone No</th>
          <th scope="col center">Update</th>
        </tr>
      </thead>
      <tbody>
        <tr *ngFor="let employee of Employee; let i = index">
          <th scope="row">{{employee._id}}</th>
          <td>{{employee.name}}</td>
          <td>{{employee.email}}</td>
          <td>{{employee.designation}}</td>
          <td>{{employee.phoneNumber}}</td>
          <td class="text-center edit-block">
            <span class="edit" [routerLink]="['/edit-employee/', employee._id]">
              <button type="button" class="btn btn-success btn-sm">Edit</button>
            </span>
            <span class="delete" (click)="removeEmployee(employee, i)">
              <button type="button" class="btn btn-danger btn-sm">Delete</button>
            </span>
          </td>
        </tr>
      </tbody>
    </table>
  </div>
Edit an Employee
Open the src/app/components/employee-edit/employee-edit.component.ts file and add the following code to it.
import { Employee } from './../../model/employee';
import { Component, OnInit } from '@angular/core';
import { ActivatedRoute, Router } from "@angular/router";
import { ApiService } from './../../service/api.service';
import { FormGroup, FormBuilder, Validators } from "@angular/forms";
@Component({
  selector: 'app-employee-edit',
  templateUrl: './employee-edit.component.html',
  styleUrls: ['./employee-edit.component.css']
})
export class EmployeeEditComponent implements OnInit {
  submitted = false;
  editForm: FormGroup;
  employeeData: Employee[];
  EmployeeProfile: any = ['Finance', 'BDM', 'HR', 'Sales', 'Admin']
  constructor(
    public fb: FormBuilder,
    private actRoute: ActivatedRoute,
    private apiService: ApiService,
    private router: Router
  ) {
    this.employeeData = []
    this.editForm = this.fb.group({})
  }
  ngOnInit() {
    this.updateEmployee();
    let id = this.actRoute.snapshot.paramMap.get('id');
    this.getEmployee(id);
    this.editForm = this.fb.group({
      name: ['', [Validators.required]],
      email: ['', [Validators.required, Validators.pattern('[a-z0-9._%+-]+@[a-z0-9.-]+\.[a-z]{2,3}$')]],
      designation: ['', [Validators.required]],
      phoneNumber: ['', [Validators.required, Validators.pattern('^[0-9]+$')]]
    })
  }
  // Choose options with select-dropdown
  updateProfile(e: any) {
    var element = e.target as HTMLSelectElement
    this.editForm?.get('designation')?.setValue(element.value, {
      onlySelf: true
    })
  }
  // Getter to access form control
  get myForm() {
    return this.editForm.controls;
  }
  getEmployee(id: any) {
    this.apiService.getEmployee(id).subscribe(data => {
      this.editForm.setValue({
        name: data['name'],
        email: data['email'],
        designation: data['designation'],
        phoneNumber: data['phoneNumber'],
      });
    });
  }
  updateEmployee() {
    this.editForm = this.fb.group({
      name: ['', [Validators.required]],
      email: ['', [Validators.required, Validators.pattern('[a-z0-9._%+-]+@[a-z0-9.-]+\.[a-z]{2,3}$')]],
      designation: ['', [Validators.required]],
      phoneNumber: ['', [Validators.required, Validators.pattern('^[0-9]+$')]]
    })
  }
  onSubmit() {
    this.submitted = true;
    if (!this.editForm.valid) {
      return false;
    } else {
      if (window.confirm('Are you sure?')) {
        let id = this.actRoute.snapshot.paramMap.get('id');
        this.apiService.updateEmployee(id, this.editForm.value)
          .subscribe(res => {
            this.router.navigateByUrl('/employees-list');
            console.log('Content updated successfully!')
          }, (error) => {
            console.log(error)
          })
      }
      return true;
    }
  }}
Open the employee-edit.component.html and add the following code to it.
<div class="row justify-content-center">
    <div class="col-md-4 register-employee">
      <!-- form card register -->
      <div class="card card-outline-secondary">
        <div class="card-header">
          <h3 class="mb-0">Edit Employee</h3>
        </div>
        <div class="card-body">
          <form [formGroup]="editForm" (ngSubmit)="onSubmit()">

            <div class="form-group">
              <label for="inputName">Name</label>
              <input class="form-control" type="text" formControlName="name">
              <div class="invalid-feedback" *ngIf="submitted && myForm.name.errors?.required">
                Name is required.
              </div>
            </div>
            <div class="form-group">
              <label for="inputEmail3">Email</label>
              <input class="form-control" type="text" formControlName="email">
              <!-- error -->
              <div class="invalid-feedback" *ngIf="submitted && myForm.email.errors?.required">
                Enter your email.
              </div>
              <div class="invalid-feedback" *ngIf="submitted && myForm.email.errors?.pattern">
                Enter valid email.
              </div>
            </div>

            <div class="form-group">
              <label for="inputPassword3">Designation</label>
              <select class="custom-select form-control" (change)="updateProfile($event)"
                formControlName="designation">
                <option value="">Choose...</option>
                <option *ngFor="let employeeProfile of EmployeeProfile" value="{{employeeProfile}}">{{employeeProfile}}
                </option>
              </select>
              <!-- error -->
              <div class="invalid-feedback" *ngIf="submitted && myForm.designation.errors?.required">
                Choose designation.
              </div>
            </div>

            <div class="form-group">
              <label for="inputVerify3">Mobile No</label>
              <input class="form-control" type="text" formControlName="phoneNumber">
              <!-- error -->
              <div class="invalid-feedback" *ngIf="submitted && myForm.phoneNumber.errors?.required">
                Enter your phone number.
              </div>
              <div class="invalid-feedback" *ngIf="submitted && myForm.phoneNumber.errors?.pattern">
                Enter Numbers Only
              </div>
            </div>

            <div class="form-group">
              <button class="btn btn-success btn-lg btn-block" type="submit">Update</button>
            </div>
          </form>
        </div>
      </div>
      <!-- form  -->
    </div>
  </div>
There you have it! Your first MEAN stack app :)


Thanks for reading this article.
Thanks Gowri M Bhatt for reviewing the content.
If you enjoyed this article, please click on the heart button ♥ and share to help others find it!
The article is also available on Medium.
The full source code for this tutorial can be found here,

Posted on August 30, 2022
Join Our Newsletter. No Spam, Only the good stuff.
Sign up to receive the latest update from our blog.
Related
November 30, 2024


