Kubernetes deployments with Cloudflare

Eddie Webbinaro
Posted on November 20, 2018
This post is the second in a series that covers multi-cloud deployment. The first post, “Dockerizing Java apps with CircleCI and Jib,” addressed using Google’s Jib project to simplify wrapping a Java application in Docker. This post covers multi-cloud deployment behind a global load balancer.
In the first post, we talked about building containerized applications and published a simple Java Spring Boot application with Google’s Jib. That process is efficient at building and assembling our application, but we did not address distribution. In this post, we will look at a method of deploying our Docker application to Kubernetes and enabling global access with Cloudflare’s domain name system (DNS) and proxy services.
We will be using several technologies in this blog, and a basic understanding of CircleCI is required. If you are new to CircleCI, we have introductory content to help you get started.
The code used in this post lives in a sample repository on Github. You can reference https://github.com/eddiewebb/circleci-multi-cloud-k8s for full code samples, or to follow along. Here is the workflow that we will be building:
Credential management
I brought credential management to the top of this post on deployments because it is fundamental to a successful CI/CD pipeline. Before we start pushing our configuration, we are going to set up our access to Docker Hub (optional), Google Cloud Platform (GCP) and Cloudflare.
Authenticating with Docker Hub
My sample workflow uses Docker Hub as the registry for our containerized application. As an alternative, you can push them to Google or Amazon's registries. How you authenticate will depend on your application. This sample app uses Maven encryption to authenticate Google Jib's connection with Docker Hub, as described in our first post.
Authenticating with Google Cloud Platform
GCP is the IaaS provider we chose to host our Kubernetes cluster. To get started authenticating with GCP, you will need to create a service user key as described in the Google docs. Choose the new .json format when it prompts you to download a key. You will also need to assign roles to the service account. To successfully create a cluster and deployment, your service account will need ‘Kubernetes Engine Cluster Admin’ and ‘Kubernetes Engine Developer.’ Those roles can be granted on the main identity and access management (IAM) tab in Google’s console.
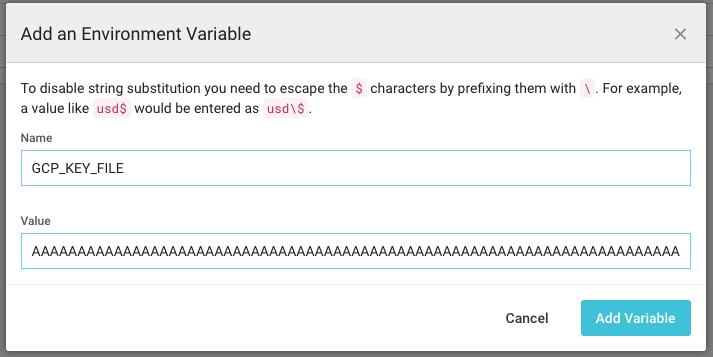
The key file contains sensitive information. We never want to check sensitive information into the source code. In order to expose it to our workflow, we will encode the file as a string, and save it as an environment variable:
base64 ~/Downloads/account-12345-abcdef1234.json
Copy the output and save it as an environment variable in the CircleCI project configuration:
Later, when we need that within our deployment job, we can decode it back to a file with base64 again:
echo "${GCP_KEY_FILE}" | base64 --decode >> gcp_key.json
I feel it necessary to issue the standard precaution: base64 is not encryption, it adds no security nor true obfuscation of the sensitive values. We use base64 as a means to turn a file into a string. It is paramount that you treat the base64 value with the same level of protection as the key file itself.
Authenticating with Cloudflare
One of the last steps in our deployment is the use of Cloudflare to route traffic for justademo.online back to our various clusters. We need a Cloudflare API key, a DNS zone, and an email address. Since these are all simple strings they can be added as is.
-
CLOUDFLARE_API_KEY- Can be found in profile and domain dashboard -
CLOUDFLARE_DNS_ZONE- Can be found on domain dashboard -
CLOUDFLARE_EMAIL- Email used to create Cloudflare account
Deploying Docker containers to Kubernetes with CircleCI
I found Google Cloud's Kubernetes support intuitive and easy to get started. Their gcloud command line interface (CLI) even provides a means to inject the required configuration into Kubernetes kubectl CLI. There are many providers out there and, although not covered in this blog post, the sample code does include a deployment to Amazon Web Services (AWS) using kops.
Configuring the command line tools
CircleCI favors deterministic and explicit configuration over plugins. That enables us to control the environment and versions used right within our configuration. The first thing we will do is install our CLI tools:
Remember: You can copy text from our sample project's configuration.
Because the steps above install the CLI on each build, it does add ~10-15 seconds to our job. For tools that you use often, it is worth your time to package your own custom Docker images instead.
With the gcloud and kubectl tools installed, we can begin creating our cluster and deployment. The general flow in GCP’s Kubernetes environment is:
- Create a cluster that defines the number and size of VMs to run our workload.
- Create a deployment that defines the container image to use as our workload.
- Create a load balancer service that maps an IP and port to our cluster.
Before gcloud will do any of that, we need to provide it with credentials and project information. This is the step where we "rehydrate" our GCP key into a readable file:
Running your first deployment
The gcloud CLI now has access to our service account. We will use that access to create our cluster:
gcloud container clusters create circleci-k8s-demo --num-nodes=2
This command should block until the cluster creation succeeds. That allows us to provide our container image as a workload. The gcloud CLI will also save the required permissions into kubectl automatically for us:
kubectl run circleci-k8s-demo --image=${DOCKER_IMAGE} --port 8080
The variable DOCKER_IMAGE defines the full coordinates of our container in standard registry format. If you followed our previous post on versioning Java containers with Jib, the DOCKER_IMAGE would be: eddiewebb/circleci-k8s-demo:0.0.1-b8.
Unlike the create cluster command, the command to create or update the deployment is asynchronous. We need to run some basic smoke tests against our cluster. We use the rollout status command to wait for a successful deployment. This command is perfect because it waits for the final status, and will exit with a 0 on a successful deployment:
kubectl rollout status deployment/circleci-k8s-demo
Our container is now running on several nodes, with various IPs, on port 8080. Before we move on from GCP, the last thing to do is set up the local load balancer to send traffic from a single IP to all of the containers in the cluster. We use kubectl's expose command for that:
kubectl expose deployment circleci-k8s-demo --type=LoadBalancer --port 80 --target-port 8080
Just to make sure everything is started and routing successfully, we can run a primitive health check:
As you may notice in the Smoke Test job above, we do not know the IP address that Google will assign ahead of time. In a production environment, you would likely choose to purchase and allocate a reserved IP, instead of using a floating IP. You can see an example of that in our AWS deployment that is part of the sample project.
Routing your domain with Cloudflare
Each cloud provider exposes ways to get your dynamic cluster IP assigned to a known domain name. I want to demonstrate how we might serve our application from multiple cloud providers and dynamically address distribution and load. In addition to providing a straightforward API to manage our DNS, Cloudflare allows us to route traffic through their proxy for additional caching and protections. Additionally, since this is running in its own step, we need to grab the CLUSTER_IP from kubectl again. We will then use that IP in a POST call to Cloudflare's DNS:
Note: Because we want to use this sub-domain in our load balancers later, it is important that we leave "proxying" disabled.
That will map the GCP cluster to a subdomain. This subdomain will be used by our global load balancer to distribute traffic among multiple cloud providers.
Cool! Did it work? If you have followed along, you will have a live sub-domain similar to k8sgcp.justademo.online routing through Cloudflare to your Kubernetes cluster in Google Cloud.
Updating existing Kubernetes deployments on GCP with CircleCI
Our example above created everything fresh. If you tried to rerun that deployment, it would fail! Google will not create a cluster, deployment, or service that already exists. To make our workflow behave properly, we have to augment our original solution to consider the current state.
We can use get and describe commands to determine if our stack already exists, and run the appropriate update commands instead.
Create cluster OR get credentials:
Run deployment OR update the image:
Our sample project uses logic that will create or update all aspects, depending on the current state.
Alternately, and for more robust deployments, you will want to explore the use of Kubernetes deployment definitions that can be defined and applied, capturing the configuration as a .yml file. More information can be found in the Kubernetes examples.
Adding AWS deployments
AWS provides several options for deploying containers, including Fargate, ECS, and building your own cluster from EC2 instances. You can look at the deploy-AWS job within our sample project to explore one approach. We used the kops project to provision a cluster from EC2 and Elastic Load Balancers (ELB) to route traffic to that cluster.
What is germane to the topic in this blog post is that we now have the same application running across multiple cloud providers. Next we will implement a global load balancer to distribute traffic among them and setup our DNS. Setting up DNS will be a little different due to kops creating an ELB for us.
Tie it together with Cloudflare
As with Cloudflare’s DNS service, their Traffic service exposes a full API for managing the load balancer configuration. This makes it straightforward for us to automate that task in CircleCI.
Create a load balancer in Cloudflare
I opted not to script this part since it truly is a one-time thing. Create a load balancer that is associated with the primary domain you want sitting in front of all your clouds:
You will need to create at least one origin pool. If you have already run a deployment, you can specify the sub-domain we created above for our GCP cluster:
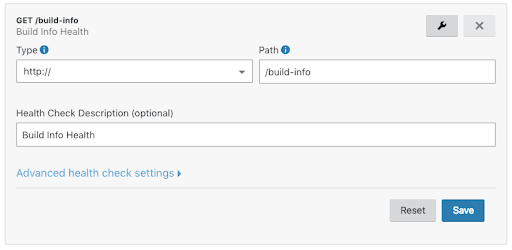
You will also be asked to define a health monitor. I chose a simple GET to a /build-info endpoint on the application, expecting a 200 response:
Once your initial load balancer and GCP origin pool are created, we can move on to scripting the AWS integration that updates a second origin pool with the dynamic AWS ELB created on each deployment.
Updating our Cloudflare origin pools on deployment
As mentioned above, when using kops in AWS it will create an ELB routed to the Kubernetes cluster automatically. Rather than setting up an AWS domain in Cloudflare, we will just use the one provided by Amazon. We will need to pass that along to Cloudflare. The ELB's name can be obtained using kubectl get service:
Because the ELB may not be immediately ready, we wrap that logic in a loop:
The result should be two healthy origin pools, running in separate cloud providers, all behind a single domain:
We are using proxying and SSL enforcement on our top-level domain, so go ahead and check out https://justademo.online/.
Summary
This post explored the creation of a Docker application and deployment across multiple cloud providers. We used Google's native support for Kubernetes cluster, while in AWS we created our cluster from scratch. Finally, we used Cloudflare as a global load balancer and DNS provider, allowing us to achieve a multi-cloud deployment that is transparent to our end users. Please check out the sample project with full sample code for everything covered in this post.
Happy shipping!

Posted on November 20, 2018
Join Our Newsletter. No Spam, Only the good stuff.
Sign up to receive the latest update from our blog.


