Shivang Bhandari
Posted on April 11, 2022

A key aspect of frontend development and products is the authentication and security of users. Adding Login flows to a project is usually the easiest way to get comfortable with authentication.
Adding Login flows to a project is usually the easiest way to get comfortable with authentication. As developers get started there are a few questions that come to mind:
- How to handle passwords
- How to handle reset passwords
- How to encrypt and store them
Why use Third-Party Providers?
Third-party sign-on has proven to be a widely adopted and secure alternative to username/password authentication.
It’s easier to retrospect on the complexities of having an in-house authentication and managing everything. This would mean all the user data including their passwords will have to be stored on internal servers and it needs to be properly salted and hashed. Managing all the complexity and solving a problem that Google, Facebook, etc. have already solved on a mammoth scale is not the most efficient solution for this problem. Third-party sign-on takes care of all of this for us as we are never dealing with the user credentials. This is done for us by the oAuth provider we have integrated.
While third-party oAuth service sounds great, when implemented it involves a fair amount of code, getting familiar with provider APIs, and integrating multiple login services is still isn't that straightforward.
Then came Canonic!
Simplified Authentication using Canonic
At Canonic, we help reduce all this complexity by providing a single API endpoint that can be used for multiple providers. The process stays the same on a high level for all the different logins. In this article, we’ll walk you through integrating Google Login with ReactJS, powered by Canonic.
So let's get started!
Setting up the backend
To set up the backend for our authentication, first, let’s head over to canonic.dev. After this, you can log in to canonic, or create a new account if you do not already have one! We provide a free plan to enable developers to try out the product.
After this, we need to set up a new project and we can name it “Test Login App” or anything else that you would want to name it 😄. Select the “Create” option which would mean we need a new DB Instance for this project (provided by canonic).
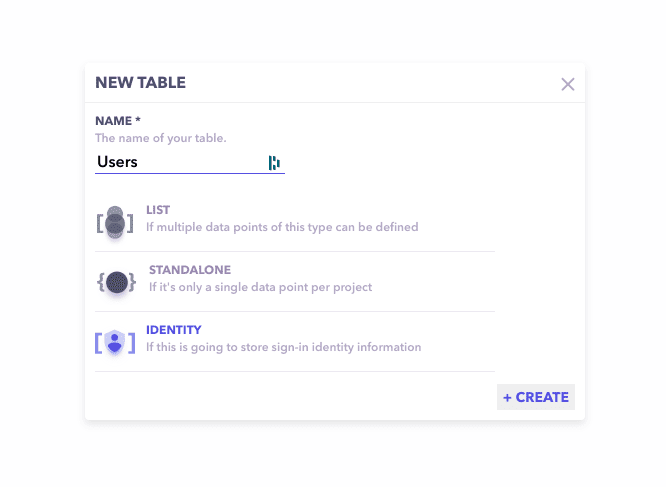
Now we need to create a table that will handle the data which will flow in. We enter the name of our table, let’s name this one “Users”. There are 3 types of tables we can create:
- List - This means we’ll be storing multiple records in this table.
- Standalone - means we can store only one record in this table.
- Identity - creates a user table where we can enable different login providers.
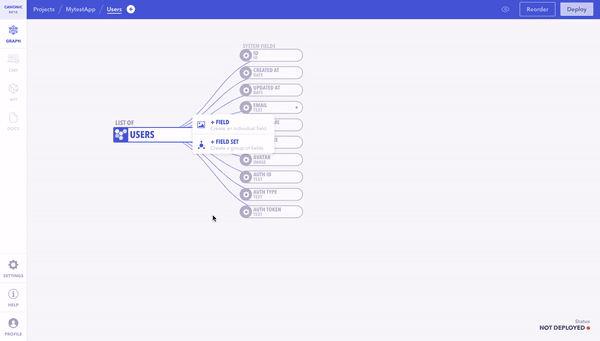
For the next step, We’ll select identity as the type. We’re provided with a bunch of predefined system field that covers most of the user information. You can also add more fields to this table as required.
Now that our table and fields are ready, we need to enable login providers on this table. To open settings, we click on the table and select identity settings from the tabs. You’ll find a list of all the service providers on your left. For our project, we enable Google login.
There are 3 fields that are needed in this setup:
-
Redirect URI → The URL where users will be redirected after logging in to google. (for our app purposes,
http://localhost:3000/will be our redirect URL) - Client ID → Client ID (provided by google)
- Secret → Secret (provided by google) Once all the settings are filled, close the panel and hit deploy on the top right corner.
And VOILA! Our APIs are ready for consumption. Now let’s start with the front end. We’ll use react with GraphQL.
Need Help in getting the client id and secret from google? Read more about it here
Setting up the Frontend
Here's what the flow will look like on frontend:
Step 1 - Frontend calls Canonic to get the google URL where the user needs to be redirected for sign in.
Step 2 - After logging in, google will redirect back to our app with a code.
Step 3 - We send this code back to Canonic to get the authorization token and user data.
To start the react app, we can go with CRA since it's easy to set up the project using it.
npx create-react-app my-test-frontend
cd my-app
npm start
Next, we install GraphQl in our app
# You can use either yarn or npm
yarn add @apollo/client graphql
After GraphQL is installed, we head over to Canonic, to get our GraphQL connection URL. Go to project documentation via the vertical navigation bar, at the bottom left, click on the button named API Playground.
You'll see the connection URL in the tab. It'll end in /graphql
Now that we have our connection URL ready,
In order to consume our GraphQL APIs, we need to establish a client using Apollo. We open the index.js file and wrap our App in ApolloProvider and create our client.
import { ApolloClient, InMemoryCache, ApolloProvider } from "@apollo/client";

const client = new ApolloClient({
  uri: "<COPIED-URI-FROM-CANONIC>",
  cache: new InMemoryCache(),
});

ReactDOM.render(
  <React.StrictMode>
    <ApolloProvider client={client}>
      <App />
    </ApolloProvider>
  </React.StrictMode>,
  document.getElementById("root")
);
This will now enable our frontend application to connect with the backend.
- Now we need a component for logging in. Let's create LoginComponent. On the screen, the user can interact with a CTA that lets them sign in using google. Once the user is logged in, We'll have to fetch our google login redirect URL (the URL we need to redirect users to. when they click on the button).
For that, we need to call
getLoginUrlsForUserquery with the following parameters:
query Login {
  getLoginUrlsForUser {
    GOOGLE
  }
}
In order to call our API and get the login URL, we call useQuery method from apollo/client
We create login.js inside the components directory.
import React from "react";
import { useQuery, gql } from "@apollo/client";

const LOGIN_URLS_QUERY = gql`
  query Login {
    getLoginUrlsForUser {
      GOOGLE
    }
  }
`;

function Login() {
  const { loading, error, data } = useQuery(LOGIN_URLS_QUERY);

  if (loading) return <p>Loading...</p>;
  if (error) return <p>Error :(</p>;


  return <a href={data?.getLoginUrlsForUser?.GOOGLE}>LOGIN with Google</a>;
}

export default Login;
So far we have got a working setup for the google redirection URL.
Next Steps:
Now we need to grab the token from the URL when google redirects back to our application. Then we have to send this token to Canonic, call login API, and get the authorization token along with the user object.
So we add a few lines of code to App.js.
Remember, we are running the project on http://localhost:3000/ so google will redirect back to this URL - with code in the URL (It'll look something like this http://localhost:3000/?code=.......
- Now in our frontend, We want to check if there's a code in the URL when the component mounts (when the web app loads), so we use
useEffectto check this.
useEffect(() => {
    const urlCode = new URLSearchParams(window.location.search).get("code");
    if (urlCode) {
      <CALL-LOGIN-API-HERE>
    }
  }, []);
So we call our login mutation - our mutation would involve two parameters - Code (Google passes it back) and Service (which will be "GOOGLE" in our case).
mutation Login($code: String!, $service: String!) {
  loginForUser(code: $code, service: $service) {
    token
    user {
      _id
      createdAt
      updatedAt
      email
      firstName
      lastName
      avatar {
        url
        name
      }
    }
  }
}
💡 NOTE: Since this is a write operation, we'll need to generate a secret key for our Canonic APIs with appropriate permissions. Go back to Canonic --- Go to your project --- project settings located in the left vertical menu --- Access Tokens --- Create a new access token. Be sure to select write permission. Read more about it here.
- When we combine our mutation and useEffect in
App.jswill look something like this. We import Login Component in our App and depending on whether we have a token or not, we show the login component.
import { useEffect } from "react";
import { gql, useMutation } from "@apollo/client";

import Login from "./components/Login";

import "./App.css";

const LOGIN_MUTATION = gql`
  mutation Login($code: String!, $service: String!) {
    loginForUser(code: $code, service: $service) {
      token
      user {
        _id
        createdAt
        updatedAt
        email
        firstName
        lastName
        avatar {
          url
          name
        }
      }
    }
  }
`;

function App() {
  const [loginMutation, { data }] = useMutation(LOGIN_MUTATION);

  useEffect(() => {
    const urlCode = new URLSearchParams(window.location.search).get("code");
    if (urlCode) {
      loginMutation({ variables: { code: urlCode, service: "GOOGLE" } });
    }
  }, []);

  return (
    <>
      {!data?.loginForUser?.token ? (
        <Login />
      ) : (
                <div>Hi, you're logged in! You're email is {data?.loginForUser?.user?.email}</div>
      )}
    </>
  );
}

export default App;
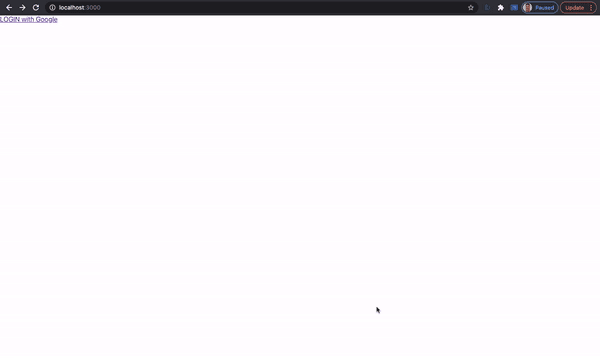
Stitching all this together will get the App working and it’ll look something like this:
To add more login providers (Github, Facebook), now you simply enable the login provider on Canonic, fill in the required secret, id, and you're good to go!
We already have the code mentioned in this blog hosted on Github, Feel free to clone this project, add your own project URL and give it a spin!

Posted on April 11, 2022
Join Our Newsletter. No Spam, Only the good stuff.
Sign up to receive the latest update from our blog.


