Brijesh Dobariya
Posted on October 11, 2022

Form controls
Give textual form controls like <input>s and <textarea>s an upgrade with custom styles, sizing, focus states, and more.
<div class="mb-3">
  <label for="exampleFormControlInput1" class="form-label">Email address</label>
  <input type="email" class="form-control" id="exampleFormControlInput1" placeholder="name@example.com">
</div>
<div class="mb-3">
  <label for="exampleFormControlTextarea1" class="form-label">Example textarea</label>
  <textarea class="form-control" id="exampleFormControlTextarea1" rows="3"></textarea>
</div>
*Sizing *
Set heights using classes like .form-control-lg and .form-control-sm.

<input class="form-control form-control-lg" type="text" placeholder=".form-control-lg" aria-label=".form-control-lg example">
<input class="form-control" type="text" placeholder="Default input" aria-label="default input example">
<input class="form-control form-control-sm" type="text" placeholder=".form-control-sm" aria-label=".form-control-sm example">
Disabled
Add the disabledboolean attribute on an input to give it a grayed out appearance, remove pointer events, and prevent focusing.

<input class="form-control" type="text" placeholder="Disabled input" aria-label="Disabled input example" disabled>
<input class="form-control" type="text" value="Disabled readonly input" aria-label="Disabled input example" disabled readonly>
Readonly plain text
If you want to have <input readonly> elements in your form styled as plain text, replace .form-control with .form-control-plaintext to remove the default form field styling and preserve the correct margin and padding.

<div class="mb-3 row">
    <label for="staticEmail" class="col-sm-2 col-form-label">Email</label>
    <div class="col-sm-10">
      <input type="text" readonly class="form-control-plaintext" id="staticEmail" value="email@example.com">
    </div>
  </div>
  <div class="mb-3 row">
    <label for="inputPassword" class="col-sm-2 col-form-label">Password</label>
    <div class="col-sm-10">
      <input type="password" class="form-control" id="inputPassword">
    </div>
  </div>
<div class="mb-3">
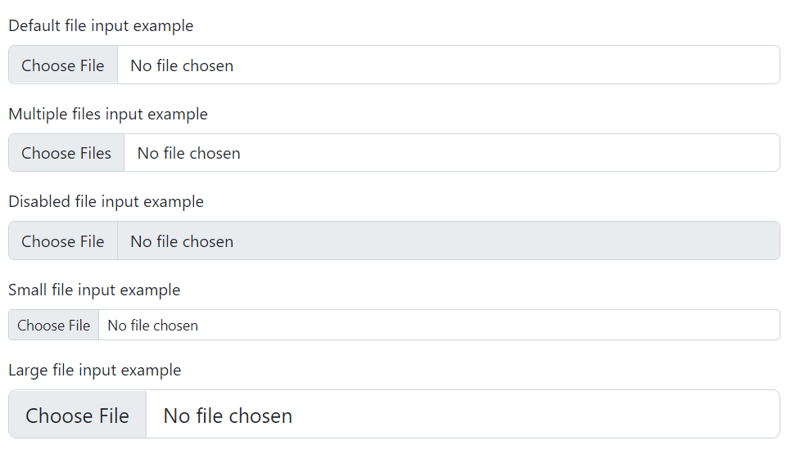
  <label for="formFile" class="form-label">Default file input example</label>
  <input class="form-control" type="file" id="formFile">
</div>
<div class="mb-3">
  <label for="formFileMultiple" class="form-label">Multiple files input example</label>
  <input class="form-control" type="file" id="formFileMultiple" multiple>
</div>
<div class="mb-3">
  <label for="formFileDisabled" class="form-label">Disabled file input example</label>
  <input class="form-control" type="file" id="formFileDisabled" disabled>
</div>
<div class="mb-3">
  <label for="formFileSm" class="form-label">Small file input example</label>
  <input class="form-control form-control-sm" id="formFileSm" type="file">
</div>
<div>
  <label for="formFileLg" class="form-label">Large file input example</label>
  <input class="form-control form-control-lg" id="formFileLg" type="file">
</div>
Select
Custom <select> menus need only a custom class, .form-select to trigger the custom styles. Custom styles are limited to the <select>’s initial appearance and cannot modify the <option>s due to browser limitations.

<select class="form-select" aria-label="Default select example">
  <option selected>Open this select menu</option>
  <option value="1">One</option>
  <option value="2">Two</option>
  <option value="3">Three</option>
</select>
Sizing
You may also choose from small and large custom selects to match our similarly sized text inputs.

<select class="form-select form-select-lg mb-3" aria-label=".form-select-lg example">
  <option selected>Open this select menu</option>
  <option value="1">One</option>
  <option value="2">Two</option>
  <option value="3">Three</option>
</select>
<select class="form-select form-select-sm" aria-label=".form-select-sm example">
  <option selected>Open this select menu</option>
  <option value="1">One</option>
  <option value="2">Two</option>
  <option value="3">Three</option>
</select>
The multiple attribute is also supported:

<select class="form-select" multiple aria-label="multiple select example">
  <option selected>Open this select menu</option>
  <option value="1">One</option>
  <option value="2">Two</option>
  <option value="3">Three</option>
</select>
Checks and radios
Browser default checkboxes and radios are replaced with the help of .form-check, a series of classes for both input types that improves the layout and behavior of their HTML elements, that provide greater customization and cross browser consistency. Checkboxes are for selecting one or several options in a list, while radios are for selecting one option from many.
<div class="form-check">
  <input class="form-check-input" type="checkbox" value="" id="flexCheckDefault">
  <label class="form-check-label" for="flexCheckDefault">
    Default checkbox
  </label>
</div>
<div class="form-check">
  <input class="form-check-input" type="checkbox" value="" id="flexCheckChecked" checked>
  <label class="form-check-label" for="flexCheckChecked">
    Checked checkbox
  </label>
</div>
Indeterminate
Checkboxes can utilize the :indeterminate pseudo class when manually set via JavaScript (there is no available HTML attribute for specifying it).

<div class="form-check">
  <input class="form-check-input" type="checkbox" value="" id="flexCheckIndeterminate">
  <label class="form-check-label" for="flexCheckIndeterminate">
    Indeterminate checkbox
  </label>
</div>
<div class="form-check">
  <input class="form-check-input" type="radio" name="flexRadioDefault" id="flexRadioDefault1">
  <label class="form-check-label" for="flexRadioDefault1">
    Default radio
  </label>
</div>
<div class="form-check">
  <input class="form-check-input" type="radio" name="flexRadioDefault" id="flexRadioDefault2" checked>
  <label class="form-check-label" for="flexRadioDefault2">
    Default checked radio
  </label>
</div>
*Switches *
A switch has the markup of a custom checkbox but uses the .form-switch class to render a toggle switch. Consider using role="switch" to more accurately convey the nature of the control to assistive technologies that support this role. In older assistive technologies, it will simply be announced as a regular checkbox as a fallback. Switches also support the disabled attribute.
<div class="form-check form-switch">
  <input class="form-check-input" type="checkbox" role="switch" id="flexSwitchCheckDefault">
  <label class="form-check-label" for="flexSwitchCheckDefault">Default switch checkbox input</label>
</div>
<div class="form-check form-switch">
  <input class="form-check-input" type="checkbox" role="switch" id="flexSwitchCheckChecked" checked>
  <label class="form-check-label" for="flexSwitchCheckChecked">Checked switch checkbox input</label>
</div>
<div class="form-check form-switch">
  <input class="form-check-input" type="checkbox" role="switch" id="flexSwitchCheckDisabled" disabled>
  <label class="form-check-label" for="flexSwitchCheckDisabled">Disabled switch checkbox input</label>
</div>
<div class="form-check form-switch">
  <input class="form-check-input" type="checkbox" role="switch" id="flexSwitchCheckCheckedDisabled" checked disabled>
  <label class="form-check-label" for="flexSwitchCheckCheckedDisabled">Disabled checked switch checkbox input</label>
</div>
Reverse
Put your checkboxes, radios, and switches on the opposite side with the .form-check-reverse modifier class.
<div class="form-check form-check-reverse">
  <input class="form-check-input" type="checkbox" value="" id="reverseCheck1">
  <label class="form-check-label" for="reverseCheck1">
    Reverse checkbox
  </label>
</div>
<div class="form-check form-check-reverse">
  <input class="form-check-input" type="checkbox" value="" id="reverseCheck2" disabled>
  <label class="form-check-label" for="reverseCheck2">
    Disabled reverse checkbox
  </label>
</div>

<div class="form-check form-switch form-check-reverse">
  <input class="form-check-input" type="checkbox" id="flexSwitchCheckReverse">
  <label class="form-check-label" for="flexSwitchCheckReverse">Reverse switch checkbox input</label>
</div>
Range
Create custom <input type="range"> controls with .form-range. The track (the background) and thumb (the value) are both styled to appear the same across browsers. As only Firefox supports “filling” their track from the left or right of the thumb as a means to visually indicate progress, we do not currently support it.
<label for="customRange1" class="form-label">Example range</label>
<input type="range" class="form-range" id="customRange1">
*Disabled *
Add the disabled boolean attribute on an input to give it a grayed out appearance, remove pointer events, and prevent focusing.
<label for="disabledRange" class="form-label">Disabled range</label>
<input type="range" class="form-range" id="disabledRange" disabled>
Min and max
Range inputs have implicit values for min and max—0 and 100, respectively. You may specify new values for those using the min and max attributes.
<label for="customRange2" class="form-label">Example range</label>
<input type="range" class="form-range" min="0" max="5" id="customRange2">
Steps
By default, range inputs “snap” to integer values. To change this, you can specify a step value. In the example below, we double the number of steps by using step="0.5".
<label for="customRange3" class="form-label">Example range</label>
<input type="range" class="form-range" min="0" max="5" step="0.5" id="customRange3">
Input group
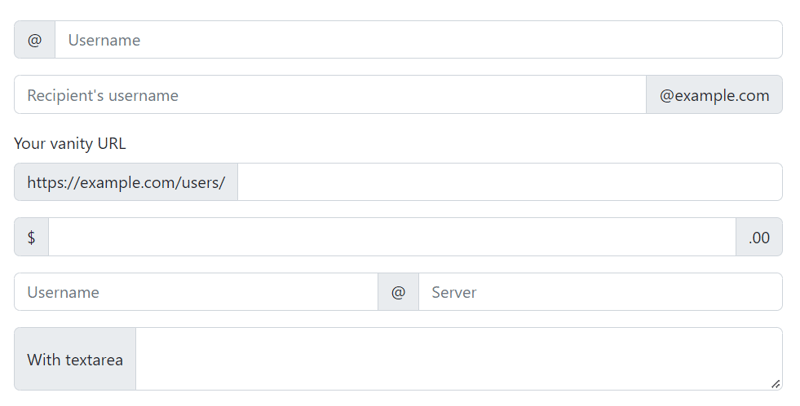
Place one add-on or button on either side of an input. You may also place one on both sides of an input. Remember to place <label>s outside the input group.
<div class="input-group mb-3">
  <span class="input-group-text" id="basic-addon1">@</span>
  <input type="text" class="form-control" placeholder="Username" aria-label="Username" aria-describedby="basic-addon1">
</div>

<div class="input-group mb-3">
  <input type="text" class="form-control" placeholder="Recipient's username" aria-label="Recipient's username" aria-describedby="basic-addon2">
  <span class="input-group-text" id="basic-addon2">@example.com</span>
</div>

<label for="basic-url" class="form-label">Your vanity URL</label>
<div class="input-group mb-3">
  <span class="input-group-text" id="basic-addon3">https://example.com/users/</span>
  <input type="text" class="form-control" id="basic-url" aria-describedby="basic-addon3">
</div>

<div class="input-group mb-3">
  <span class="input-group-text">$</span>
  <input type="text" class="form-control" aria-label="Amount (to the nearest dollar)">
  <span class="input-group-text">.00</span>
</div>

<div class="input-group mb-3">
  <input type="text" class="form-control" placeholder="Username" aria-label="Username">
  <span class="input-group-text">@</span>
  <input type="text" class="form-control" placeholder="Server" aria-label="Server">
</div>

<div class="input-group">
  <span class="input-group-text">With textarea</span>
  <textarea class="form-control" aria-label="With textarea"></textarea>
</div>
Sizing
Add the relative form sizing classes to the .input-group itself and contents within will automatically resize—no need for repeating the form control size classes on each element.
Sizing on the individual input group elements isn’t supported.
<div class="input-group input-group-sm mb-3">
  <span class="input-group-text" id="inputGroup-sizing-sm">Small</span>
  <input type="text" class="form-control" aria-label="Sizing example input" aria-describedby="inputGroup-sizing-sm">
</div>

<div class="input-group mb-3">
  <span class="input-group-text" id="inputGroup-sizing-default">Default</span>
  <input type="text" class="form-control" aria-label="Sizing example input" aria-describedby="inputGroup-sizing-default">
</div>

<div class="input-group input-group-lg">
  <span class="input-group-text" id="inputGroup-sizing-lg">Large</span>
  <input type="text" class="form-control" aria-label="Sizing example input" aria-describedby="inputGroup-sizing-lg">
</div>
Checkboxes and radios
Place any checkbox or radio option within an input group’s addon instead of text. We recommend adding .mt-0 to the .form-check-input when there’s no visible text next to the input.
<div class="input-group mb-3">
  <div class="input-group-text">
    <input class="form-check-input mt-0" type="checkbox" value="" aria-label="Checkbox for following text input">
  </div>
  <input type="text" class="form-control" aria-label="Text input with checkbox">
</div>

<div class="input-group">
  <div class="input-group-text">
    <input class="form-check-input mt-0" type="radio" value="" aria-label="Radio button for following text input">
  </div>
  <input type="text" class="form-control" aria-label="Text input with radio button">
</div>
<div class="input-group mb-3">
  <button class="btn btn-outline-secondary" type="button" id="button-addon1">Button</button>
  <input type="text" class="form-control" placeholder="" aria-label="Example text with button addon" aria-describedby="button-addon1">
</div>

<div class="input-group mb-3">
  <input type="text" class="form-control" placeholder="Recipient's username" aria-label="Recipient's username" aria-describedby="button-addon2">
  <button class="btn btn-outline-secondary" type="button" id="button-addon2">Button</button>
</div>

<div class="input-group mb-3">
  <button class="btn btn-outline-secondary" type="button">Button</button>
  <button class="btn btn-outline-secondary" type="button">Button</button>
  <input type="text" class="form-control" placeholder="" aria-label="Example text with two button addons">
</div>

<div class="input-group">
  <input type="text" class="form-control" placeholder="Recipient's username" aria-label="Recipient's username with two button addons">
  <button class="btn btn-outline-secondary" type="button">Button</button>
  <button class="btn btn-outline-secondary" type="button">Button</button>
</div>
<div class="input-group mb-3">
  <button class="btn btn-outline-secondary dropdown-toggle" type="button" data-bs-toggle="dropdown" aria-expanded="false">Dropdown</button>
  <ul class="dropdown-menu">
    <li><a class="dropdown-item" href="#">Action</a></li>
    <li><a class="dropdown-item" href="#">Another action</a></li>
    <li><a class="dropdown-item" href="#">Something else here</a></li>
    <li><hr class="dropdown-divider"></li>
    <li><a class="dropdown-item" href="#">Separated link</a></li>
  </ul>
  <input type="text" class="form-control" aria-label="Text input with dropdown button">
</div>

<div class="input-group mb-3">
  <input type="text" class="form-control" aria-label="Text input with dropdown button">
  <button class="btn btn-outline-secondary dropdown-toggle" type="button" data-bs-toggle="dropdown" aria-expanded="false">Dropdown</button>
  <ul class="dropdown-menu dropdown-menu-end">
    <li><a class="dropdown-item" href="#">Action</a></li>
    <li><a class="dropdown-item" href="#">Another action</a></li>
    <li><a class="dropdown-item" href="#">Something else here</a></li>
    <li><hr class="dropdown-divider"></li>
    <li><a class="dropdown-item" href="#">Separated link</a></li>
  </ul>
</div>

<div class="input-group">
  <button class="btn btn-outline-secondary dropdown-toggle" type="button" data-bs-toggle="dropdown" aria-expanded="false">Dropdown</button>
  <ul class="dropdown-menu">
    <li><a class="dropdown-item" href="#">Action before</a></li>
    <li><a class="dropdown-item" href="#">Another action before</a></li>
    <li><a class="dropdown-item" href="#">Something else here</a></li>
    <li><hr class="dropdown-divider"></li>
    <li><a class="dropdown-item" href="#">Separated link</a></li>
  </ul>
  <input type="text" class="form-control" aria-label="Text input with 2 dropdown buttons">
  <button class="btn btn-outline-secondary dropdown-toggle" type="button" data-bs-toggle="dropdown" aria-expanded="false">Dropdown</button>
  <ul class="dropdown-menu dropdown-menu-end">
    <li><a class="dropdown-item" href="#">Action</a></li>
    <li><a class="dropdown-item" href="#">Another action</a></li>
    <li><a class="dropdown-item" href="#">Something else here</a></li>
    <li><hr class="dropdown-divider"></li>
    <li><a class="dropdown-item" href="#">Separated link</a></li>
  </ul>
</div>
<div class="input-group mb-3">
  <label class="input-group-text" for="inputGroupFile01">Upload</label>
  <input type="file" class="form-control" id="inputGroupFile01">
</div>

<div class="input-group mb-3">
  <input type="file" class="form-control" id="inputGroupFile02">
  <label class="input-group-text" for="inputGroupFile02">Upload</label>
</div>

<div class="input-group mb-3">
  <button class="btn btn-outline-secondary" type="button" id="inputGroupFileAddon03">Button</button>
  <input type="file" class="form-control" id="inputGroupFile03" aria-describedby="inputGroupFileAddon03" aria-label="Upload">
</div>

<div class="input-group">
  <input type="file" class="form-control" id="inputGroupFile04" aria-describedby="inputGroupFileAddon04" aria-label="Upload">
  <button class="btn btn-outline-secondary" type="button" id="inputGroupFileAddon04">Button</button>
</div>
Horizontal form
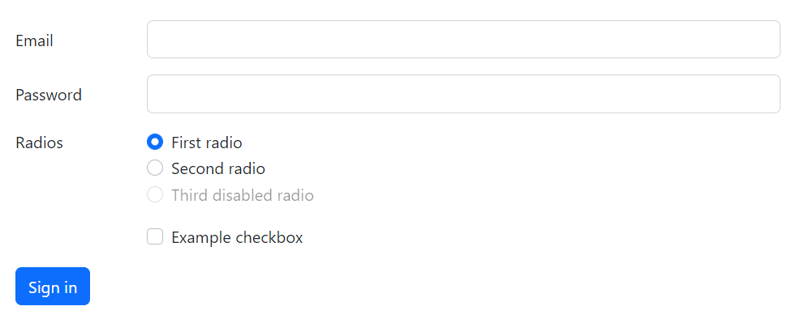
Create horizontal forms with the grid by adding the .row class to form groups and using the .col-*-* classes to specify the width of your labels and controls. Be sure to add .col-form-label to your <label>s as well so they’re vertically centered with their associated form controls.
At times, you maybe need to use margin or padding utilities to create that perfect alignment you need. For example, we’ve removed the padding-top on our stacked radio inputs label to better align the text baseline.
<form>
  <div class="row mb-3">
    <label for="inputEmail3" class="col-sm-2 col-form-label">Email</label>
    <div class="col-sm-10">
      <input type="email" class="form-control" id="inputEmail3">
    </div>
  </div>
  <div class="row mb-3">
    <label for="inputPassword3" class="col-sm-2 col-form-label">Password</label>
    <div class="col-sm-10">
      <input type="password" class="form-control" id="inputPassword3">
    </div>
  </div>
  <fieldset class="row mb-3">
    <legend class="col-form-label col-sm-2 pt-0">Radios</legend>
    <div class="col-sm-10">
      <div class="form-check">
        <input class="form-check-input" type="radio" name="gridRadios" id="gridRadios1" value="option1" checked>
        <label class="form-check-label" for="gridRadios1">
          First radio
        </label>
      </div>
      <div class="form-check">
        <input class="form-check-input" type="radio" name="gridRadios" id="gridRadios2" value="option2">
        <label class="form-check-label" for="gridRadios2">
          Second radio
        </label>
      </div>
      <div class="form-check disabled">
        <input class="form-check-input" type="radio" name="gridRadios" id="gridRadios3" value="option3" disabled>
        <label class="form-check-label" for="gridRadios3">
          Third disabled radio
        </label>
      </div>
    </div>
  </fieldset>
  <div class="row mb-3">
    <div class="col-sm-10 offset-sm-2">
      <div class="form-check">
        <input class="form-check-input" type="checkbox" id="gridCheck1">
        <label class="form-check-label" for="gridCheck1">
          Example checkbox
        </label>
      </div>
    </div>
  </div>
  <button type="submit" class="btn btn-primary">Sign in</button>
</form>
Inline forms
Use the .row-cols-* classes to create responsive horizontal layouts. By adding gutter modifier classes, we’ll have gutters in horizontal and vertical directions. On narrow mobile viewports, the .col-12 helps stack the form controls and more. The .align-items-center aligns the form elements to the middle, making the .form-check align properly.
<form class="row row-cols-lg-auto g-3 align-items-center">
  <div class="col-12">
    <label class="visually-hidden" for="inlineFormInputGroupUsername">Username</label>
    <div class="input-group">
      <div class="input-group-text">@</div>
      <input type="text" class="form-control" id="inlineFormInputGroupUsername" placeholder="Username">
    </div>
  </div>

  <div class="col-12">
    <label class="visually-hidden" for="inlineFormSelectPref">Preference</label>
    <select class="form-select" id="inlineFormSelectPref">
      <option selected>Choose...</option>
      <option value="1">One</option>
      <option value="2">Two</option>
      <option value="3">Three</option>
    </select>
  </div>

  <div class="col-12">
    <div class="form-check">
      <input class="form-check-input" type="checkbox" id="inlineFormCheck">
      <label class="form-check-label" for="inlineFormCheck">
        Remember me
      </label>
    </div>
  </div>

  <div class="col-12">
    <button type="submit" class="btn btn-primary">Submit</button>
  </div>
</form>

Posted on October 11, 2022
Join Our Newsletter. No Spam, Only the good stuff.
Sign up to receive the latest update from our blog.
Related

August 14, 2023


