Set up the M1 Mac for frontend development in no time

Barbara
Posted on August 6, 2021

As you don't switch computers everyday, this blogpost will provide a guide how to set up your new M1 Mac for frontend development in no time.
💾 Prerequisites 💾
Save all your data from you old computer, that you also want or need on your new computer. Make sure not to forget your configuration files and ssh keys.
If you have used Homebrew to install all your programs, now you can simply type
brew bundle dump --file=brewFile.txt
into the terminal. This command will generate a .txt file with all installed programs.
This is how my minimal brew file for frontend development looks like:
tap "homebrew/bundle"
tap "homebrew/cask"
tap "homebrew/cask-fonts"
tap "homebrew/core"
brew "fish"
brew "git"
brew "node"
brew "nvm"
brew "starship"
brew "yarn"
cask "firefox"
cask "font-fira-code"
cask "font-fira-code-nerd-font"
cask "snagit"
cask "visual-studio-code"
👩💻 Turn on your new M1 Mac 👩💻
Open a terminal and type
/bin/bash -c "$(curl -fsSL https://raw.githubusercontent.com/Homebrew/install/HEAD/install.sh)" Homebrew.
You will get a warning, telling you that:
Warning : /opt/homebrew/bin is not in your PATH in macOS Big Sur.
To fix this make sure to set the path in your shell correctly. When you are using fish simply add
set -x PATH /opt/homebrew/bin:$PATH to your
.config/fish/config.fish.
For the zsh or the bash the syntax is slightly different and you would add export PATH=/opt/homebrew/bin:$PATH to your ~/.zshrc or ~/.bashrc.
To install all your programs you simply have to copy the previously generated brewFile.txt to your new computer and call
❯ xargs brew install < brewFile.txt
This will install all your programs.
✨ Using NodeJS with M1 Mac ✨
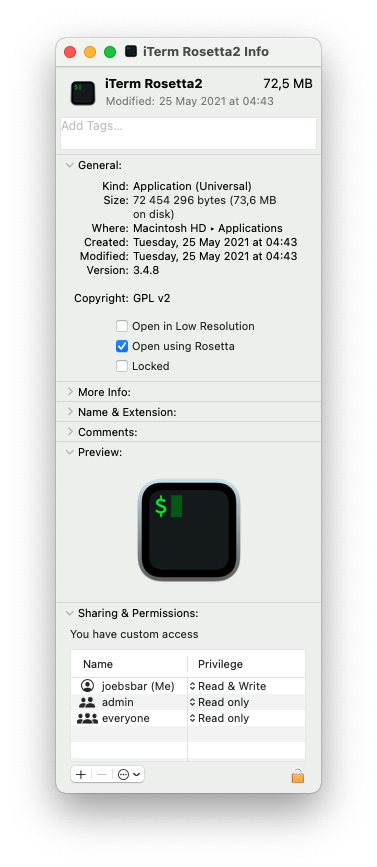
If you need to use NodeJS with a version minor than 16 you need to switch the arch. To do so, create a clone of your terminal.
![]()
Press Command-I (or right-click/use the File menu and select Get Info.) for the selected cloned terminal. This will open an info window with details about the app. Check "Open using Rosetta".
Et voilà: Now this terminal will use the Rosetta translation layer and run the intel version when opening up this terminal.
When you type arch into the terminal you should see either arm64 or when using the translation layer i386.
If needed you can also enable or disable Rosetta for other apps. Check https://isapplesiliconready.com/ for more information.
With the help of Homebrew and the Rosetta translation layer switching to the new M1 Mac is really easy. ❤️

Posted on August 6, 2021
Join Our Newsletter. No Spam, Only the good stuff.
Sign up to receive the latest update from our blog.
