Build a Serverless app using Go and Azure Functions

Abhishek Gupta
Posted on December 10, 2020
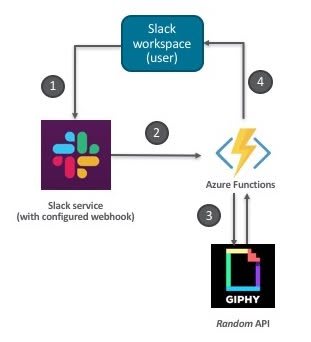
Webhook backend is a popular use case for FaaS (Functions-as-a-service) platforms. They could be used for many use cases such as sending customer notifications to responding with funny GIFs! Using a Serverless function, it's quite convenient to encapsulate the webhook functionality and expose it in the form of an HTTP endpoint. In this tutorial you will learn how to implement a Slack app as a Serverless backend using Azure Functions and Go. You can extend the Slack platform and integrate services by implementing custom apps or workflows that have access to the full scope of the platform allowing you to build powerful experiences in Slack.
This is a simpler version of the Giphy for Slack. The original Giphy Slack app works by responding with multiple GIFs in response to a search request. For the sake of simplicity, the function app demonstrated in this post just returns a single (random) image corresponding to a search keyword using the Giphy Random API. This post provides a step-by-step guide to getting the application deployed to Azure Functions and integrating it with your Slack workspace.
In this post, you will:
- Get an overview of Custom Handlers in Azure Functions
- Understand what's going on behind the scenes with a brief code walk through
- Learn how to setup the solution using configure Azure Functions and Slack
- and of course, run your Slack app in the workspace!
The backend function logic is written in Go (the code isavailable on GitHub. Those who have worked with Azure Functions might recall that Go is not one of the language handlers that is supported by default. That's where Custom Handlers come to the rescue!
What are Custom Handlers?
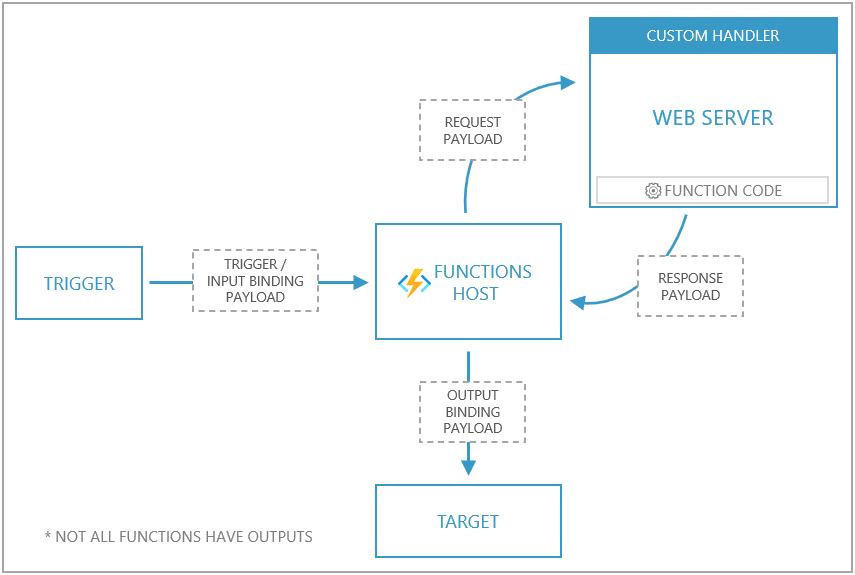
In a nutshell, a Custom Handler is a lightweight web server that receive events from the Functions host. The only thing you need to implement a Custom Handler in your favorite runtime/language is: HTTP support! This does not mean that Custom handlers are restricted to HTTP triggers only - you are free to use other triggers along with input and output bindings via extension bundles.
Here is a summary of how Custom Handlers work at a high level (the diagram below has been picked from the documentation)
An event trigger (via HTTP, Storage, Event Hubs etc.) invokes the Functions host. The way Custom Handlers differ from traditional functions is that the Functions host acts as a middle man: it issues a request payload to the web server of the Custom Handler (the function) along with a payload that contains trigger, input binding data and other metadata for the function. The function returns a response back to the Functions host which passes data from the response to the function's output bindings for processing.
Overview
Before we dive into the other areas, it might help to understand the nitty gritty by exploring the code (which is relatively simple by the way)
Application structure
Let's look at the how the app is setup. this is as defined in the doc
.
├── cmd
│   └── main.go
├── funcy
│   └── function.json
├── go.mod
├── host.json
└── pkg
    └── function
        ├── function.go
        ├── giphy.go
        └── slack.go
- The
function.jsonfile is a located in a folder whose name is used the function name (this is by convention)
{
    "bindings": [
        {
            "type": "httpTrigger",
            "direction": "in",
            "name": "req",
            "methods": [
                "get",
                "post"
            ]
        },
        {
            "type": "http",
            "direction": "out",
            "name": "res"
        }
    ]
}
-
host.jsontells the Functions host where to send requests by pointing to a web server capable of processing HTTP events. Notice thecustomHandler.description.defaultExecutablePathwhich defines thatgo_funcyis the name of the executable that'll be used to run the web server."enableForwardingHttpRequest": trueensures that the raw HTTP data is sent to the custom handlers without any modifications
{
    "version": "2.0",
    "extensionBundle": {
        "id": "Microsoft.Azure.Functions.ExtensionBundle",
        "version": "[1.*, 2.0.0)"
    },
    "customHandler": {
        "description": {
            "defaultExecutablePath": "go_funcy"
        },
        "enableForwardingHttpRequest": true
    },
    "logging": {
        "logLevel": {
            "default": "Trace"
        }
    }
}
- The
cmdandpkgdirectories contain the Go source code. Let's explore this in the next sub-section
Code walk through
cmd/main.go sets up and starts the HTTP server. Notice that the /api/funcy endpoint is the one which the Function host sends the request to the custom handler HTTP server.
func main() {
    port, exists := os.LookupEnv("FUNCTIONS_CUSTOMHANDLER_PORT")
    if !exists {
        port = "8080"
    }
    http.HandleFunc("/api/funcy", function.Funcy)
    log.Fatal(http.ListenAndServe(":"+port, nil))
}
All the heavy lifting is done in function/function.go.
The first part is to read the request body (from Slack) and ensure its integrity via a signature validation process based on this recipe defined by Slack.
    signingSecret := os.Getenv("SLACK_SIGNING_SECRET")
    apiKey := os.Getenv("GIPHY_API_KEY")

    if signingSecret == "" || apiKey == "" {
        http.Error(w, "Failed to process request. Please contact the admin", http.StatusUnauthorized)
        return
    }

    slackTimestamp := r.Header.Get("X-Slack-Request-Timestamp")

    b, err := ioutil.ReadAll(r.Body)
    if err != nil {
        http.Error(w, "Failed to process request", http.StatusBadRequest)
        return
    }
    slackSigningBaseString := "v0:" + slackTimestamp + ":" + string(b)
    slackSignature := r.Header.Get("X-Slack-Signature")

    if !matchSignature(slackSignature, signingSecret, slackSigningBaseString) {
        http.Error(w, "Function was not invoked by Slack", http.StatusForbidden)
        return
    }
Once we've confirmed that the function has indeed being invoked via Slack, the next part is to extract the search term entered by the (Slack) user
    vals, err := parse(b)
    if err != nil {
        http.Error(w, "Failed to process request", http.StatusBadRequest)
        return
    }
    giphyTag := vals.Get("text")
Look up for GIFs with the search term by invoking the GIPHY REST API
    giphyResp, err := http.Get("http://api.giphy.com/v1/gifs/random?tag=" + giphyTag + "&api_key=" + apiKey)
    if err != nil {
        http.Error(w, "Failed to process request", http.StatusFailedDependency)
        return
    }

    resp, err := ioutil.ReadAll(giphyResp.Body)
    if err != nil {
        http.Error(w, "Failed to process request", http.StatusInternalServerError)
        return
    }
Un-marshal the response sent back by the GIPHY API, convert it into a form which Slack can make sense of and return it. That's it !
    var gr GiphyResponse
    json.Unmarshal(resp, &gr)
    title := gr.Data.Title
    url := gr.Data.Images.Downsized.URL

    slackResponse := SlackResponse{Text: slackResponseStaticText, Attachments: []Attachment{{Text: title, ImageURL: url}}}

    w.Header().Set("Content-Type", "application/json")
    json.NewEncoder(w).Encode(slackResponse)
    fmt.Println("Sent response to Slack")
Check the
matchSignaturefunction if you're interested in checking the signature validation process and look at slack.go, giphy.go (in thefunctiondirectory) to see the Go structs used represent information (JSON) being exchanged between various components. These have not been included here to keep this post concise.
Alright! So far, we have covered lots of theory and background info. It's time to get things done! Before you proceed, ensure that you take care of the below mentioned pre-requisites.
Pre-requisites
- Download and install Go if you don't have it already
- Install Azure functions Core Tools - this will allow you to deploy the function using a CLI (and also run it test and debug it locally)
- Create a Slack workspace if you don't have one.
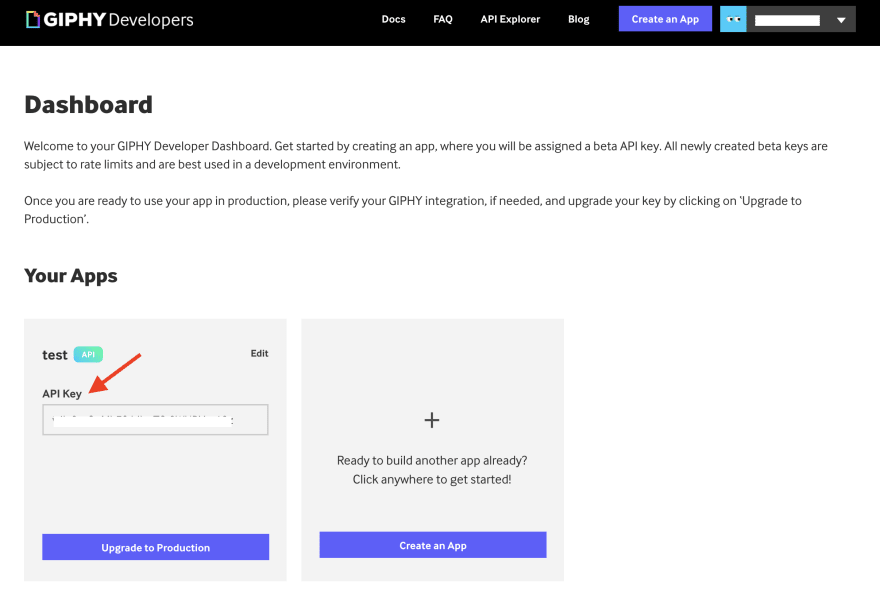
- Get a GIPHY API key - You need to create a GIHPY account (it's free!) and create an app. Each application you create will have its own API Key.
Please note down your GIPHY API key as you will be using it later
The upcoming sections will guide you through the process of deploying the Azure Function and configuring the Slack for the Slash command.
Azure Functions setup
Start by creating a Resource Group to host all the components of the solution.
Create a Function App
Start by searching for Function App in the Azure Portal and click Add
Enter the required details: you should select Custom Handler as the Runtime stack
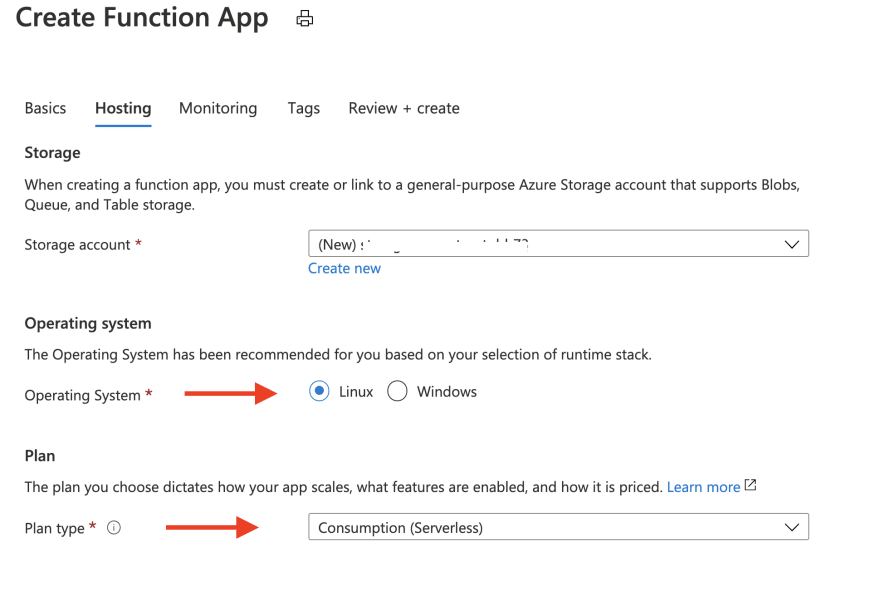
In the Hosting section, choose Linux and Consumption (Serverless) for Operating system and Plan type respectively.
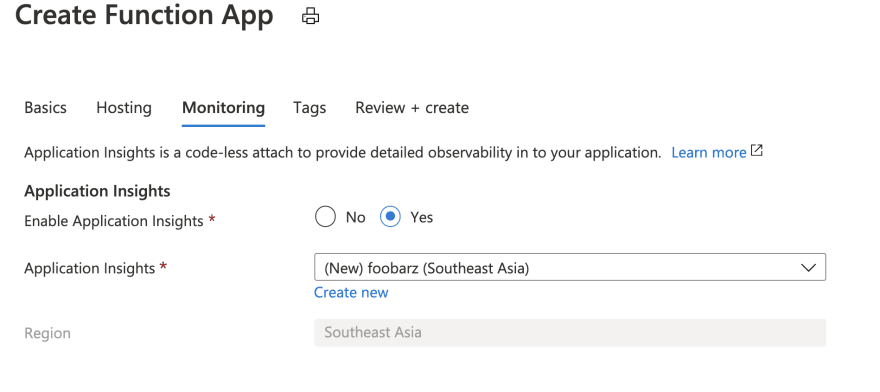
Enable Application Insights (if you need to)
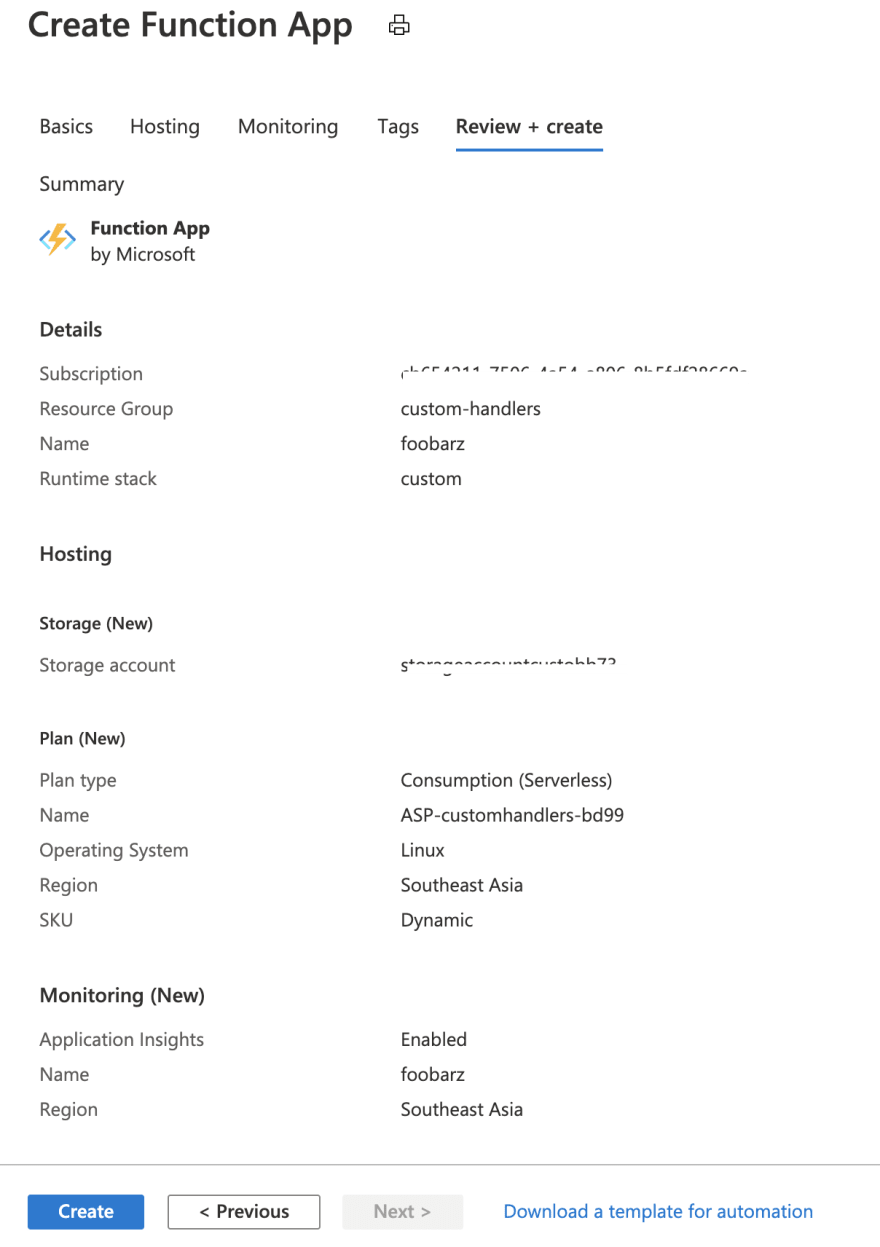
Review the final settings and click Create to proceed
Once the process is complete, the following resource will also be created along with the Function App:
- App Service plan (a Consumption/Serverless plan in this case)
- An Azure Storage account
- An Azure Application Insights function)
Deploy the function
Clone the GitHub repo and build the function
git clone https://github.com/abhirockzz/serverless-go-slack-app
cd serverless-go-slack-app

GOOS=linux go build -o go_funcy cmd/main.go
GOOS=linuxis used to build aLinuxexecutable since we chose aLinuxOS for our Function App
To deploy, use the Azure Functions core tools CLI
func azure functionapp publish <enter name of the function app>
Once you've deployed, copy the function URL that's returned by the command - you will use it in subsequent steps
Configure Slack
This section will cover the steps you need to execute to setup the Slack application (Slash command) in your workspace:
- Create a Slack app
- Create a Slash Command
- Install the app to your workspace
Create a Slack App and Slash command
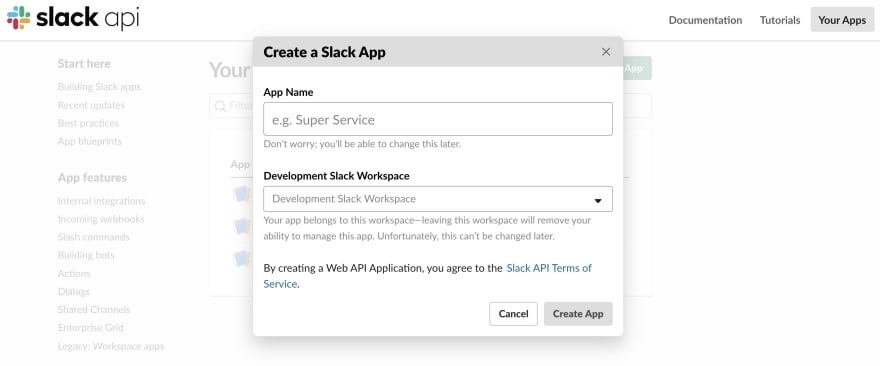
Sign into your Slack Workspace and start by creating a new Slack App
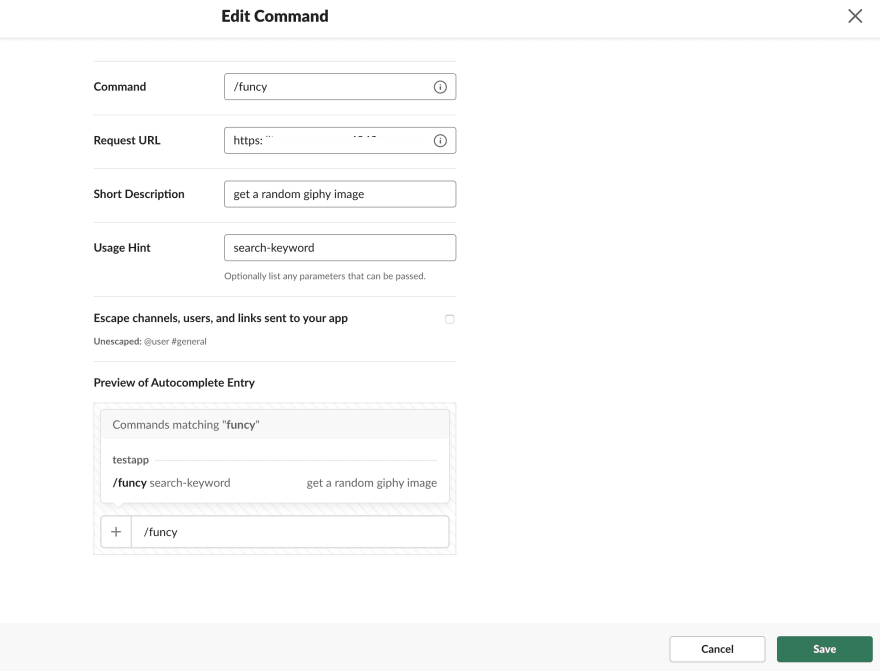
Click on Create New Command to define your new Slash Command with the required information. Please note that the Request URL field is the one where you will enter the HTTP endpoint of function which is nothing but the URL you obtained after deploying the function in the previous section. Once you're done, hit Save to finish.
Install the app to your workspace
Once you're done creating the Slash Command, head to your app's settings page, click the Basic Information feature in the navigation menu, choose Install your app to your workspace and click Install App to Workspace - this will install the app to your Slack workspace to test your app and generate the tokens you need to interact with the Slack API. As soon as you finish installing the app, the App Credentials will show up on the same page.
Make a note of your app Signing Secret as you'll be using it later
Before moving on to the fun part ...
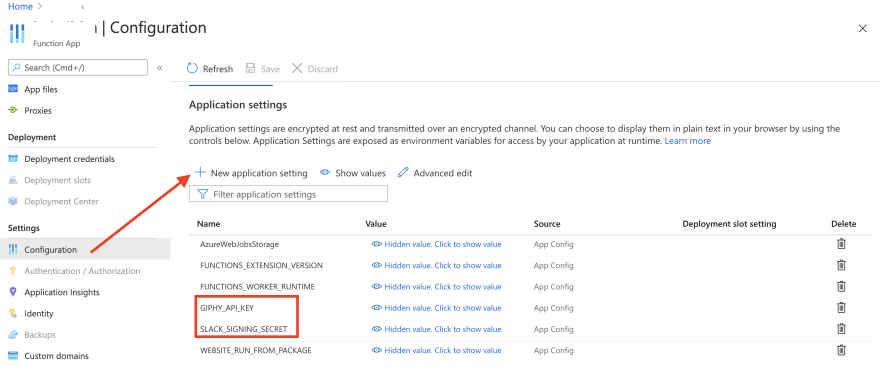
... make sure to update the Function App configuration to add the Slack Signing Secret (SLACK_SIGNING_SECRET) and Giphy API key (GIPHY_API_KEY) - they will be available as environment variables inside the function.
fun(cy) time!
From your Slack workspace, invoke the command /funcy <search term>. For e.g. try /funcy dog.
You should get back a random GIF in return!
Just a recap of what's going on: When you invoke the /funcy command in Slack, it calls the function, which then interacts Giphy API and finally returning the GIF to the user (if all goes well!)
You may see timeout error from Slack after the first invocation. This is most likely due to the cold start where the function takes a few seconds to bootstrap when you invoke it for the very first time. This is combined with the fact that Slack expects a response in 3 seconds - hence the error message.
There is nothing to worry about. All you need is to retry again and things should be fine!
Clean up: Once you're done, don't forget to delete the resource group which in turn will delete all the resources created before (Function app, App Service Plan etc.)
There is nothing stopping you from using Go for your serverless functions on Azure! I hope this turns out to be a fun way to try out Custom Handlers. Let us know what you think!

Posted on December 10, 2020
Join Our Newsletter. No Spam, Only the good stuff.
Sign up to receive the latest update from our blog.
