Ahmed Salem
Posted on February 17, 2024
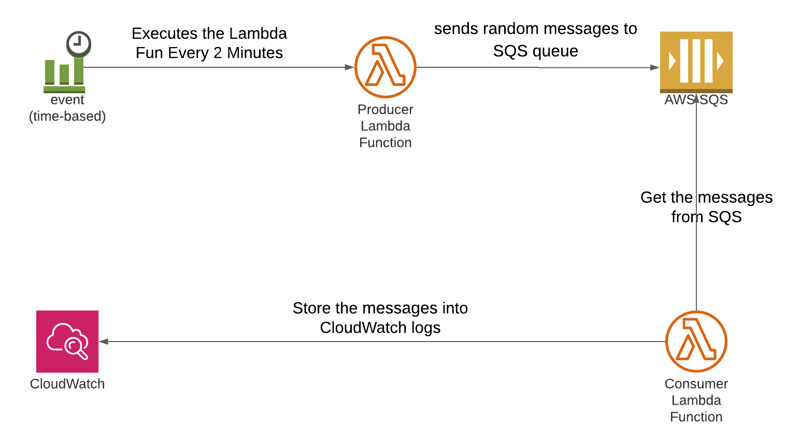
In this tutorial, we will explore how to leverage the AWS Serverless Application Model (SAM) to build a scalable serverless application that utilizes Amazon Simple Queue Service (SQS) and AWS Lambda. Our goal is to create a system where a scheduled Lambda function sends random messages to an SQS queue, triggering another Lambda function to process and log these messages.
Overview
Our solution involves creating two Lambda functions - one to produce random messages and push them into an SQS queue, and another to consume these messages from the queue and log them to CloudWatch. We'll use AWS SAM to define and deploy our serverless application.
Architecture
Step-by-Step Guide
Let's break down the implementation into the following steps:
1. Setting Up AWS SAM CLI
Ensure the AWS SAM CLI is installed on your local machine. Follow the installation instructions provided here for Windows or refer to the official documentation for other operating systems.
2. Creating an AWS SAM Project using PowerShell Window
1) Use SAM init command to generate a sample module. This will
give us a preformatted module that is ready to be deployed
after we change a few things.
 # sam init

          sam-app/
            ├── README.md
            ├── events/
            │   └── event.json
            ├── hello_world/
            │   ├── __init__.py
            │   ├── app.py            #Contains your AWS Lambda handler logic.
            │   └── requirements.txt  #Contains any Python dependencies the application requires, used for sam build
            ├── template.yaml         #Contains the AWS SAM template defining your application's AWS resources.
            └── tests/
                  └── unit/
                  ├── __init__.py
                  └── test_handler.py
2) the project will be created under C:\Windows\System32. Copy the project into your target directory and navigate to it in
PowerShell using the below command:
# cd "C:\Users\ahmedsalem"
3. Defining SQS Resource
Create SQS resource in template.yaml file
template.yaml
AWSTemplateFormatVersion: '2010-09-09'
Transform: AWS::Serverless-2016-10-31
Description: >
  ahmedsalem

  Sample SAM Template for ahmedsalem

# More info about Globals: https://github.com/awslabs/serverless-application-model/blob/master/docs/globals.rst
Globals:
  Function:
    Timeout: 3

Resources:
  MyQueue:
    Type: AWS::SQS::Queue
    Properties:
      QueueName: "ahmedsalem-sqs"
      VisibilityTimeout: 120

  SendDataToSQS:
    Type: AWS::Serverless::Function # More info about Function Resource: https://github.com/awslabs/serverless-application-model/blob/master/versions/2016-10-31.md#awsserverlessfunction
    Properties:
      CodeUri: Sender/
      Handler: sender.send_data
      Runtime: nodejs12.x
      Timeout: 60

  LambdaScheduledRule:
      Type: AWS::Events::Rule
      Properties:
        Description: "ScheduledRule"
        ScheduleExpression: cron(*/2 * * * ? *)
        State: "ENABLED"
        Targets:
          -
            Arn: !GetAtt 'SendDataToSQS.Arn'
            Id: "TargetFunctionV1"

  PermissionForEventsToInvokeLambda:
      Type: AWS::Lambda::Permission
      Properties:
        FunctionName: !Ref SendDataToSQS
        Action: "lambda:InvokeFunction"
        Principal: "events.amazonaws.com"
        SourceArn: !GetAtt LambdaScheduledRule.Arn

  LambdaRoleForSQS:
    Type: 'AWS::IAM::Role'
    Properties:
      AssumeRolePolicyDocument:
        Version: 2012-10-17
        Statement:
          - Effect: Allow
            Principal:
              Service:
              - lambda.amazonaws.com
            Action:
              - 'sts:AssumeRole'
      Path: /
      ManagedPolicyArns:
        - "arn:aws:iam::aws:policy/service-role/AWSLambdaBasicExecutionRole"
        - "arn:aws:iam::aws:policy/AmazonSQSFullAccess"
        - "arn:aws:iam::aws:policy/service-role/AWSLambdaSQSQueueExecutionRole"
      # Policies:
      #   - PolicyName: SQSpermissions
      #     PolicyDocument:
      #       Version: 2012-10-17
      #       Statement:
      #         - Effect: Allow
      #           Action:
      #           - "sqs:*"
      #           Resource: '*'

  SampleSQSPolicy:
    Type: AWS::SQS::QueuePolicy
    Properties:
      Queues:
        - !Ref MyQueue
      PolicyDocument:
        Statement:
          -
            Action:
            - "SQS:*"
            # - "SQS:SendMessage"
            # - "SQS:ReceiveMessage"
            Effect: "Allow"
            Resource: "*"
            Principal:
              Service:
              - lambda.amazonaws.com

  LambdaConsumer:
    Type: AWS::Lambda::Function
    Properties:
        #CodeUri: Receiver/
        Handler: receiver.receive_data
        Runtime: nodejs12.x
        Timeout: 60
        Role: !GetAtt LambdaRoleForSQS.Arn

  LambdaFunctionEventSourceMapping:
   Type: AWS::Lambda::EventSourceMapping
   Properties:
     BatchSize: 1
     Enabled: true
     EventSourceArn: !GetAtt MyQueue.Arn
     FunctionName: !GetAtt LambdaConsumer.Arn
4. Configuring CloudWatch Event Rule
Define a CloudWatch Event Rule in the template.yaml file to trigger the Lambda function every two minutes.
5. Implementing Lambda Functions
Create lambda function resource that sends random data to SQS with its nodeJS backend code.
sender.js
// Load the AWS SDK for Node.js
var AWS = require('aws-sdk');

// Set the region
//AWS.config.update({region: 'REGION'});

// Create an SQS service object
var sqs = new AWS.SQS({apiVersion: '2012-11-05'});

module.exports.send_data = (event, context) => {
    var sqs_url = "https://sqs.us-east-2.amazonaws.com/944163165741/ahmedsalem-sqs"

    var params = {
        // Remove DelaySeconds parameter and value for FIFO queues
       DelaySeconds: 10,
       MessageAttributes: {
         "Title": {
           DataType: "String",
           StringValue: "The Whistler"
         },
         "Author": {
           DataType: "String",
           StringValue: "John Grisham"
         },
         "WeeksOn": {
           DataType: "Number",
           StringValue: "6"
         }
       },
       MessageBody: "Information about current NY Times fiction bestseller for week of 12/11/2016.",
       // MessageDeduplicationId: "TheWhistler",  // Required for FIFO queues
       // MessageGroupId: "Group1",  // Required for FIFO queues
       QueueUrl: sqs_url
    };

     sqs.sendMessage(params, function(err, data) {
       if (err) {
         console.log("Error", err);
       } else {
         console.log("Success", params.MessageBody);
       }
     });

     return;


}
6. Create a lambda permission resource for events to invoke sender.js Lambda Function.
7. Create an IAM Role to allow lambda access to SQS.
8. Create SQS QueuePolicy resource to grant lambda access to SQS.
9. Create lambda function resource that receives that random data from SQS and send it to CloudWatch logs with its nodeJS backend code.
recevier.js
exports.receive_data = async function(event, context) {
    event.Records.forEach(record => {
      const { body } = record;
      console.log(body);
    });
    return {};
  }
10. Build your application
change into the project directory, where the template.yaml file for the sample application is located. Then run the below command:
# sam build
11. Deploy your application to the AWS Cloud
# sam deploy --guided
12.Clean up
If you no longer need the AWS resources that you created, you can remove them by deleting the AWS CloudFormation stack that you deployed.
You can delete the AWS CloudFormation stack using one of the below options:
1- From the AWS Management Console.
2- By running the following AWS CLI command:
# aws cloudformation delete-stack --stack-name ahmedsalem --region us-east-2
Conclusion
By following these steps, you can build a scalable serverless application using AWS SAM, SQS, and Lambda. This architecture enables efficient processing of messages and facilitates the development of event-driven applications.

Posted on February 17, 2024
Join Our Newsletter. No Spam, Only the good stuff.
Sign up to receive the latest update from our blog.
