Toluwalope Aiyegbusi
Posted on March 28, 2023

Introduction
Ansible is an open-source command-line IT automation software application sponsored by RedHat.
It is mostly used as a server configuration management tool, network automation tool and can also be used for provisioning
several services like kubernetes, nginx and services across several cloud platforms. Check the official documentation to see a list supported services.
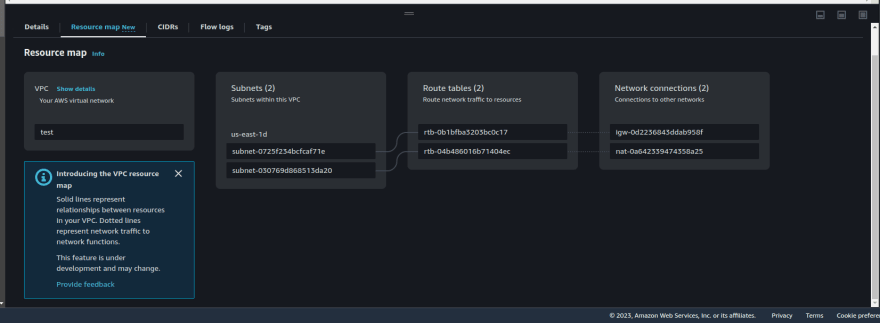
This article gives a run-down of how to build an AWS VPC without having to use the AWS console using Ansible. The VPC would contain a private and public subnet, internet gateway for the public subnet, a Nat gateway for the private subnet, and route tables.
Prerequisites
- An AWS account
- An AWS user with an IAM role that has the necessary permissions to create resources, mostly an admin role.
- Should have ansible installed. Click here for installation guide
Setting up the project directory
Create a directory where you would have your project set up. In the working directory,create a network.yml file and a vars folder with a main.yml file in it. The vars folder will contain environment variables. Your directory structure should look like this:
├── network.yml
└── vars
    └── main.yml
Variables
The use of variables is to ensure flexibility within the main playbook in case of repeated values and you can easily modify values without modifying the main file.
Copy and paste this into the main.yml file in the vars folder. Make sure to replace the "aws_secret_key" and "aws_access_key" with yours. Although it is not advisable to hard code secret keys into variable files, check the documentation on how to use best practices to store credentials
aws_secret_key: ""
aws_access_key: ""
region: us-east-1
vpc_cidr: 10.1.0.0/16
public_subnet_cidr: 10.1.1.0/24
private_subnet_cidr: 10.1.2.0/24
Creating the VPC
Copy and paste this code into the network.yml file
- name: Create VPC and Subnets
  hosts: localhost
  # This is to make sure the playbook references the variables in the vars folder
  vars_files:
    - vars/main.yml
  module_defaults:
    group/aws:
      aws_secret_key: "{{ aws_secret_key }}"
      aws_access_key: "{{ aws_access_key }}"

  tasks:
    - name: Create a VPC
      amazon.aws.ec2_vpc_net:
        name: test
        state: present
        cidr_block: "{{ vpc_cidr }}"
        region: "{{ region }}"
        dns_hostnames: true
        dns_support: true
        tags:
          key: name
          value: dev
      # the 'register' keyword here is to register the module returned data in the 'vpc_name' variable
      register: vpc_name

    - name: Create Public Subnet
      amazon.aws.ec2_vpc_subnet:
        state: present
        vpc_id: "{{ vpc_name.vpc.id }}"
        region: "{{ region }}"
        cidr: "{{ public_subnet_cidr }}"
        map_public: true
      register: public_sub

    - name: Create Private Subnet
      amazon.aws.ec2_vpc_subnet:
        state: present
        vpc_id: "{{ vpc_name.vpc.id }}"
        region: "{{ region }}"
        cidr: "{{ private_subnet_cidr }}"
        map_public: true
      register: private_subnet

    - name: Create Internet Gateway
      amazon.aws.ec2_vpc_igw:
        vpc_id: "{{ vpc_name.vpc.id }}"
        region: "{{ region }}"
        state: present
      register: igw

    - name: Public Subnet Route Table
      amazon.aws.ec2_vpc_route_table:
        vpc_id: "{{ vpc_name.vpc.id }}"
        region: "{{ region }}"
        subnets:
          - "{{ public_sub.subnet.id }}"
        routes:
          - dest: 0.0.0.0/0
            gateway_id: "{{ igw.gateway_id }}"
      register: public_route_table

    - name: Elastic IP for Nat gateway
      amazon.aws.ec2_eip:
        region: "{{ region }}"
        state: present
      register: eip

    - name: Network gateway
      amazon.aws.ec2_vpc_nat_gateway:
        state: present
        subnet_id: "{{ private_subnet.subnet.id }}"
        eip_address: "{{ eip.public_ip }}"
        region: "{{ region }}"
        wait: true
      register: nat

    - name: Private subnet route table
      amazon.aws.ec2_vpc_route_table:
        vpc_id: "{{ vpc_name.vpc.id }}"
        region: "{{ region }}"
        subnets:
          - "{{ private_subnet.subnet.id }}"
        routes:
          - dest: 0.0.0.0/0
            gateway_id: "{{ nat.nat_gateway_id }}"
Run the playbook
Open the terminal in the working directory and run the command
ansible-playbook network.yml
The output should look like this
PLAY [Create VPC and Subnets] **************************************

TASK [Gathering Facts] *********************************************
ok: [localhost]

TASK [Create a VPC] ************************************************
changed: [localhost]

TASK [Create Public Subnet] ****************************************
changed: [localhost]

TASK [Create Private Subnet] ***************************************
changed: [localhost]

TASK [Create Internet Gateway] *************************************
changed: [localhost]

TASK [Public Route Table] ******************************************
changed: [localhost]

TASK [Elastic IP for Nat gateway] **********************************
changed: [localhost]

TASK [Network gateway] *********************************************
changed: [localhost]

TASK [Private subnet route table] **********************************
changed: [localhost]

PLAY RECAP *********************************************************
localhost                  : ok=9    changed=8    unreachable=0    failed=0    skipped=0    rescued=0    ignored=0
You can log in to the AWS console and be sure it created successfully

Conclusion
That's it on how to use Ansible to create a VPC. In my next article, I'll show how to delete the resources created using Ansible.

Posted on March 28, 2023
Join Our Newsletter. No Spam, Only the good stuff.
Sign up to receive the latest update from our blog.
Related

February 5, 2022