Part 1: Configuring a ReactJS Typescript project with .editorconfig, Eslint e Prettier

Ary Barros
Posted on August 2, 2020

In this article, we will see how to set up a Typescript template with eslint and prettier to speed up the setup of your front-end projects. Fingers ready? Let's get into code!!
Minimum requirements
To proceed with the creation of our template, we will need these programs installed on your PC:
Installing the Create React App
We will normally install the create-react-app, which is a bundler for a react application with integrated features such as jest (automated tests), webpack (javascript bundler ), babel (JS compiler/converter) and much more.
To install it globally, we use the command:
yarn global add create-react-app
Creating the react application in typescript
With the increasing use of typescript, create-react-app now has a functionality to create your bundle react only with typescript files. Let's create it with the command below:
# The name of our template will be react-ts-template
yarn create react-app react-ts-template --template typescript
After the end of compilation and creation, we will have the following structure:
Configuring .editorconfig
The first configuration we will do is the file .editorconfig, it is used to store settings between several editors. To create it in Visual Studio Code, we need to add the proper extension for this. In the VSCode extensions tab, search for Editorconfig and install the extension.
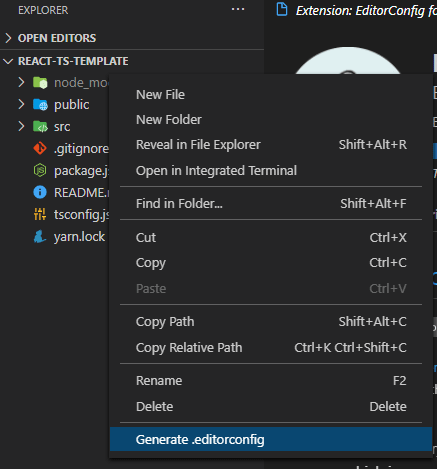
After installing the extension, we need to right click on the root of our project and select the option Generate .editorconfig, as in the image below:
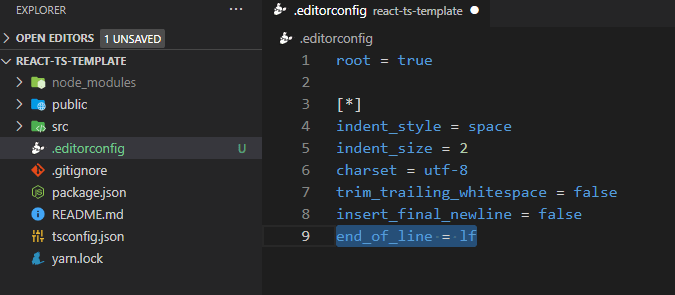
A .editorconfig file will appear in your project structure. It already has the most common settings, however, you only need to add one configuration to it, the line break compatibility between Windows and Mac/Linux.
Open your .editorconfig file and add the line below:
All set! Our .editorconfig file is ready.
Configuring Eslint
ESLint is one of the well-known code linters, and they serve for all files to maintain a writing code pattern, indentation and spacing, forcing that your project does not have disparity between file formatting, which occurs mainly when several developers working on the same project.
The first configuration we will do is to exclude the default configuration of the eslint that comes with React. To do this, in the package.json file, delete the set of lines below:
That done, let's install eslint with the command below:
yarn add eslint -D
With the installation done, enter the following command:
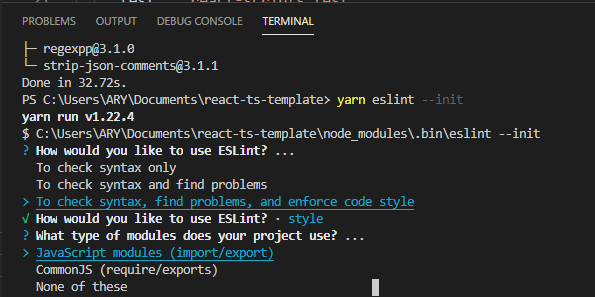
yarn eslint --init
We will need to answer a few things for the configuration to be correct.
Configuring the eslint function
The first option is the configuration of the eslint function, we will select the last option:
Importing modules
The selection of the type of import that we will use will be the default of react, the import/export, therefore, we select the first option:
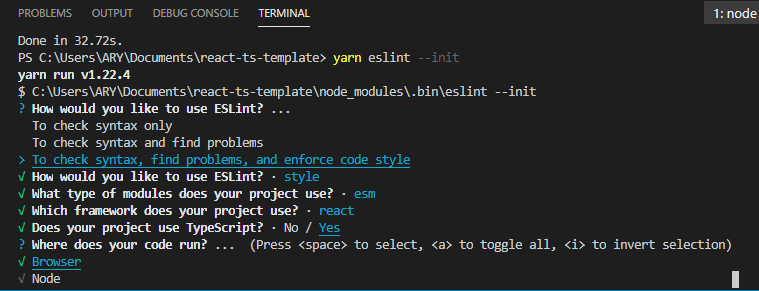
Selecting the framework used
In this step, we’ll select React:
Use of typescript
Select the option Yes
Code targeting
We can select between browser (front-end) and Node (back-end). The browser option is already selected, so just hit enter.
Style Guide
There are several code patterns used by several companies, and many of them create style patterns. This option is free for you to choose. The option that I use the most is the airbnb standard which standardizes the use of single quotes, file imports below packages, among other things. It can be selected below:
File format configs
Finally, we select the type of configuration file. We will use JSON, as it becomes easier to edit throughout the production of the project:
Installing dependencies with Yarn
ESLint asks if you would like to install the dependencies using npm. As we use yarn, we select the option NO and run the command below:
yarn add eslint-plugin-react@^7.19.0 @ typescript-eslint / eslint-plugin @ latest eslint-config-airbnb @ latest eslint-plugin-import@^2.20.1 eslint-plugin-jsx-a11y@^6.2. 3 eslint-plugin-react-hooks@^2.5.0 @ typescript-eslint / parser @ latest -D
We will also install the eslint module for importing typescript files with the command below:
yarn add eslint-import-resolver-typescript -D
Configuring .eslintignore
Let's create a file called .eslintignore and add the content below. It will prevent eslint from forcing styles in the /node_modules files, javascript files at the project root and in the typescript react env file.
/*.js
** / *. js
node_modules
build
/src/react-app-env.d.ts
Configuring .eslintrc.json
Let's open the file and add settings for the typescript. The first one is in extends, where we will insert the options:
"plugin: @ typescript-eslint / recommended",
"prettier / @ typescript-eslint",
"plugin: prettier / recommended"
In the plugins tab, we will add the options:
react-hooks,
"prettier"
In the rules tab we will insert the following options:
"prettier / prettier": "error",
"react-hooks / rules-of-hooks": "error",
"react-hooks / exhaustive-deps": "warn",
"react / jsx-filename-extension": [1, {"extensions": [".tsx"]}],
"import / prefer-default-export": "off",
"import / extensions": [
    "error",
    "ignorePackages",
    {
      "ts": "never",
      "tsx": "never"
    }
  ]
Finally, we add the settings option below the rules with the settings below:
"settings": {
    "import / resolver": {
      "typescript": {}
    }
  }
Final file .eslintrc.json
{
  "env": {
    "browser": true,
    "es6": true
  },
  "extends": [
    "plugin:react/recommended",
    "airbnb",
    "plugin:@typescript-eslint/recommended",
    "prettier/@typescript-eslint",
    "plugin:prettier/recommended"
  ],
  "globals": {
    "Atomics": "readonly",
    "SharedArrayBuffer": "readonly"
  },
  "parser": "@typescript-eslint/parser",
  "parserOptions": {
    "ecmaFeatures": {
      "jsx": true
    },
    "ecmaVersion": 2018,
    "sourceType": "module"
  },
  "plugins": [
    "react",
    "react-hooks",
    "@typescript-eslint",
    "prettier"
  ],
  "rules": {
    "prettier/prettier": "error",
    "react-hooks/rules-of-hooks": "error",
    "react-hooks/exhaustive-deps": "warn",
    "react/jsx-filename-extension": [
      1,
      {
        "extensions": [
          ".tsx"
        ]
      }
    ],
    "import/prefer-default-export": "off",
    "import/extensions": [
      "error",
      "ignorePackages",
      {
        "ts": "never",
        "tsx": "never"
      }
    ]
  },
  "settings": {
    "import/resolver": {
      "typescript": {}
    }
  }
}
Everithing ready! Our ESLint is properly configured.
Setting up prettier
The prettier is a code formatter and serves to make your code as beautiful and readable as possible. To install it, just use the command:
yarn add prettier eslint-config-prettier eslint-plugin-prettier -D
Creating the prettier configuration file
Let's create the file prettier.config.js at the root of our project and insert the following settings:
module.exports = {
  singleQuote: true, // Force using single quotes
  trailingComma: 'all', // Force the use of a comma at the end of objects
  arrowParens: 'avoid', // Force not using parentheses with single parameter functions.
}
Project configured! Shall we go to github?
We will create a template repository on github that will facilitate when, in the future, whe need a react project. Log-in to your github account and create a repository with the name of your choice. Insert the MIT license and gitignore NODE as shown in the image below:
Sending files
Upload the files to the repository, excluding the node_modules folder. It can be done either via the terminal, cloning the project, or via the github web interface.
Activating template
Finally, in the settings tab of github, check the Template Repository option:
ALL RIGHT! Our template is ready and can be used to create new repositories in the template tab. This project is on my github. Just use it here or create your own.
Thanks for reading!

Posted on August 2, 2020
Join Our Newsletter. No Spam, Only the good stuff.
Sign up to receive the latest update from our blog.


