Migrate local Data Science workspaces to SageMaker Studio

Anna Pastushko
Posted on August 8, 2022

Workspace requirements
Problem context
The data science team used Jupyter notebooks and PyCharm IDE on their local machines to train models but had issues with model’s performance and configuration tracking. They used Google Sheets to track model’s name, parameters values used and performance. It quickly became messy with the increasing number of models. Also, team members wanted to collaborate with each other when building models.
Functional requirements
- FR-1 Solution provides collaborative development.
- FR-2 Solution can be integrated/expanded with AWS EMR.
Non-functional requirements
- NFR-1 Data and code should not be transferred via public internet.
- NFR-2 Data scientists should not have access to the public internet.
Constraints
- C-1 Data is stored in AWS S3.
- C-2 Users’ credentials should be stored in AWS IAM Identity Center (SSO).
- C-3 AWS CodeCommit is selected as a version control system.
Proposed Solution
TL;DR
Migrate local development environment to AWS SageMaker Studio and enable SageMaker Experiments and SageMaker Model Registry to track models’ performance.
SageMaker Studio will be launched in VPC only mode to make connection to Amazon EMR available and to satisfy the requirement of disabling access to the public internet.
Architecture
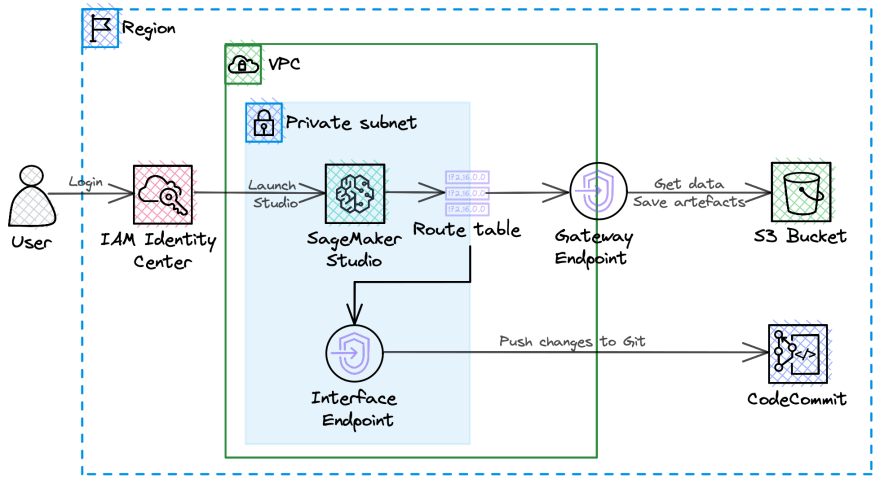
The solution consists of the following components:
- VPC with S3 Gateway Endpoint and one Private Subnet with Interface Endpoint to allow data/code transfer without public internet.
- IAM Identity Center to reuse existing credentials and enable SSO to SageMaker.
- AWS SageMaker Studio
- AWS S3 buckets to get data and save models artefacts
- AWS CodeCommit repository to store code
You can see the combination of these components on the Deployment view in the diagram at the top of the page.
Functional View
User would login through SSO Login page and access SageMaker Studio. Then user can create and modify Jupyter notebooks, train ML models and track them using Model Registry.
Migration plan
Step 1. Inventory of resources and estimation of needed capacity
The first step is to create a list of all users, models they used and minimal system requirements. You can see an example of such inventory below.
| User | Feature | Model | Memory | GPU usage |
|---|---|---|---|---|
| Harry Potter | Sorting Hat algorithm | XGBoost | 15 Mb | No |
| Ronald Weasley | Generate summaries for inquiries for Hogwarts | Seq2seq | 25 Mb | Yes |
| Hermione Granger | Forecast number of owls needed to deliver school letters | ARIMA | 2 Mb | No |
| Hermione Granger | Access to Restricted Section in Hogwarts Library | CNN | 50 Mb | Yes |
While choosing the best instance types for models provided in the inventory, I considered the following:
- Desired speed of training
- Data volume
- GPU usage capability
- Instance pricing and fast launch capability
I decided to use ml.t3.medium for XGBoost and ARIMA models, and ml.g4dn.xlarge for CNN and Seq2seq. With Free Tier, you have 250 hours of ml.t3.medium instance on Studio notebooks per month for the first 2 months.
Step 2. Set up VPC with Gateway endpoint and update routing table
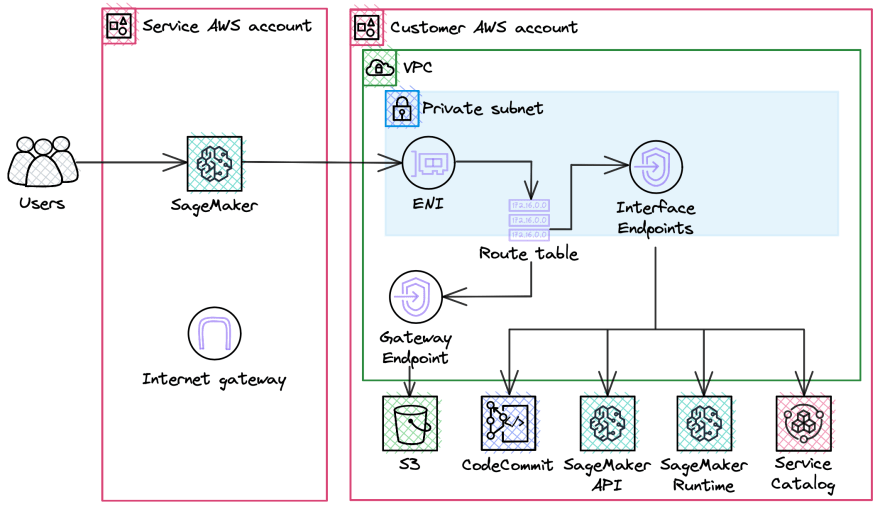
AWS has the option to create VPC with public/private subnets and S3 Gateway Endpoint automatically. After that, you need to create the following Interface Endpoints:
- SageMaker API
com.amazonaws.<region>.sagemaker.api. - SageMaker runtime
com.amazonaws.<region>.sagemaker.runtime. This is required to run Studio notebooks and to train and host models. - To use SageMaker Projects
com.amazonaws.<region>.servicecatalog. - To connect to CodeCommit
com.amazonaws.<region>.git-codecommit.
⚠️ Replace
<region>with your region. All resources including SSO account, VPC and SageMaker domain should be in the same region. This is important because AWS Identity Center (SSO) is not available in all regions.
Also, you can use provided CDK stack to deploy network resources automatically. Once completed, you would have such network:
Step 3. Set up SSO for users in IAM Identity Center
The next step is to create new/add existing users to group in IAM Identity Center.
Later, you will be able to add this group to SageMaker users. You can add each user without creating group as well, but I prefer to use groups. It allows you to manage users from one place easily.
Step 4. Set up SageMaker Studio without public internet access
Start SageMaker configuration with Standard setup of SageMaker Domain. Each AWS account is limited to one domain per region.
It proposes two options for authentication and I choose AWS Single Sign-On because we have an identity store there. Please note, that SageMaker with SSO authentication should be launched in the same region as SSO, in my case, both are in eu-central-1 region.
After completing SageMaker Domain configuration, you will be able to see SageMaker in Application tab and assign users to it.
The next step is to assign a default execution role, you can use the default role AWS creates for you with AmazonSageMakerFullAccess policy attached to it.
After that, you should configure if you want to use public internet from SageMaker or not. In my case, I disabled internet access with VPC only mode and used created VPC and private subnet to host SageMaker.
Also, you can configure data encryption, Jupyter Lab version and notebook sharing options. Then, you should add data science user group by navigating to the Control panel and Manage your user groups section in it.
Step 5. Link AWS CodeCommit
Create a repository in AWS CodeCommit named sagemaker-repository and clone HTTPS. Then, in the left sidebar of SageMaker Studio, choose the Git icon (identified by a diamond with two branches), then choose Clone a Repository. After that, you will be able to push changes to current notebooks or new notebooks to Git.
Step 6. Setup automatic shut down of idle resources
Sometimes people can forget to shut down instances after they finished their work. This can lead to the situation when resources run all night and in the morning you will receive unexpectedly large bill. But one of JupyterLab extensions can help you to avoid such situations. It automatically shuts down KernelGateway Apps, Kernels and Image Terminals in SageMaker Studio when they are idle for a stipulated period of time. You will be able to configure an idle time limit of your preference. Instructions for setup and scripts can be found in GitHub repository. After installation, you will see a new tab on the left of SageMaker Studio interface.
Step 7. Add experiments and model registry
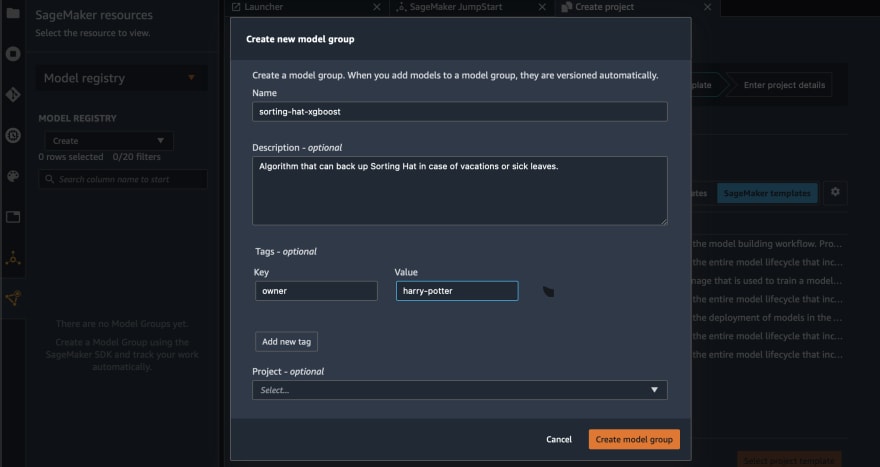
SageMaker Model Registry is a great tool to keep track of models that were developed by the team. To enable this functionality, you need to go to the SageMaker resources tab (bottom one in the left panel) and choose Model Registry from the drop-down list. You need to create model group for each model that you want to be versioned.
After that, data scientists can register models using one of the methods described in documentations.
SageMaker Experiments is a feature that lets you organize, and compare your machine learning experiments. Model Registry keeps track of model versions that have been chosen as best versions. Experiments are useful for data scientists, because they allow to track all training runs and compare model performance to choose best one. You can add experiments using instruction from documentation.
Step 8. Migrate notebooks
Amazon SageMaker provides XGBoost as a built-in algorithm and data science team decided to use it and re-train the model. So, data scientists just need to call built-in version and provide path to data on S3, more detailed description can be found in documentation. Example notebook can be found here.
Seq2seq notebook migration is pretty similar to the previous case — SageMaker has built-in Seq2seq algorithm. So, you just need to call right image URI and create SageMaker Estimator using it. Example of SageMaker notebook which uses Seq2seq algorithm can be found here.
With ARIMA situation is slightly more difficult, because data science team don’t want to use DeepAR proposed by SageMaker. So, we need to create custom algorithm container. At first, we need to build Docker image, publish it to ECR, and then we can use it from SageMaker. You can find detailed instruction and example of notebook in the documentation.
For CNN build with TensorFlow we can use SageMaker script mode to bring our own model, an example notebook can be found here. Also, we can use local machine to train it, example notebook can be found here.
More examples of different models notebooks you can find in Amazon SageMaker examples repository.
Step 9. Ensure that data science team can use new environment
The final step is to create documentation for the process, so any new users can use it for onboarding to data science working environment. It should include the following sections:
- How to add a new model (feature) to registry
- How to add a new experiment to SageMaker
- How to choose an instance for the model
Conclusion
SageMaker is a great tool for data scientists that allows you to label data, track experiments, train, register and deploy models. It automates and standardizes MLOps practices and provides a lot of helpful features.
CDK resources for Network creation and cost breakdown can be found in GitHub repository.
Thank you for reading till the end. I do hope it was helpful, please let me know if you spot any mistakes in the comments.

Posted on August 8, 2022
Join Our Newsletter. No Spam, Only the good stuff.
Sign up to receive the latest update from our blog.


